Stripe & Plaid: Making Money Move at the Speed of Trust
The distance between 'yes' and 'paid' is where most businesses leak revenue.
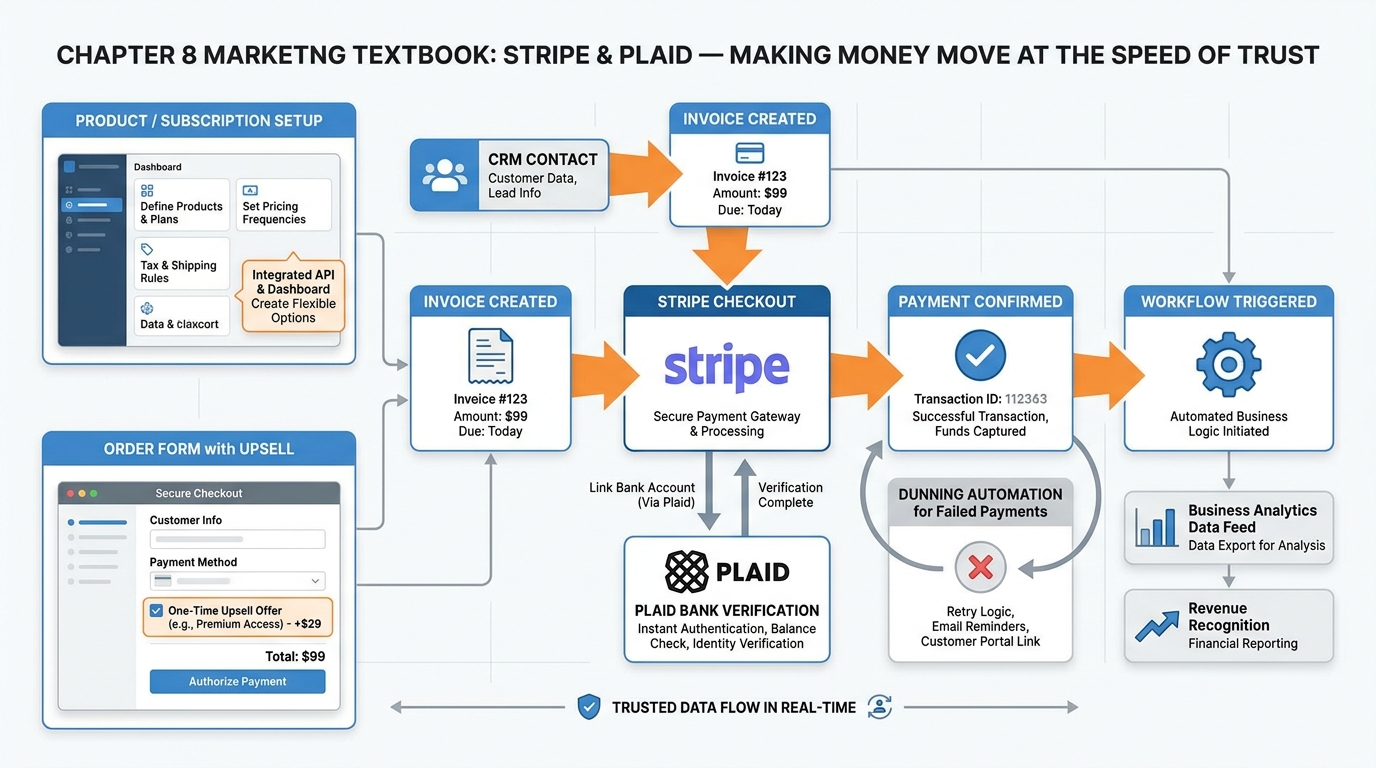
Figure 1:Chapter 8 overview: from CRM contact to collected funds — the complete financial layer inside VibeReach, powered by Stripe for card and ACH payments and Plaid for instant bank verification.
The handshake happened — figuratively, digitally, emotionally — and the client said yes. Then what? You emailed a payment link. They forgot. You followed up three days later. They said they would get to it. A week passed. By the time money actually moved, the emotional high of “yes” had evaporated, replaced by friction, delay, and doubt.
The distance between “yes” and “paid” is where most businesses hemorrhage revenue. Not because customers change their minds. But because the payment infrastructure was not built to move at the speed of the agreement. Your close moved at the speed of a handshake. Your collection moved at the speed of a fax machine.
This chapter eliminates that gap.
18.1 The Financial Layer: Why Payments Belong Inside Your CRM
For most of the history of small business software, payments lived in a separate tool. You closed a deal in your CRM, then pivoted to QuickBooks to send an invoice, or logged into PayPal, or emailed a bank transfer request. Each pivot was a friction point — not just for you, but for your contact. Every app they had to visit, every password they had to remember, every checkout that looked different from your brand was a moment where the deal could die.
The insight behind embedded payments is deceptively simple: the fastest path from commitment to cash is the one with the fewest steps. When payment infrastructure lives inside your CRM, every trigger, every contact record, every pipeline stage can generate financial events. A deal moves to “Proposal Sent” and an invoice fires automatically. A subscription lapses and a dunning workflow starts without anyone touching a keyboard. A new client books a call and a payment link is included in the confirmation email — before anyone has asked for a credit card.
In VibeReach.io (the white-labeled GoHighLevel platform you are working in), the financial layer is not an add-on. It is built into the same environment as your contacts, pipelines, funnels, and workflows. Stripe handles card and ACH payment processing. Plaid handles bank account verification for high-trust, high-volume transactions. Together, they form a payment infrastructure that rivals what enterprise finance teams spend months building — available to any business with a Stripe account and an afternoon.
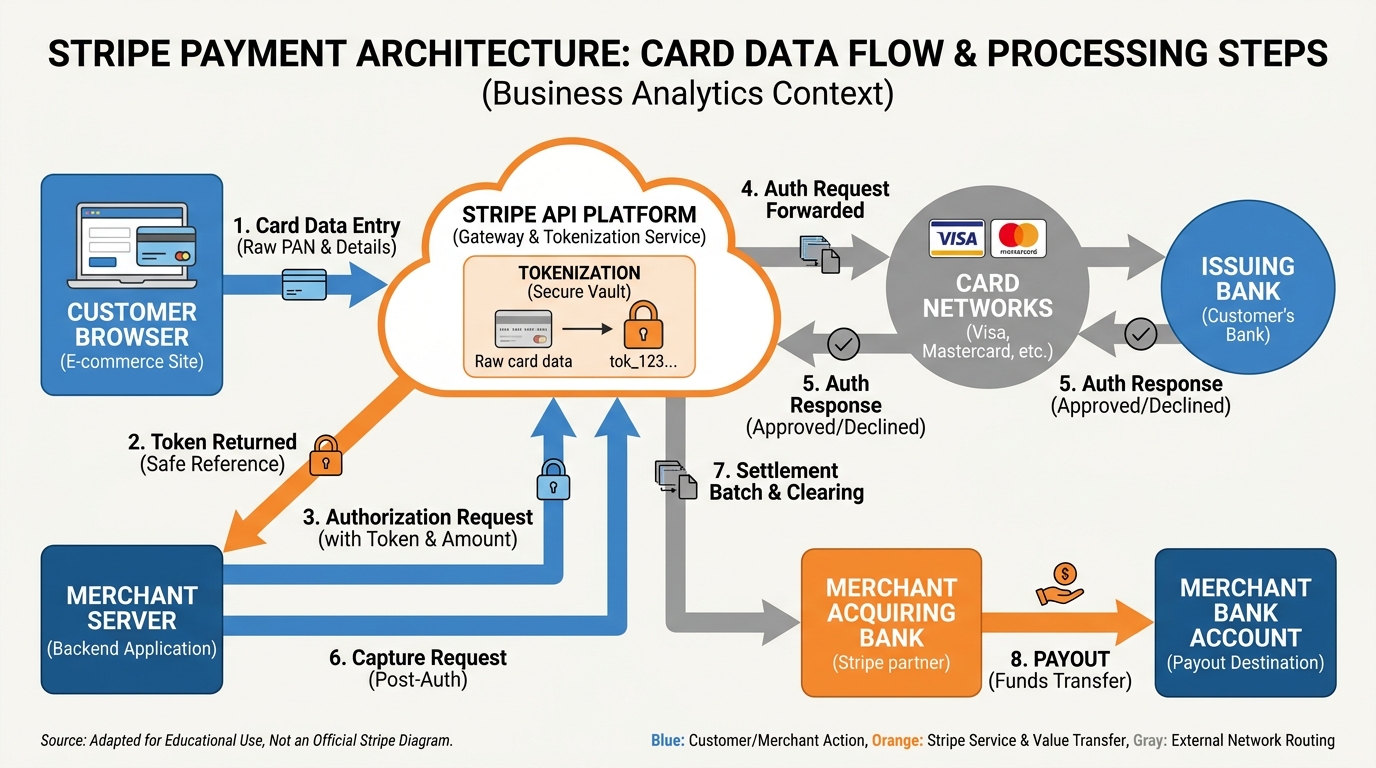
Figure 2:Stripe payment architecture: customer card data is tokenized at the browser level, travels through Stripe’s API for authorization, and settles to the merchant’s bank account — your platform never stores raw card numbers.
The shift from “payments as a separate tool” to “payments as a CRM feature” changes how you think about revenue operations. Instead of asking “how do I collect payment?” you start asking “at what trigger point should payment happen, and what should occur the moment it does?” That is a fundamentally more powerful question.
28.2 Stripe Explained in Ten Minutes — Cards, ACH, Fees, Payouts
Stripe is a payment processing platform. At its core, it does one thing: moves money from your customer’s account to yours. But the way it does that — securely, compliantly, across dozens of payment methods and currencies — is sophisticated enough that understanding it at a conceptual level will save you hours of troubleshooting and thousands of dollars in avoidable fees.
Cards: When a customer enters a credit or debit card number into a Stripe-powered checkout, the card number never touches your servers. Stripe.js captures card data client-side, tokenizes it, and sends only the token to Stripe’s servers. Your system never stores raw card numbers — this is the foundation of PCI compliance.
Stripe then sends an authorization request to the card network (Visa, Mastercard, Amex), which routes it to the issuing bank. The bank approves or declines. Stripe returns the result to your platform in milliseconds — customer clicks “Pay” to “Payment confirmed” in under two seconds.
ACH: Electronic bank-to-bank transfers. ACH is slower than cards (one to three business days for settlement) but significantly cheaper — 0.8% capped at 0.30 for cards. For invoices over $1,000, ACH saves meaningful money. The tradeoff: ACH requires bank account verification — this is where Plaid enters (covered in section 8.3).
Fees: Stripe’s standard pricing is transparent and published:
Card processing: 2.9% + $0.30 per successful charge (domestic cards)
ACH Direct Debit: 0.8%, capped at $5.00
Invoices sent via Stripe Invoicing: included in card/ACH rates
International cards: additional 1.5% cross-border fee
Currency conversion: 1% above Stripe’s exchange rate
When you collect 29.30 and sends you 1 million annually, Stripe will negotiate custom rates.
Payouts: Stripe holds your collected funds and pays them out to your connected bank account on a schedule. For new Stripe accounts, the default payout schedule is two business days after each charge. Standard accounts settle daily (funds collected Monday arrive Wednesday). You can accelerate this to same-day payouts (for an additional 1% fee) or set custom schedules if you prefer weekly lump-sum deposits.
38.3 Plaid Explained in Ten Minutes — Bank Verification Without the Statement Chase
Before ACH payments became practical for small businesses, collecting bank account information looked like this: you emailed the client, asked for a voided check or a bank statement, waited two days for them to locate and scan it, received a blurry PDF, manually keyed the routing and account numbers into your system, and hoped you had not made a typo. If you had, the ACH debit would fail three days later and you would start over.
Plaid replaced that entire process with a flow that takes under ninety seconds.
Here is how the Plaid verification flow works in practice:
The customer never pastes a routing number. They never upload a document. They log in to the same portal they use every day to check their balance, select the account, and Plaid hands the verified token back to the platform — all without the business ever touching the raw credentials.
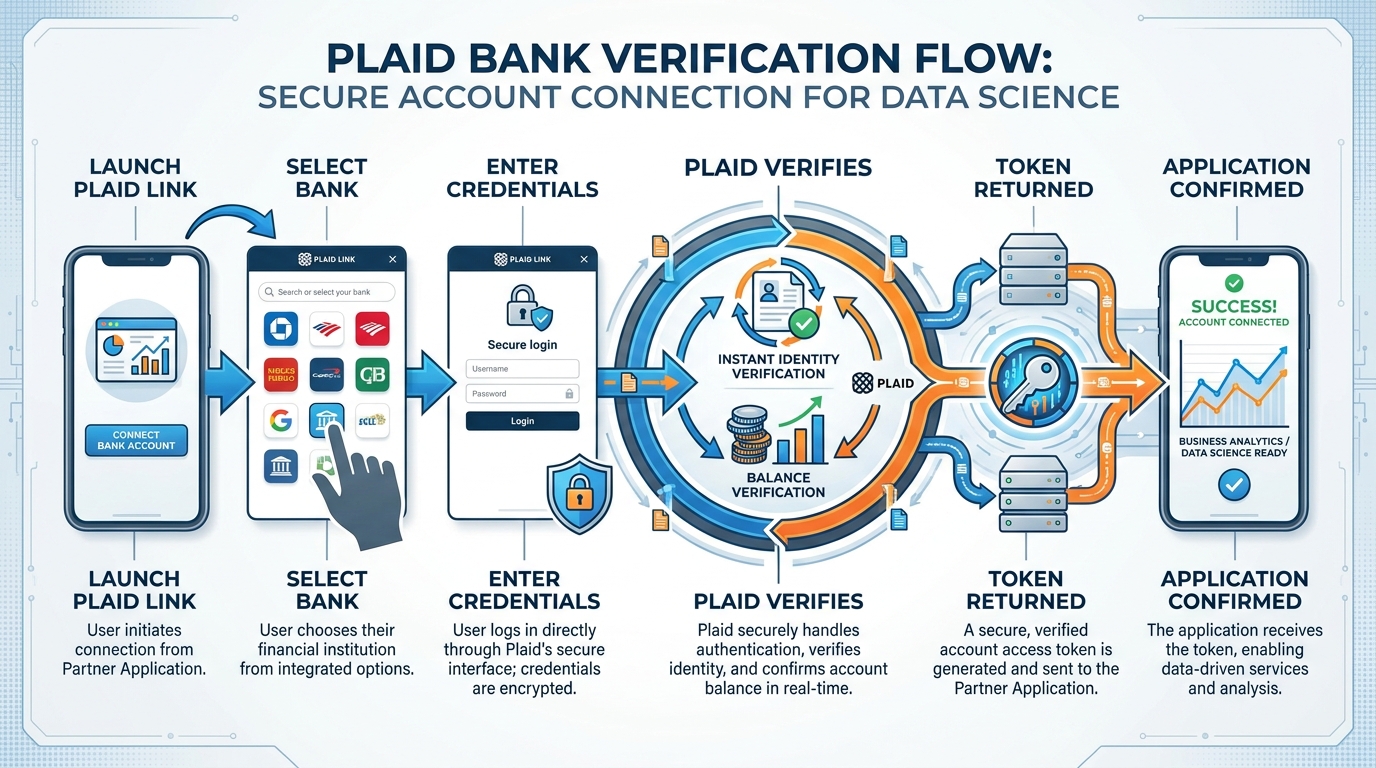
Figure 3:The Plaid Link verification flow: customers authenticate directly with their bank, and the platform receives a verified token — never raw credentials or account numbers.
What Plaid verifies instantly:
Account ownership (name on the account matches the authorized signer)
Account existence and active status
Current balance (to assess whether an ACH pull will succeed)
Routing and account numbers (without the user having to type them)
What Plaid is not: It is not universally available to all VibeReach accounts. Plaid integration requires additional business verification from GoHighLevel — your business must have completed KYC (Know Your Customer) review, and Plaid access is granted on an account-by-account basis. If your account does not yet have Plaid enabled, you will see Stripe-only options in your Payments settings. Reach out to VibeReach support to begin the verification process.
48.4 Products, Prices, and Subscriptions in the Platform
Every payment starts with a product. Before you can send an invoice, build an order form, or create a subscription, you need to define what you are selling — and at what price. VibeReach organizes its financial layer using a three-tier hierarchy borrowed directly from Stripe’s data model.
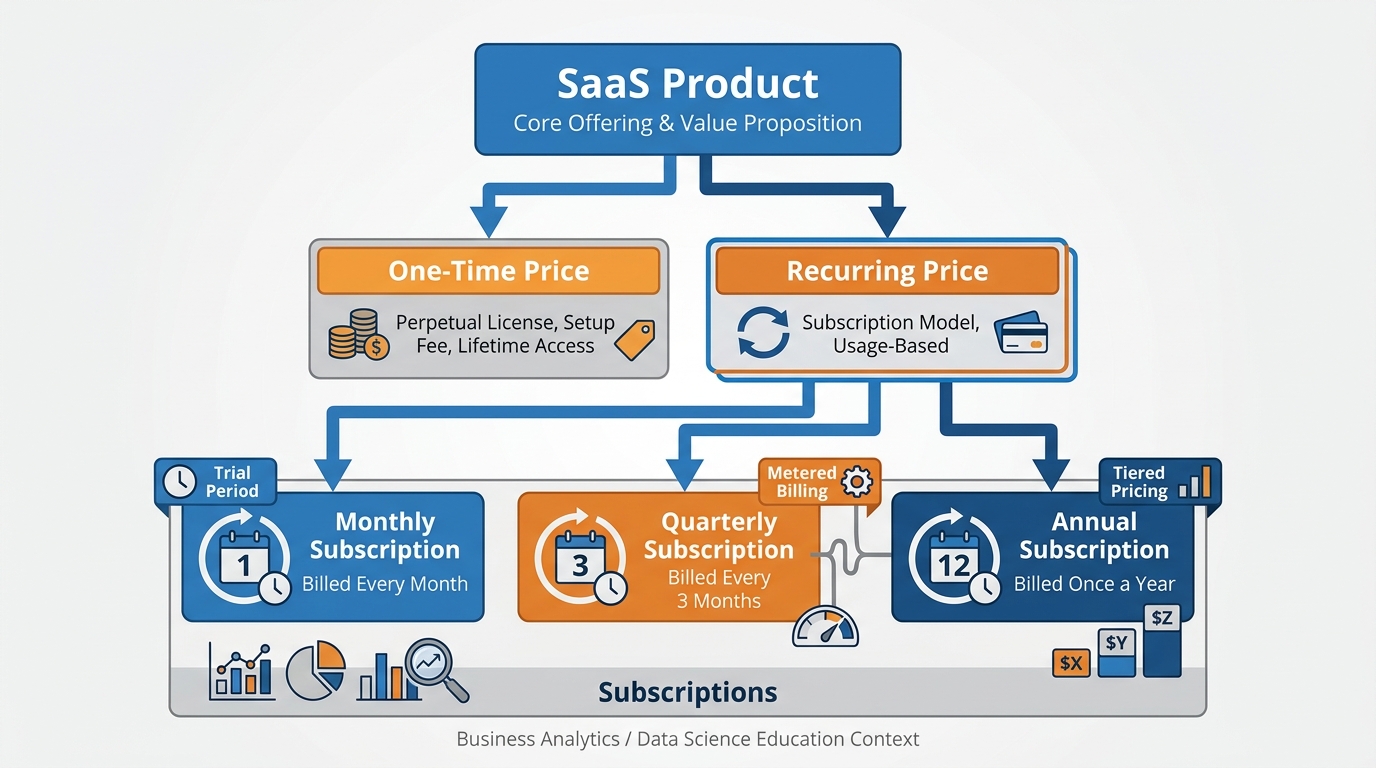
Figure 4:The product-price-subscription hierarchy: each product can have multiple prices (one-time or recurring), and each subscription ties a contact to a recurring price on a billing schedule.
Tier 1 — Product: The product is the thing you sell. “Business Funding Consultation.” “Monthly Marketing Retainer.” “SEO Audit Package.” A product has a name, a description, and optionally an image. It is the catalog entry. By itself, it has no price — that lives at the next tier.
Tier 2 — Price: A price is a specific offering of a product at a specific amount and billing frequency. One product can have multiple prices: “Business Funding Consultation — 147 with 60-minute extension” could both be prices under the same product. Prices are either one-time (a single charge) or recurring (charged on a schedule: weekly, monthly, quarterly, or annually).
Tier 3 — Subscription: A subscription ties a contact to a recurring price. When you create a subscription for a client, VibeReach automatically charges the client on the billing schedule and creates a new invoice for each cycle. Subscriptions can include trial periods (a set number of days before the first charge), setup fees (a one-time charge at subscription start), and cancellation policies.
To create a product in VibeReach, navigate to Payments > Products > + Add Product. You will define the name, add optional description and image, and then create one or more prices. For recurring prices, select the billing interval and whether to include a trial period. Save the product — it is now available to attach to invoices, order forms, and subscription workflows.
58.5 One-Time Payments, Installments, and the Psychology of Price Framing
Not every transaction is a subscription. Many of the most significant revenue events in a service business are one-time: a strategy day, a setup fee, a done-for-you deliverable, a course. Understanding how to structure and present one-time payments — and when to offer installments — is as important as the mechanics of processing them.
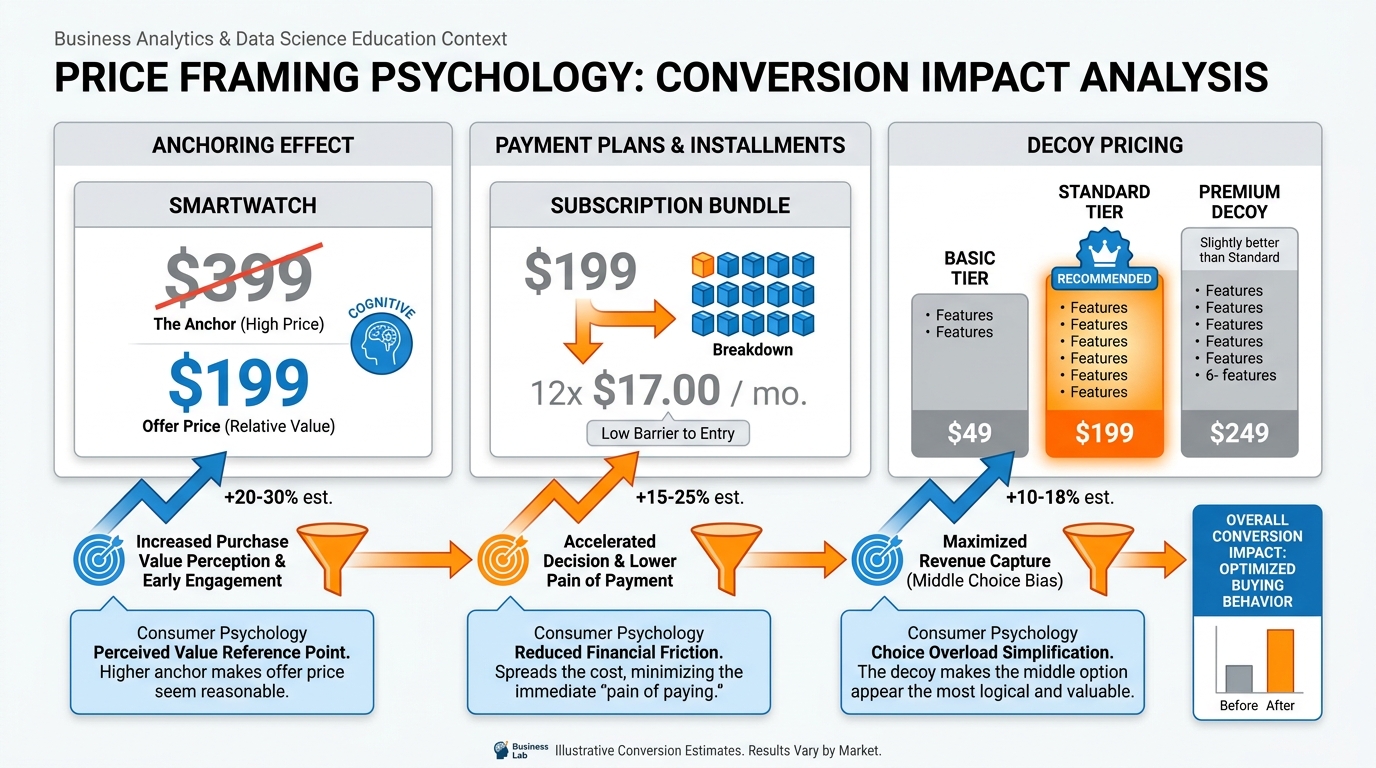
Figure 5:Three evidence-based price framing tactics: anchoring (present the higher reference price first), installment reframing (break annual cost into per-day or per-month language), and decoy pricing (make the target option look like the obvious middle choice).
Price Anchoring: The first number a buyer sees sets their reference point. Present a 249 monthly option and the 249 totals $2,988. The anchor does not need to be dishonest; it simply needs to be presented first. Always open with your highest-value option.
Installment Reframing: “1,200” feels like a major decision. The total is identical; the psychological weight is not. In VibeReach, offer installment plans by creating a recurring price and building a workflow that cancels the subscription after N payments — a five-minute setup that can dramatically lift conversion on high-ticket offers.
Decoy Pricing: When presenting three tiers, the middle option almost always wins highest volume. Structure tiers so the option you want to sell most is the obvious middle choice — not manipulation, but removing the cognitive burden of choosing between extremes.
VibeReach handles one-time payments through invoices or order forms (covered in sections 8.6 and 8.7). For installment plans, create a recurring monthly price and build a workflow that cancels the subscription after N payments. For large one-time transactions where the customer prefers ACH (to avoid card fees on their end), ensure your Plaid integration is active and offer the bank-debit option explicitly — many B2B buyers prefer it.
68.6 Invoices That Get Paid: Schedules, Reminders, and the Overdue Workflow
An invoice is a request for payment. Most businesses treat it as a formality — a document that states the amount owed and hopes the client eventually gets around to paying it. The businesses that collect faster treat the invoice as the beginning of an automated follow-up campaign, not the end of their involvement.
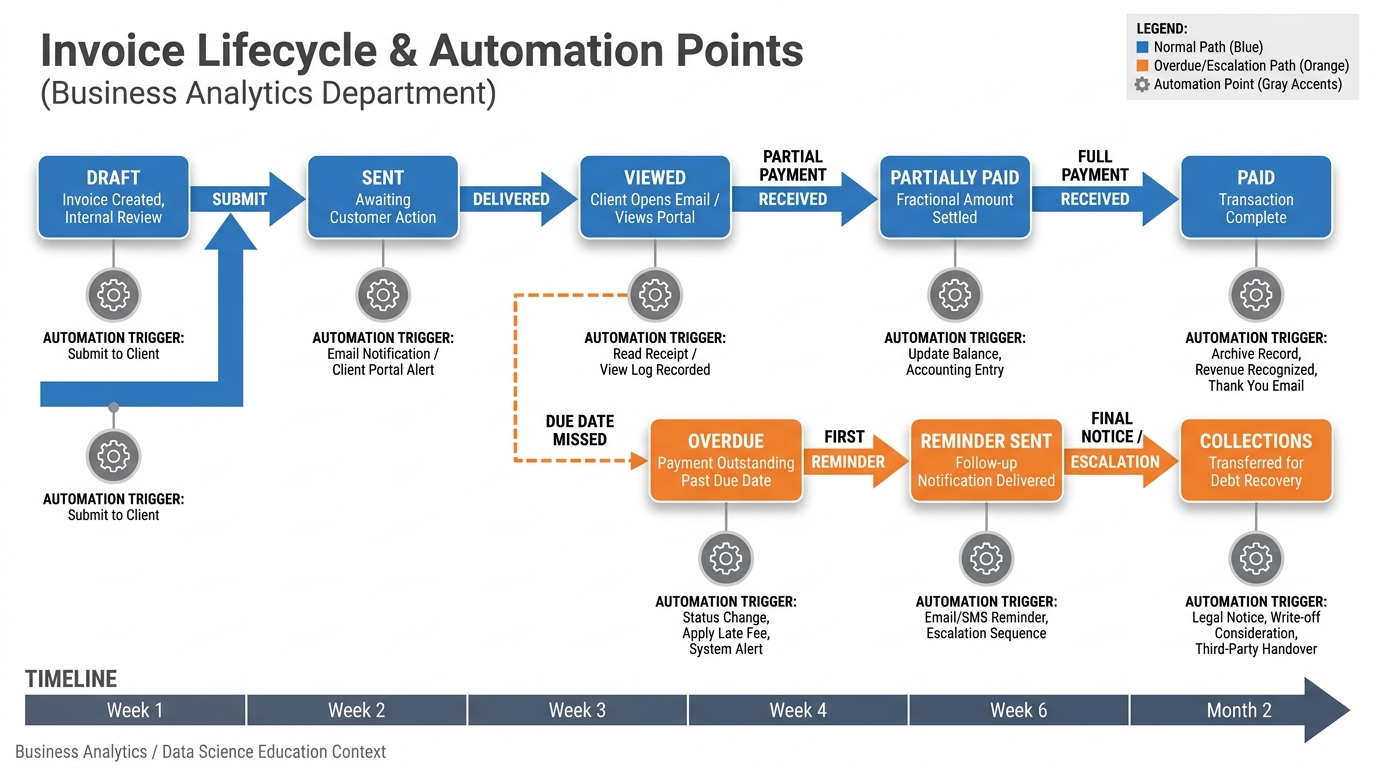
Figure 6:The invoice lifecycle: each stage transition can trigger an automation — from delivery confirmation when sent to escalation workflows when overdue.
In VibeReach, invoices live at Payments > Invoices. Creating an invoice takes under two minutes: select or create a contact, add one or more products from your catalog, set a due date, add any notes, and send. The platform generates a branded payment page with a Stripe checkout — the recipient clicks the link in their email and pays by card or ACH without creating an account.
Payment Schedules: For large projects, split a total into multiple scheduled invoices — deposit at signing, progress at midpoint, final at delivery. VibeReach handles each as a separate invoice with its own due date and independent follow-up automation.
Reminder Automation: The step most businesses skip: build a workflow triggered by invoice overdue status. A simple sequence:
Day 0 (due date passed): Polite email reminder with payment link
Day 3: SMS reminder (“Your invoice for [amount] is still open: [link]”)
Day 7: Final notice email, firmer tone
Day 14: Task assigned to human team member for personal outreach
Escalate tone only slightly. The goal is reducing cognitive friction — they forgot, they lost the link — not embarrassing anyone.
78.7 Order Forms and Upsells — Turning One Sale Into Three
An invoice is reactive — you send it after the client has already agreed to pay. An order form is proactive — it is the checkout page embedded in your funnel, where the buyer decides to purchase without any back-and-forth. Order forms are the difference between a service business and a productized business.
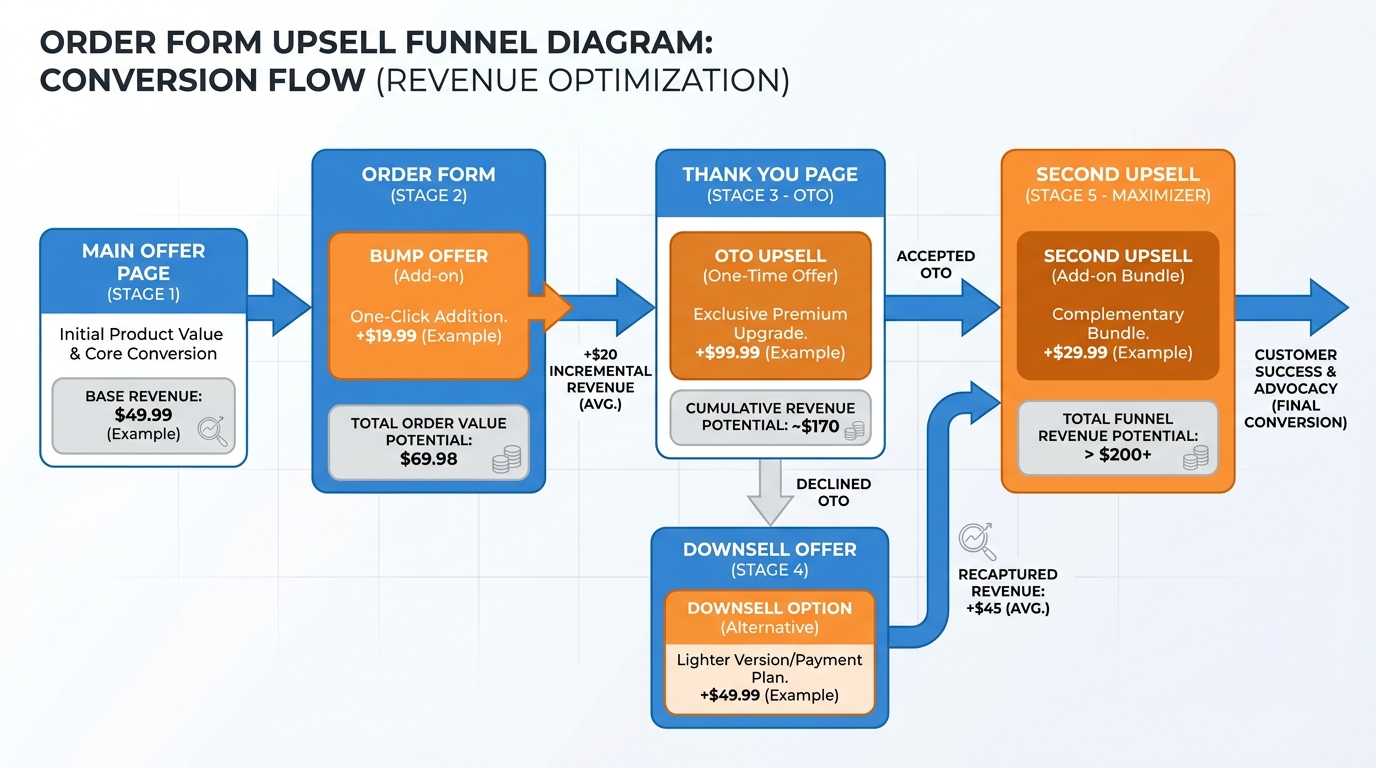
Figure 7:The order form upsell funnel: the main offer converts buyers, the order bump adds incremental revenue at checkout, and the one-time offer (OTO) on the thank-you page converts a portion of buyers into higher-value customers — without a second sales conversation.
Order Bumps: A checkbox add-on below the main offer — “Add a 30-minute strategy call for $47” — captures buyers already in purchasing mode. Because card details are already entered, bump conversions run 20–40%. Building an order bump into every order form is one of the highest-ROI five-minute decisions in your marketing stack.
One-Time Offers (OTOs): After purchase, redirect to a thank-you page with a complementary offer available only at that moment. The psychology: commitment consistency (they already said yes), scarcity (this page only), and obvious complementarity. Well-structured OTOs convert 10–25% of buyers at 2–5x the original purchase price.
Downsells: If the buyer declines the OTO, present a smaller, lower-commitment version. “If the full program is not right, would you like the starter kit at $97?” Downsells convert 5–15% of OTO declines.
In VibeReach, order forms are built in the Funnels builder (Chapter 2), and upsell/downsell flows connect page-by-page. Each step links to a Stripe product/price, and payment is captured automatically at each stage.
88.8 Failed Payments, Dunning, and How to Recover Revenue Without Being Rude
Subscriptions fail. It is not personal; it is probabilistic. Credit cards expire. Banks flag unfamiliar recurring charges. Accounts go temporarily negative. Industry data from Stripe suggests that approximately 9% of subscription payments fail on the first attempt — a number that climbs to 15–20% for businesses with older card data on file. For a business with 200 active subscriptions at 6,000 per month in revenue at risk.
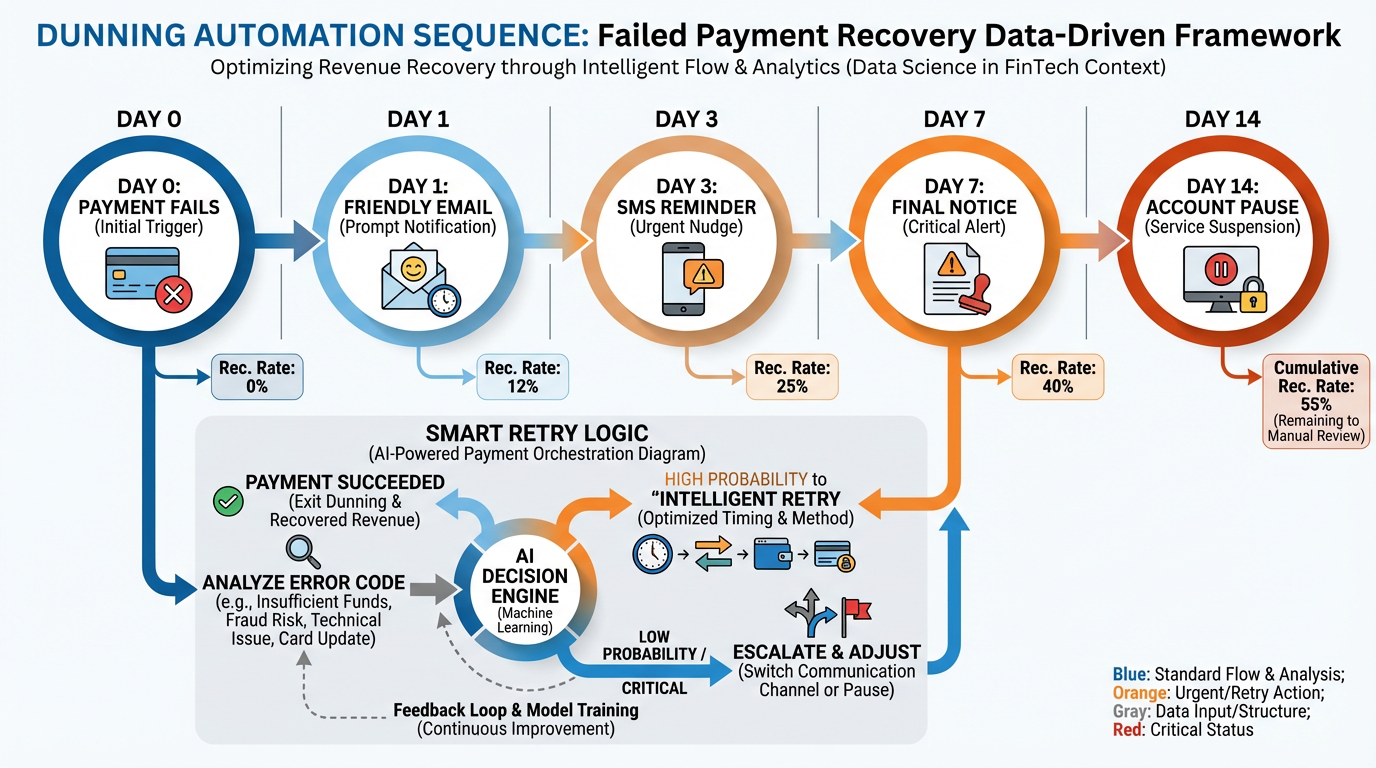
Figure 8:The dunning sequence: smart retry logic combined with graduated messaging recovers 60–80% of initially failed payments without manual intervention.
Smart Retry Logic: Rather than retrying a failed card immediately (which almost never works — if the card failed at 2 PM on Tuesday, it will fail again at 2 PM on Tuesday), VibeReach and Stripe use intelligent retry scheduling. Stripe’s research on optimal retry timing suggests:
First retry: 3 days after initial failure (catches most temporary declines)
Second retry: 5 days after first retry
Third retry: 7 days after second retry
The Dunning Sequence: Communicate at each stage — not to scold, but to help:
Day 0: “Your payment of [amount] did not process. Update your payment method here: [link]”
Day 3 (first retry): “We tried again and had trouble — could you check your card details?”
Day 7 (second retry): “We want to keep your account active. Update billing info in 30 seconds: [link]”
Day 14 (final notice): “Your account will be paused on [date] if we cannot process payment.”
Day 15: Account restricted. Reactivation requires payment update.
Language matters. “Your payment failed” is accusatory. “We had trouble processing” is neutral. “Here is a link to update billing info” is action-oriented. Most failed payments resolve when updating a payment method is trivially easy.
98.9 Tax, Compliance, and the Boring Stuff That Keeps You in Business
Tax and compliance are not exciting topics. They are also not optional. The businesses that grow past seven figures do so in part because they built compliance infrastructure early — before a state tax authority sent a notice, before a bank flagged a suspicious transaction, before a customer demanded a proper receipt for their accountant.
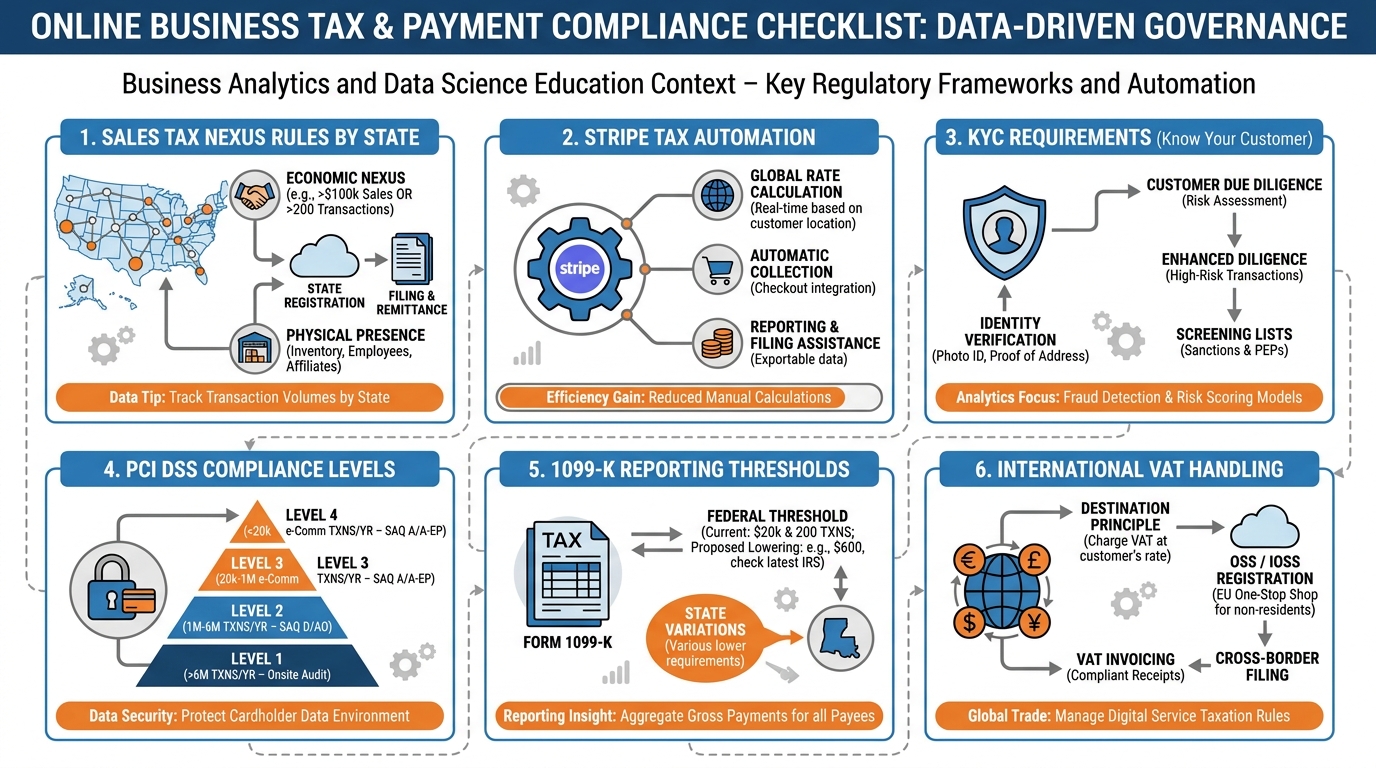
Figure 9:The compliance checklist: five domains every business with digital payments must address — and how Stripe and VibeReach handle each one.
Sales Tax Nexus: In the United States, you are required to collect sales tax in any state where you have “nexus” — a sufficient economic or physical presence. Since the Supreme Court’s 2018 South Dakota v. Wayfair decision, economic nexus (based on sales volume, not physical location) applies in most states. If you make more than $100,000 in sales or more than 200 transactions in a state, you may have nexus there. Stripe Tax automates sales tax calculation and collection, applying the correct rate based on the buyer’s location. Enable it in your Stripe dashboard, and it handles multi-state compliance automatically.
PCI DSS Compliance: Payment Card Industry Data Security Standard (PCI DSS) governs how businesses handle cardholder data. Stripe’s architecture (tokenization at the browser, no card data on your servers) means most businesses using Stripe qualify for SAQ A — the simplest compliance level, requiring minimal documentation. Never store raw card numbers in any database or spreadsheet, ever.
KYC and Identity Verification: Stripe requires Know Your Customer (KYC) verification for all accounts. This means providing your business entity details, EIN or Social Security Number, and identity documents for beneficial owners. Stripe’s onboarding walks you through this process. Incomplete KYC results in payout holds — set this up completely before you process your first transaction.
1099-K Reporting: Starting with the 2024 tax year, Stripe is required to issue 1099-K forms to any account that processes more than $5,000 in gross payments in a calendar year. Stripe handles the form generation; you are responsible for accurate reporting on your tax return. Keep your Stripe tax information current to avoid 1099-K mismatch notices.
Refunds and Disputes: Stripe charges the processing fee even on refunds (you get principal back, not the fee). Chargebacks incur a $15 dispute fee. Build a clear refund policy into every order form and invoice, and respond to disputes within Stripe’s window (7–21 days) with documentation: order confirmation, delivery evidence, and terms acceptance.
108.10 Case Study: How an MCA Broker Replaced a Three-Day Manual Underwriting Process with Plaid Verification and Collected Funds in 14 Minutes
The Problem:
Capital Access Partners, a South Florida merchant cash advance brokerage, operated on a model that had not changed in a decade. When a merchant applied for funding, the underwriting process required: a phone call to collect business details, an email request for three months of bank statements, waiting two to three days for the merchant to locate and scan the statements, manual review of the PDFs to verify average daily balance and cash flow consistency, data entry of the reviewed figures into the underwriting spreadsheet, a follow-up call to the funder with the verified numbers, and finally — if approved — a funding wire that arrived the following business day.
Total elapsed time from “yes, I want funding” to funded: three to five business days.
Merchant attrition during this window was significant. Competing brokers who could move faster won the deal. Merchants who needed urgent capital abandoned the process midway through the statement collection step. The brokerage’s conversion rate from application to funded was 34%.
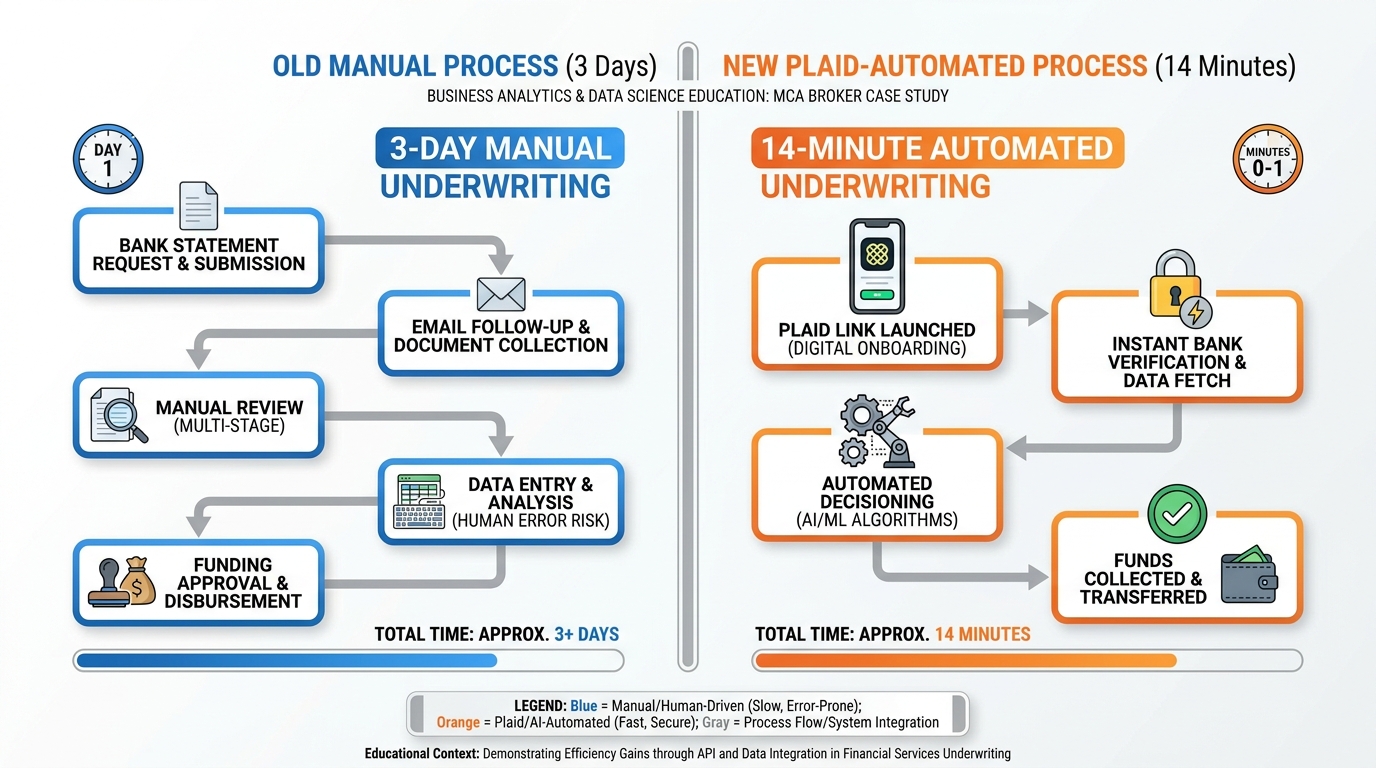
Figure 10:Before and after: the Plaid integration compressed a three-day manual underwriting process — with its multi-step statement chase — into a fourteen-minute digital flow from application to verified financial data.
The Solution:
Capital Access Partners integrated VibeReach with Stripe and Plaid and rebuilt their intake process as a digital workflow:
VibeReach Funnel: A two-page funnel captures business information (name, monthly revenue range, time in business, funding need) and creates a contact record automatically.
Plaid Link Trigger: Immediately after form submission, a workflow sends a personalized SMS with a Plaid Link URL. The message reads: “Thanks, [First Name] — to complete your funding application, click here to securely connect your business bank account. This takes about 60 seconds and does not affect your credit: [Plaid Link]”
Instant Verification: The merchant selects their bank, logs in, and selects their primary business checking account. Plaid returns: verified routing and account numbers, last 90 days of transaction data, average daily balance, and account holder name — all in under 90 seconds.
Automated Underwriting Pre-Screen: A webhook from Plaid delivers the verified data to a VibeReach custom field set. A workflow evaluates: average daily balance above 15,000 AND account age above 6 months → moves the contact to “Pre-Approved” stage in the pipeline and sends an automated approval text within seconds.
Stripe Invoice for Processing Fee: Pre-approved merchants receive an automated invoice for the application processing fee ($250) via Stripe. The invoice includes a direct payment link. Payment is made by card or ACH in under two minutes.
Funded: With verified bank data and application fee collected, the broker submits the pre-screened package to the funder. Most funders in this workflow fund within four hours of receiving a Plaid-verified package with clean financials.
The Results:
Application-to-funded time: reduced from 3–5 days to 14 minutes (Plaid Link completion) + same-day funding
Merchant conversion rate: from 34% to 61% (fewer dropoffs during statement collection)
Broker team capacity: the same three-person team handles 4x the application volume with no additional headcount
Average revenue per funded deal: up 18% (faster funding allows brokers to work with larger merchants who previously went elsewhere for speed)
What This Means for You:
The MCA example is extreme in its time compression — 3 days to 14 minutes. But the principle applies to any business where verification, documentation, or payment collection creates a gap between customer commitment and revenue realization. Every step you eliminate from that process is not just a convenience — it is a conversion rate. It is a deal that does not die in the gap.
118.11 Lab 8: Connect Stripe, Create a Product, and Send Your First Payable Invoice
A business that manually sends PayPal invoices and waits for bank transfers is leaving 20–30% of its revenue on the table from collection delays, forgetting to follow up, and uncomfortable “did you pay yet?” conversations. This lab wires Stripe directly into your VibeReach.io account, creates a real product in your payments catalog, and sends a live invoice that generates a professional Stripe checkout experience — all within a single platform. By the end, you can collect payment from any client in under 60 seconds without leaving GHL.
11.1Step 1: Connect Stripe to VibeReach.io
In the left sidebar, click ⚙️ Settings → Integrations.
Scroll to find Stripe in the integrations list → click Connect Stripe.
A new browser window opens showing Stripe’s OAuth authorization screen.
Log in to your Stripe account (or click “Create Account” if you don’t have one yet and complete basic Stripe setup).
Review the permissions GHL is requesting → click Connect my Stripe account.
You are redirected back to VibeReach.io.
You’ll know you did this right when: In Settings → Integrations, the Stripe section shows your Stripe account name (or email) and a green “Connected” status indicator.
11.2Step 2: Create a Product in Your Catalog
In the left sidebar, click Payments → Products.
Click + Add Product in the upper right.
Configure the product:
Name:
Business Funding ConsultationDescription:
One-hour business funding strategy session — we review your options, qualify your business, and identify the best funding path forward.Price:
97.00Currency: USD
Payment Type: One-Time
Click Save.
Your product now appears in the Products catalog.
You’ll know you did this right when: “Business Funding Consultation” appears in your Products list with the $97.00 price displayed.
11.3Step 3: Create and Send a Payable Invoice
In the left sidebar, click Payments → Invoices.
Click + New Invoice in the upper right.
In the invoice creation screen, fill in:
Contact: Click the contact search field → type your name or test email → select the contact
Invoice Title:
Business Funding Consultation(optional — auto-fills from product)Add Item: Click + Add Item → select
Business Funding Consultationfrom your catalog → verify price shows $97.00Due Date: Set to 7 days from today (click the calendar and select)
Notes (optional): “Thank you for scheduling your consultation. Payment secures your appointment time and includes your personalized funding readiness report.”
Click Send Invoice.
In the delivery dialog, select Email → confirm the contact’s email address is correct → click Send.
You’ll know you did this right when: The invoice appears in your Invoices list with status “Sent” and the send timestamp displayed.
11.4Step 4: View the Invoice From the Recipient’s Perspective
Check the inbox of the email address you used for the test contact.
Open the invoice email — it arrives from your verified sending domain, branded with your business name.
Click the View Invoice or Pay Now button.
You see the Stripe-hosted checkout page with:
Your business name at the top
Invoice line items (Business Funding Consultation — $97.00)
Payment form accepting credit/debit card
Enter the test card: 4242 4242 4242 4242 · Expiry: any future month/year · CVV: any 3 digits · ZIP: any 5 digits.
Click Pay.
You’ll know you did this right when: The payment processes without errors and you see a “Payment Successful” confirmation screen.
11.5Step 5: Confirm Payment in the GHL Dashboard
Return to VibeReach.io → Payments → Invoices.
Find the invoice you sent → confirm its status has changed from “Sent” to “Paid”.
Click the invoice to view the full record — it shows: amount paid, payment timestamp, payment method used (card), and the Stripe transaction ID.
Navigate to the contact record → scroll to the Payments or Transactions section → confirm the payment is visible on the contact’s record.
You’ll know you did this right when: The invoice shows “Paid” status with a Stripe transaction reference, and the payment appears in the contact’s record.
11.6Step 6: Create a Payment Automation Workflow (Bonus)
Wire a workflow that fires automatically when an invoice is paid:
Automation → Workflows → + New Workflow → Start from Scratch
Name:
Invoice Paid — Onboarding TriggerTrigger: Search for “Invoice” or “Payment” → select Invoice Paid (or “Order Submitted / Payment Received” — the exact name varies by GHL version).
Add actions:
Add Tag:
paying-clientRemove Tag:
consultation-applicant(cleanup)Create Pipeline Opportunity → move to your Onboarding pipeline, stage “Contract Signed”
Send Email: “Welcome aboard! Your onboarding coordinator will reach out within 24 hours...”
Toggle Active → Publish.
You’ll know you did this right when: The workflow is Active and the trigger shows “Invoice Paid” as the trigger type.
Troubleshooting Common Issues
“Connect Stripe” button does nothing or opens a blank page: Pop-up blockers prevent the Stripe OAuth window from opening. Disable your pop-up blocker for the GHL domain (or allow pop-ups from gohighlevel.com / your VibeReach.io subdomain) and try again. Also try in an incognito browser window.
Stripe shows “Connected” but invoices fail to send: Your Stripe account may not have completed KYC (Know Your Customer) verification. Stripe requires business details, a linked bank account, and sometimes identity documents before processing live payments. Go to stripe.com → Settings → Business → check for any incomplete verification steps. For Test Mode, full KYC is not required.
The invoice email arrived but the Pay Now link shows an error: This usually means your Stripe connection lost authorization. Return to Settings → Integrations → Stripe → click “Reconnect” and re-authorize. This can happen if you changed your Stripe password or revoked API access.
Test card declined: Use exactly: 4242 4242 4242 4242 with any future expiry and any 3-digit CVV. For intentional declines in testing, use Stripe’s decline test card: 4000 0000 0000 0002. If neither works, check that your Stripe account is in Test Mode (stripe.com dashboard should show “Test Mode” in the upper right).
Payment successful but invoice still shows “Sent” not “Paid”: GHL receives payment confirmation via Stripe webhooks. Webhook delivery can take 1–2 minutes. Wait, then refresh the Invoices page. If it still shows “Sent” after 5 minutes, check your Stripe webhook configuration: stripe.com → Developers → Webhooks → confirm the GHL webhook endpoint is active and the last delivery shows 200 status.
I don’t see the Payments section in my sidebar: The Payments module requires a GHL plan that includes payment features. Some lower-tier plans do not include full Payments access. Check your VibeReach.io plan under Settings → Account → Billing. Contact support if Payments should be included in your plan but isn’t visible.
128.12 Chapter Takeaways & Reflection Questions
12.1Key Takeaways
Payments belong inside your CRM. Every manual step between “yes” and “paid” reduces your collection rate. Embedded payment infrastructure eliminates context-switching and accelerates the revenue cycle.
Stripe processes cards and ACH. Cards are instant and convenient; ACH is slower but significantly cheaper (0.8% capped at 0.30). For high-ticket B2B transactions, ACH saves real money.
Plaid removes the bank statement chase. In under 90 seconds, customers authenticate with their bank directly, and your platform receives verified account data and routing numbers without ever touching credentials.
The product-price-subscription hierarchy gives you flexibility. One product can have multiple prices. Recurring prices power subscriptions. Subscriptions automate billing without manual intervention.
Price framing is strategy, not manipulation. Anchoring, installment reframing, and decoy pricing are evidence-based tactics that help buyers make decisions — and they help you close more at higher values.
Invoices need automation, not hope. Build overdue workflows, viewed-but-not-paid triggers, and reminder sequences from day one. The platform will follow up so you do not have to feel awkward about it.
Order forms with upsells multiply revenue per customer. A 20–40% order bump conversion and a 10–25% OTO conversion can increase your average transaction value by 40–100% without acquiring a single new customer.
Dunning is revenue recovery, not customer punishment. Smart retry logic plus graduated, helpful messaging recovers 60–80% of initially failed payments without human intervention.
Compliance is not optional. Stripe Tax handles multi-state sales tax. KYC protects your payout access. PCI tokenization protects your customers. Set these up before your first transaction.
12.2Reflection Questions
Where in your current business does the gap between “yes” and “paid” most commonly appear? What is the average number of days between a client commitment and actual payment receipt?
Consider your highest-ticket service or product. Which payment method would be most appropriate for your typical client — card or ACH — and what does that imply about your Plaid integration priority?
You currently have 150 active subscriptions at $197/month. Industry data suggests a 10% monthly payment failure rate. Walk through the math: what is your monthly revenue at risk, and what would a 70% dunning recovery rate mean for your annual revenue?
Review your last ten invoices. How many had a structured follow-up sequence? How many were paid within the due date? What is the correlation?
13Exercises
---

## Discussion

**Discussion Prompt:** The integration of payment infrastructure directly into a CRM platform raises interesting questions about the nature of customer relationships and business ethics. When a business can trigger an automatic invoice the moment a deal is marked "closed," send dunning sequences without human review, and collect ACH payments from a verified bank account — all within seconds of customer consent — where does automation end and responsibility begin?

Consider: A subscription customer's payment fails because they lost their job and their bank account was overdrawn. An automated dunning sequence sends four messages over fourteen days and ultimately pauses their account. Is this the right outcome? What design choices in the dunning workflow could make the system more humane without sacrificing revenue recovery effectiveness? Use at least one scholarly or industry source to support your position.

> **Discussion Guidelines:** Write a substantive response of at least 200 words addressing the prompt above. Include at least one scholarly or credible citation (journal article, textbook, or authoritative industry report) to support your argument. Then respond to at least TWO peers with substantive feedback — go beyond "I agree" and explain why their perspective adds to or challenges your thinking.

---

## Glossary

**ACH (Automated Clearing House):** Electronic bank-to-bank transfer network operated by NACHA; cheaper than card processing but settles in 1–3 business days.

**Authorization:** The process by which a card network confirms that a card is valid and has sufficient funds or credit available before a charge is captured.

**Capture:** The step that actually moves money from a customer's account to the merchant; authorization reserves funds, capture collects them.

**Chargeback:** A forced payment reversal initiated by a cardholder through their bank; costs the merchant the transaction amount plus a dispute fee.

**Dunning:** The systematic process of communicating with customers and retrying payments to recover failed subscription charges.

**Economic Nexus:** The legal threshold (usually $100K in sales or 200 transactions per year) that creates a sales tax collection obligation in a state, even without physical presence.

**KYC (Know Your Customer):** Identity and business verification requirements imposed by financial regulators; Stripe requires KYC before allowing payouts.

**Order Bump:** A complementary add-on offer presented within the main order form, checked by the buyer before completing checkout.

**Order Form:** A Stripe-powered checkout page embedded in a funnel that simultaneously captures contact information and processes payment.

**PCI DSS:** Payment Card Industry Data Security Standard; the security framework governing how businesses handle cardholder data.

**Payment Gateway:** Technology that securely captures and transmits payment data between the customer, the processor, and the card network.

**Plaid:** A financial data network that connects applications to bank accounts for instant verification and ACH payment setup.

**Price Anchoring:** A cognitive bias technique where the first price presented creates a reference point that makes subsequent prices feel higher or lower by comparison.

**Stripe Tax:** Stripe's automated sales tax calculation and collection feature that applies correct rates based on buyer location.

**Subscription:** An active recurring billing agreement between a business and a customer, auto-charging on a defined schedule.

**Tokenization:** The process of replacing sensitive card data with a randomly generated token that represents the card without exposing its actual number.

**1099-K:** IRS tax form issued by payment processors to merchants who exceed reporting thresholds; required for accurate tax reporting.

---

## 🎯 Your Turn: Apply It to Your Business

Money sitting in a "yes" that hasn't been invoiced yet is not revenue — it's hope. This chapter closes the distance between agreement and deposit. Now apply it to your actual offers.

**1. Connect your Stripe account to GHL.**
Log into GHL → **Settings → Payments → Integrations → Stripe**. Click **Connect with Stripe**. You'll be redirected to Stripe's OAuth flow — log in with your Stripe credentials and authorize the connection. Return to GHL and confirm the integration shows "Connected." If you don't have a Stripe account yet, create one at stripe.com (free to set up, pay-per-transaction). This connection is the foundation of everything else in this chapter.

**2. Create your first product or service in GHL.**
In GHL → **Payments → Products → + New Product**, create your primary offer: name, description, price, and type (one-time or recurring). Set up pricing tiers if applicable. For a subscription offer, configure the billing interval (monthly, quarterly, annual). Save it. Then generate a quick payment link: **Payments → Payment Links → + New Payment Link** → select your product → copy the link. Test it with a $1 dummy charge to yourself to confirm the full payment flow works end-to-end.

**3. Build an automated invoice workflow.**
In GHL → **Automation → Workflows**, create a workflow: Trigger = Opportunity Stage Changed → filter to your "Proposal Accepted" or "Contract Signed" stage. Action = **Send Invoice** (select your product). The invoice should arrive in the contact's email within seconds of the stage change. Test it by manually moving a test contact's opportunity to that stage. Did the invoice fire? Did it appear in the contact's timeline? Did it show up in **Payments → Invoices**?

**4. Set up your dunning sequence.**
In GHL → **Automation → Workflows**, build the Payment Failed recovery workflow: Trigger = Payment Failed → Action 1: Send Email to contact ("Your payment didn't go through — here's how to update your card") with a payment link → Wait 3 days → If/Else: Check if payment is now current → YES: End → NO: Create Task for billing team + Send second email. This workflow runs without human intervention and recovers a significant percentage of failed charges before they become cancellations.

**5. Create an order form embedded in your funnel.**
In GHL → **Payments → Order Forms → + New Order Form**, build a checkout form for your core offer. Add your product, configure the layout (one-step or two-step checkout), add an order bump (a secondary product offered at checkout). Then embed the order form URL as a step in your existing funnel — replacing the old "contact us" step with a direct checkout step. Now your funnel ends in a payment, not a conversation.

:::{admonition} 🏋️ Stretch Challenge
:class: tip
Calculate your revenue leakage from failed payments over the last 90 days. In GHL → **Payments → Transactions**, filter by "Failed." Total the attempted charge amounts. That number is your dunning opportunity — the revenue that a properly configured recovery sequence would have captured. Now check: Do you have a dunning workflow live? If not, build one today and tag it with the date you activated it. In 90 days, pull the same failed payment report and compare. Document the delta. That number is the direct ROI of a single afternoon's automation work.
:::