Forms, Document Intelligence & The Calendar: From Hello to Signed in Minutes
Paperwork killed more deals than price ever did.
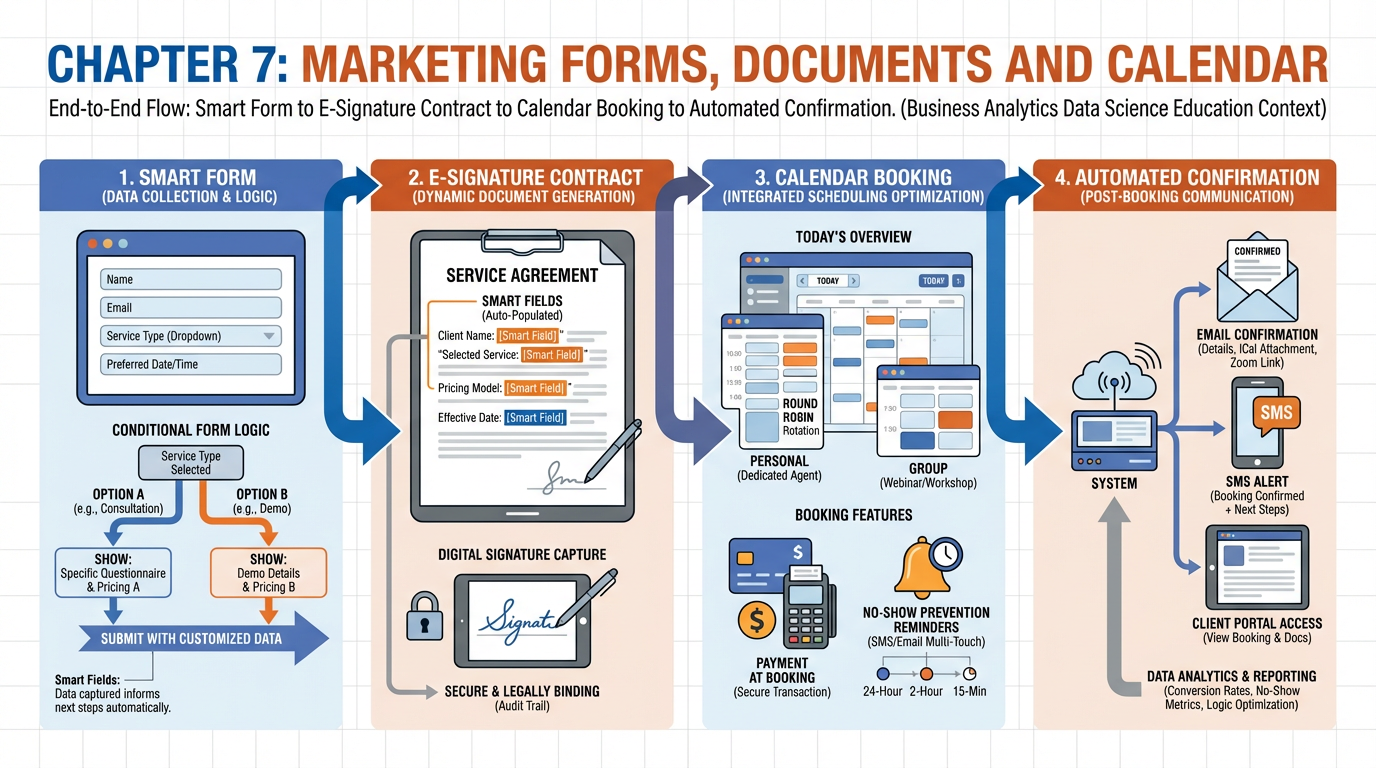
Figure 1:Chapter 7 overview: the closing layer connects a prospect’s first form submission to a signed agreement and booked appointment — without a single manual step.
17.1 The Death of the Printed PDF
A mortgage broker in Dallas had a prospect ready to move. The deal was worth $340,000 in origination fees. The prospect filled out a paper inquiry form at a networking event, handed it over, shook hands, and said the words every salesperson loves: “Send me the paperwork tonight and I’m in.”
The broker went back to the office. His assistant scanned the paper form, typed the data into the CRM, found the PDF template in an old email thread, filled in the fields manually, and hit send at 11:47 p.m. The 4.2-megabyte attachment landed in spam. The broker assumed the prospect was reviewing it. The prospect assumed the broker had forgotten. Three days passed. By the time anyone followed up, the prospect had signed with a competitor who texted a signing link thirty minutes after the conversation.
The paperwork did not fail. The process did. The printed PDF was already dead — it just had not been buried yet.
A document that sits in someone’s inbox is a lead that is cooling by the hour. Every second between “I’m interested” and “I’m signed” is an opportunity for doubt, distraction, or a competitor’s text message to arrive first. The modern closing layer is not about having good documents. It is about having documents that move — triggered automatically, signed digitally, and confirmed with a booked calendar slot before the prospect has time to reconsider.
This chapter covers the entire closing layer: smart forms that qualify, documents that close, and calendars that book — all connected in a single automated flow inside VibeReach.
27.2 Smart Forms: Conditional Logic, Multi-Step, and File Uploads
A form is not just a data collection tool. It is the first conversation you have with a prospect, and like any good conversation, it should adapt to what the other person says.
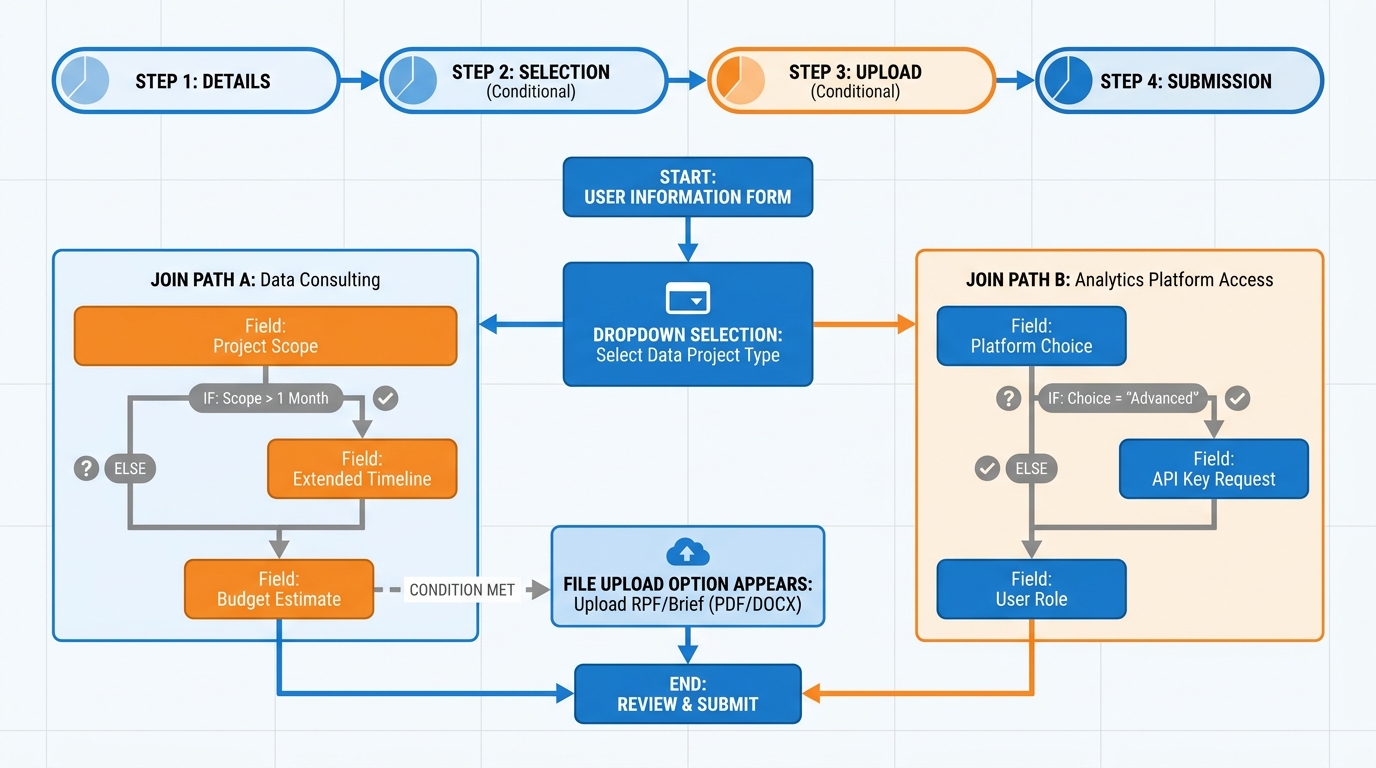
Figure 2:Conditional logic routes prospects through different question paths based on their answers — a business owner sees different fields than a freelancer, without either noticing the difference.
In VibeReach, forms live under Sites → Forms. Creating a new form opens a drag-and-drop builder with field types covering text, email, phone, dropdown, multi-select, date, file upload, signature, and hidden fields. The power is in the Conditional Logic tab on each field, where you define show/hide rules based on any other field’s value.
Multi-step forms divide a long form into sequential pages with a progress bar. Research from Typeform shows multi-step forms with a visible progress indicator generate 86% more completions than single-page equivalents — each step feels achievable, and the sunk-cost psychology of partial completion keeps prospects moving forward.
File uploads are often overlooked but critically useful for service businesses: tax returns for mortgage applications, ID verification for financial services, photos for medical consultations, signed proof documents for legal intake. VibeReach supports file upload fields with configurable size limits and accepted file type restrictions (PDF, image, document). Uploaded files attach directly to the contact record.
Three form behaviors every professional should configure:
On Submit Action — redirect to a thank-you page, a calendar booking link, or trigger a workflow. This connects forms to the rest of the closing layer.
Spam Protection — enable reCAPTCHA or honeypot fields to block bot submissions.
Partial Submission Capture — VibeReach can save a lead’s information even if they abandon mid-form. A partial name and email is still a lead you can follow up with.
37.3 Surveys for Qualification, Onboarding, and NPS
Surveys and forms share the same builder in VibeReach but serve different strategic functions. Where forms capture — surveys measure.
Qualification surveys appear at the top of the funnel, embedded in a landing page or sent via SMS to a cold list. A four-question survey asking about budget, decision timeline, team size, and pain point filters in real time — prospects below your minimum threshold route to nurture; prospects above it get a calendar link immediately. The automation does the sorting.
Onboarding surveys appear after the sale. A new client who just signed should receive a survey collecting communication preferences, access credentials, specific goals, and team contacts. Structured collection ensures nothing is missed and data lands directly in the CRM.
NPS surveys are a single question — “On a scale of 0–10, how likely are you to recommend us?” — followed by an optional open-text field. VibeReach triggers NPS surveys at strategic moments: 30 days after onboarding, at project milestones, or six months into a retainer. A score of 9 or 10 triggers a review request sequence; a score of 0–6 triggers an internal alert so leadership can intervene before the client churns.
47.4 Document Intelligence: Smart Fields, Templates, and Dynamic Contracts
Once a form is submitted, most businesses still manually copy that data into a contract template, print it or export it as a PDF, and email it as an attachment. This is the process that loses deals.
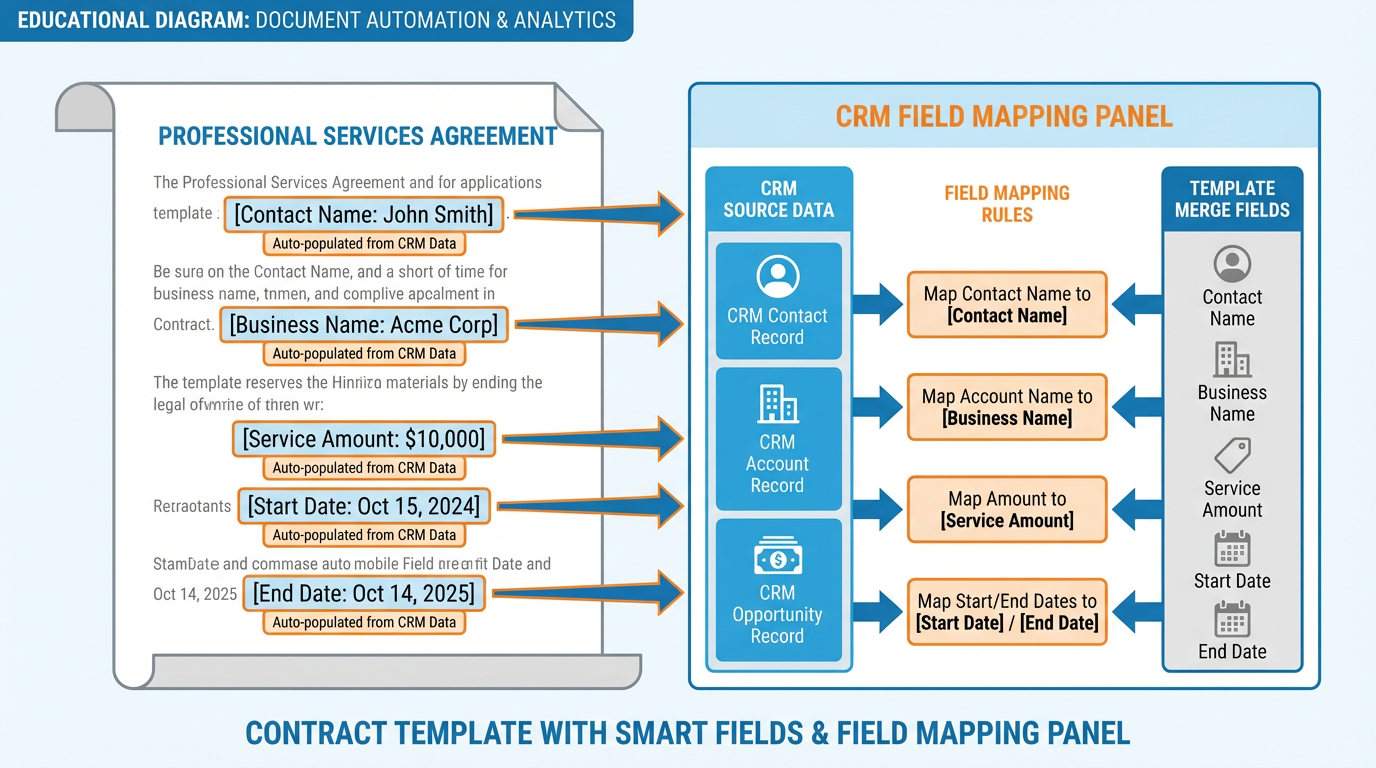
Figure 3:Smart fields pull directly from the CRM contact record — every merge field in the template is populated automatically when the document is sent, eliminating manual data entry and transcription errors.
In VibeReach, documents live under Payments → Documents & Contracts. The document builder supports:
Smart Fields (Merge Tags): Any field from the contact or opportunity record can be inserted as a merge tag —
{{contact.first_name}},{{opportunity.value}},{{company.name}}. When the document is sent, the system populates every tag automatically from the CRM record. No typing. No transcription errors.Templates: Create reusable templates for your most common documents — service agreements, NDA templates, consulting proposals, independent contractor agreements. Templates lock the boilerplate language and leave only the dynamic fields exposed for automated population.
Conditional Sections: Entire sections of a document can be shown or hidden based on opportunity data. A contract for a client who selected the “Premium” tier automatically includes the premium service schedule section; the standard tier version omits it. The same template serves both.
The document builder also supports embedded payment collection — you can require payment as part of the signing flow, so a client signs the contract and pays the deposit in a single session. Chapter 8 covers payments in detail, but the architecture point is critical: in VibeReach, signing and paying are not separate events. They are steps in the same screen.
57.5 E-Signatures That Close Deals at 2 a.m. on a Tuesday
An e-signature is legally binding in all 50 U.S. states under the Electronic Signatures in Global and National Commerce (ESIGN) Act of 2000 and recognized internationally under eIDAS in the European Union. A prospect who signs your contract at 2 a.m. from their phone while watching television is as legally committed as one who signed in your office with a notary present.
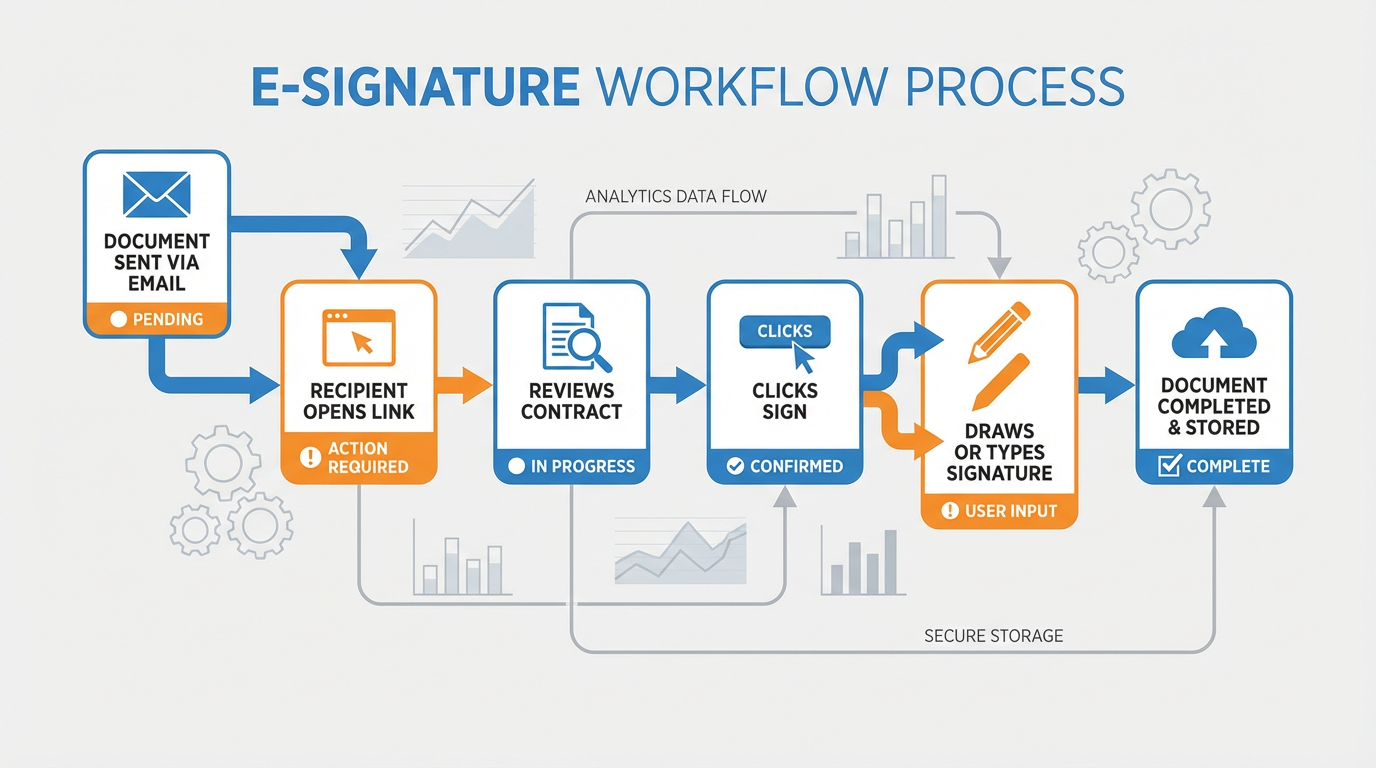
Figure 4:The e-signature flow: document link arrives via email or SMS → recipient reviews in browser → signs by drawing or typing → all parties receive a completed copy → workflow trigger fires.
In VibeReach, e-signatures work through the Documents & Contracts module. When you send a document for signature:
The recipient receives an email or SMS with a unique, secure link.
They open the document in their browser — no app download, no login required.
They review the document and click each designated signature or initial field.
They choose to draw, type, or upload their signature.
They submit. All parties receive a completed PDF copy immediately.
VibeReach maintains a full audit trail for every document: timestamp of send, timestamp of first open, IP address of signing device, and timestamp of completion. This audit trail is the legal foundation of the e-signature’s enforceability.
Signing order matters for multi-party contracts. VibeReach supports sequential signing — a contract can be configured so the client must sign before the internal account executive countersigns, or vice versa. This prevents the common mistake of sending a contract already countersigned by the company when the client has not yet committed.
67.6 Proposals and Invoices as Part of the Same Flow
Proposals and invoices in most businesses live in completely separate systems. The proposal is in Google Docs. The invoice is in QuickBooks. The signature is collected on DocuSign. The payment is processed via Stripe. Four platforms. Four logins. Four chances for something to fall through.
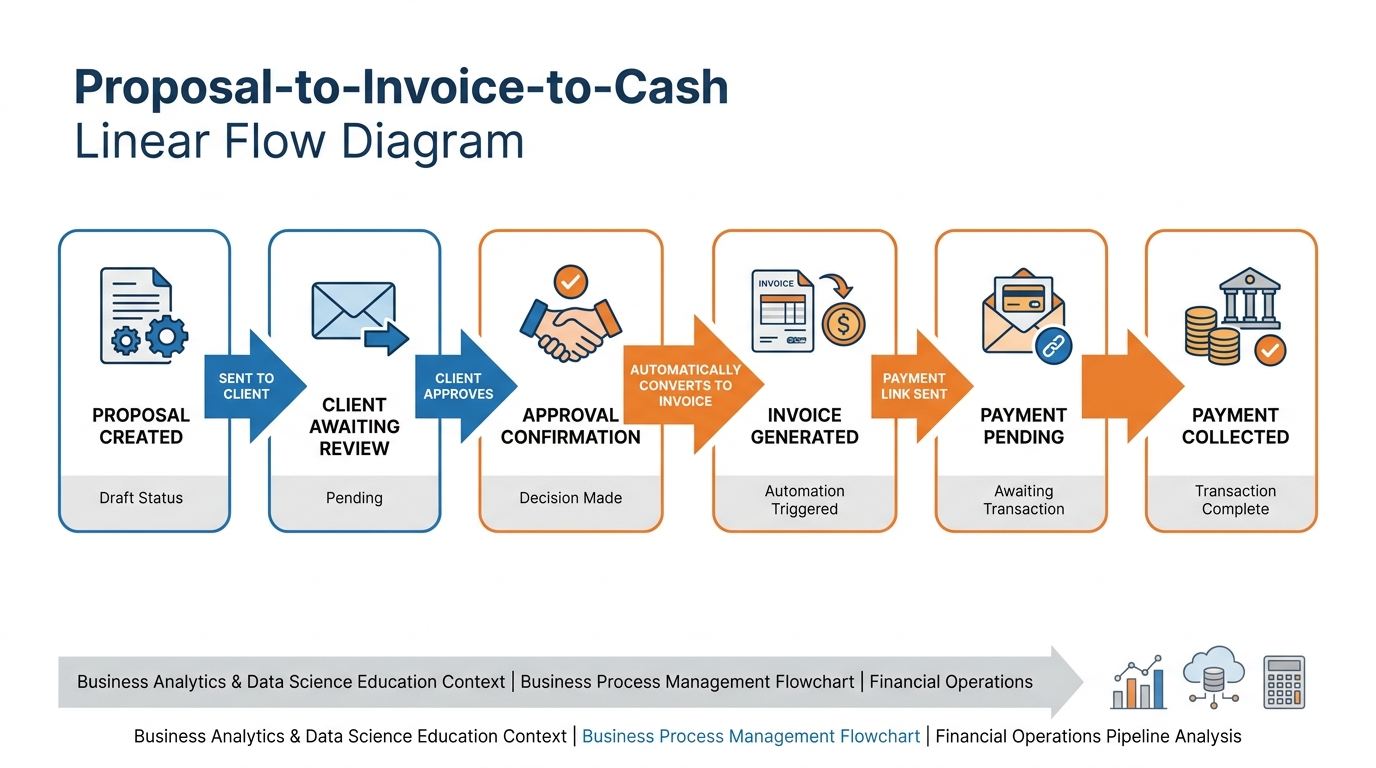
Figure 5:The integrated proposal-to-payment flow: one platform handles proposal creation, e-signature, invoice generation, and payment collection — no data re-entry, no platform switching.
VibeReach consolidates all four into a single flow inside Payments → Documents & Contracts:
Proposals can be built with a visual editor that supports pricing tables, service descriptions, team bios, case study sections, and custom branding. A proposal is not just a document — in VibeReach it is an interactive page that tracks how long the recipient spent on each section.
The approval-to-invoice conversion is automatic. When a client accepts a proposal (by clicking an “Accept” button or signing a signature field), the system can automatically generate an invoice for the agreed amount and send it immediately. The data does not get re-entered. The contract value in the opportunity record updates. The pipeline stage moves. All of this from a single client action.
Recurring invoices for retainer clients are scheduled from the same module — set the amount, frequency, and start date, and the system handles billing indefinitely.
The strategic point: when proposals and invoices live in the same system as the CRM and calendar, data flows forward automatically. A signed proposal updates the opportunity value. A paid invoice updates the contact’s revenue-to-date. A failed recurring invoice generates a task. No human copies numbers between systems.
77.7 Document Workflow Triggers: Sent, Viewed, Signed, Completed
Document events are workflow triggers. This is the architectural feature most businesses completely miss.
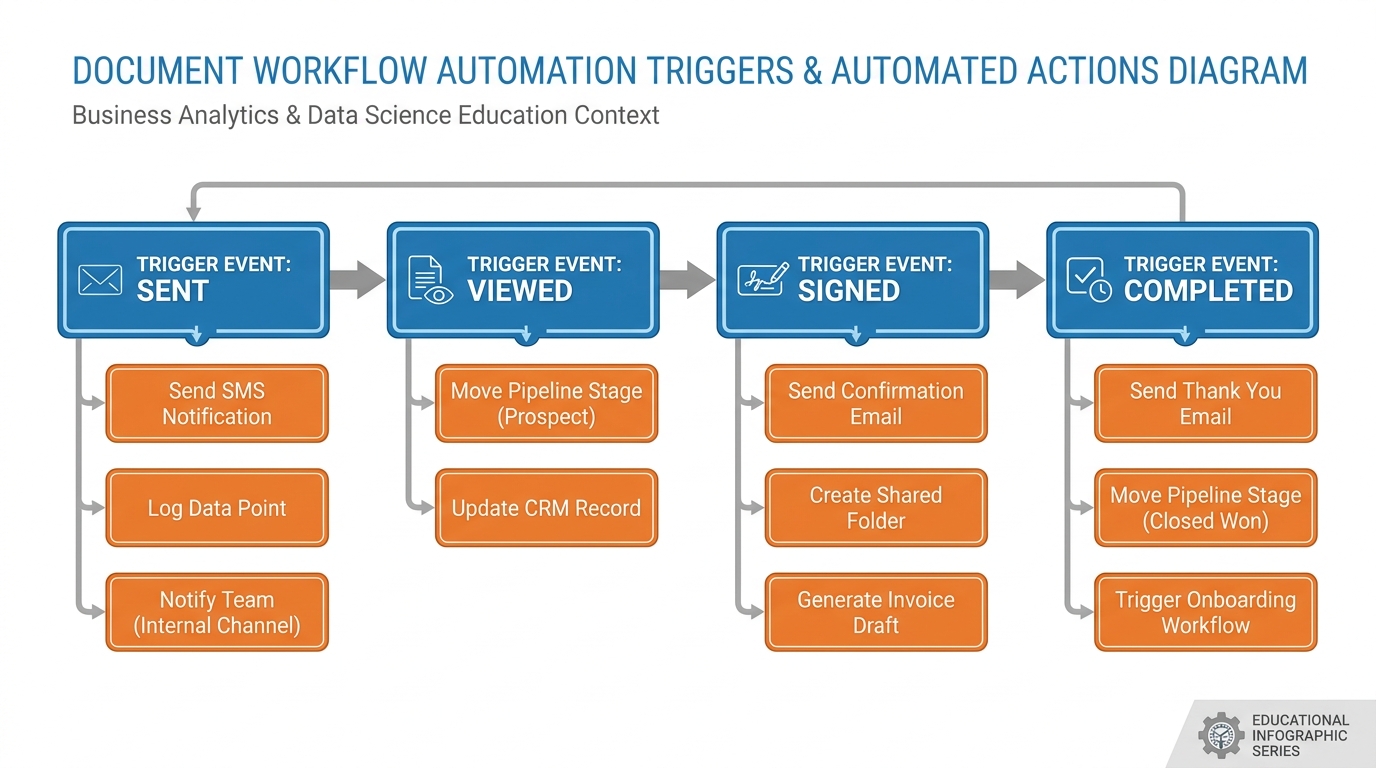
Figure 6:Four document events, four trigger points: each state change in a document’s lifecycle can initiate an automated action — from a gentle “Did you have a chance to review?” nudge to a pipeline stage update and calendar booking link.
In VibeReach, you build automations triggered by Document/Contract events under the Workflow trigger menu. The four key events and their practical applications:
| Event | Timing | Automation Use |
|---|---|---|
| Document Sent | Immediately when sent | Start a follow-up timer; notify the assigned sales rep |
| Document Viewed | When recipient first opens the link | Send a “Let me know if you have questions” SMS; notify rep so they can follow up while prospect is actively reading |
| Document Signed | When signature is collected | Move pipeline stage to “Signed”; send welcome sequence; send deposit invoice; book onboarding call |
| Document Completed | When all required parties have signed | Notify delivery team; create project tasks; send client confirmation with next steps |
The Document Viewed trigger is underused gold. A prospect who opens your contract is telling you something important: they are actively considering it. A text message that arrives thirty seconds after they open the document — “Hey, I saw you’re reviewing the agreement. Happy to jump on a quick call if you have any questions” — converts at a dramatically higher rate than a follow-up sent blindly three days later. The automation makes this look personal. It is personal — it just scales.
87.8 The Calendar Inside the Closing Flow — Why Booking Belongs Here
Most businesses treat the calendar as a scheduling utility — a tool for organizing the team’s time. That is the narrowest possible interpretation of what a calendar does.
In a properly designed closing flow, the calendar is the conversion endpoint. A form submission means interest. A signed document means intent. But a booked calendar appointment is the first irreversible commitment. Once a prospect has a meeting on their calendar, the psychology shifts from “I might work with these people” to “I have a meeting with these people.” That shift is everything.
The sequence is this: form submitted → qualification confirmed → document sent → document signed → calendar booking link sent → appointment booked → confirmation + reminders triggered. Every step reduces the prospect’s exit options. The calendar is the last gate, and once they pass through it, they are in.
Practically, VibeReach calendars live under Calendars in the main navigation. The booking page is a dedicated URL you can embed in a funnel, attach as a form redirect, drop in a text message, or nest inside a chat widget. It displays your real-time availability and lets prospects self-select their slot without a single email exchange.
97.9 Calendar Types in Plain English: Personal, Round Robin, Class/Group, Service
VibeReach offers four calendar types. Each solves a different scheduling problem.
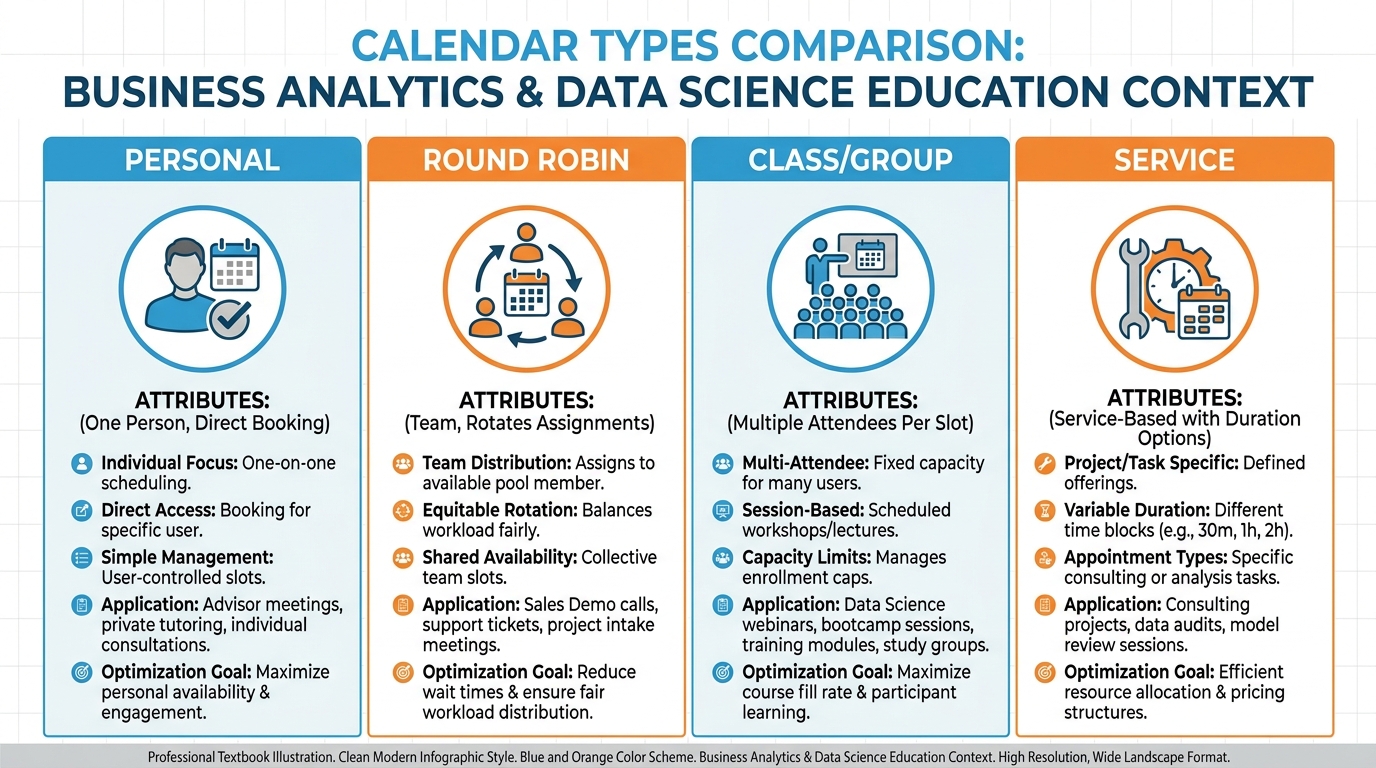
Figure 7:Four calendar types for four distinct booking scenarios — choosing the right type is the first configuration decision, and the wrong choice creates scheduling chaos before a single appointment is booked.
Use case: One person, direct booking.
The Personal Calendar is tied to a single team member. All bookings go to that person. Availability is pulled from their connected Google or Outlook calendar in real time. Best for solopreneurs, individual consultants, and single-rep businesses where routing is unnecessary. Navigation: Calendars → + New Calendar → Personal.
Use case: Team booking with automatic assignment.
The Round Robin calendar accepts bookings for a team and assigns each incoming appointment to the next available member. Two distribution modes exist: Optimized (assigns to the rep with the fewest appointments that day) and Strict (rotates in fixed order regardless of load). Best for sales teams where every prospect should get a rep, but no specific rep. The prospect sees a unified availability — they book a slot without knowing or caring which rep they get.
Use case: Multiple attendees per slot.
A single time slot can accept multiple bookings up to a configured capacity. A webinar, a group coaching session, a fitness class — any scenario where the same event hosts many people at once. The host sets the max capacity. Once full, that slot disappears from the booking page. Best for educators, coaches, and event-based businesses.
Use case: Service-based booking with variable durations.
The Service calendar associates each booking type with a specific service and duration. A medical spa might offer a 30-minute consultation, a 60-minute HydraFacial, and a 90-minute treatment package — each with different durations, staff assignments, and pricing. Prospects select the service first, then see only slots long enough to accommodate it. Best for health, beauty, legal, and service-based businesses with multiple service types.
107.10 Availability, Buffer Times, and the Art of Not Getting Burned Out
Calendar availability in VibeReach is configured at the calendar level under Availability Settings. You set which days are bookable, the start and end times for each day, and whether to enable different hours on different days (for example, Tuesday and Thursday open until 7 p.m. for evening appointments, Monday, Wednesday, Friday standard 9 a.m.–5 p.m.).
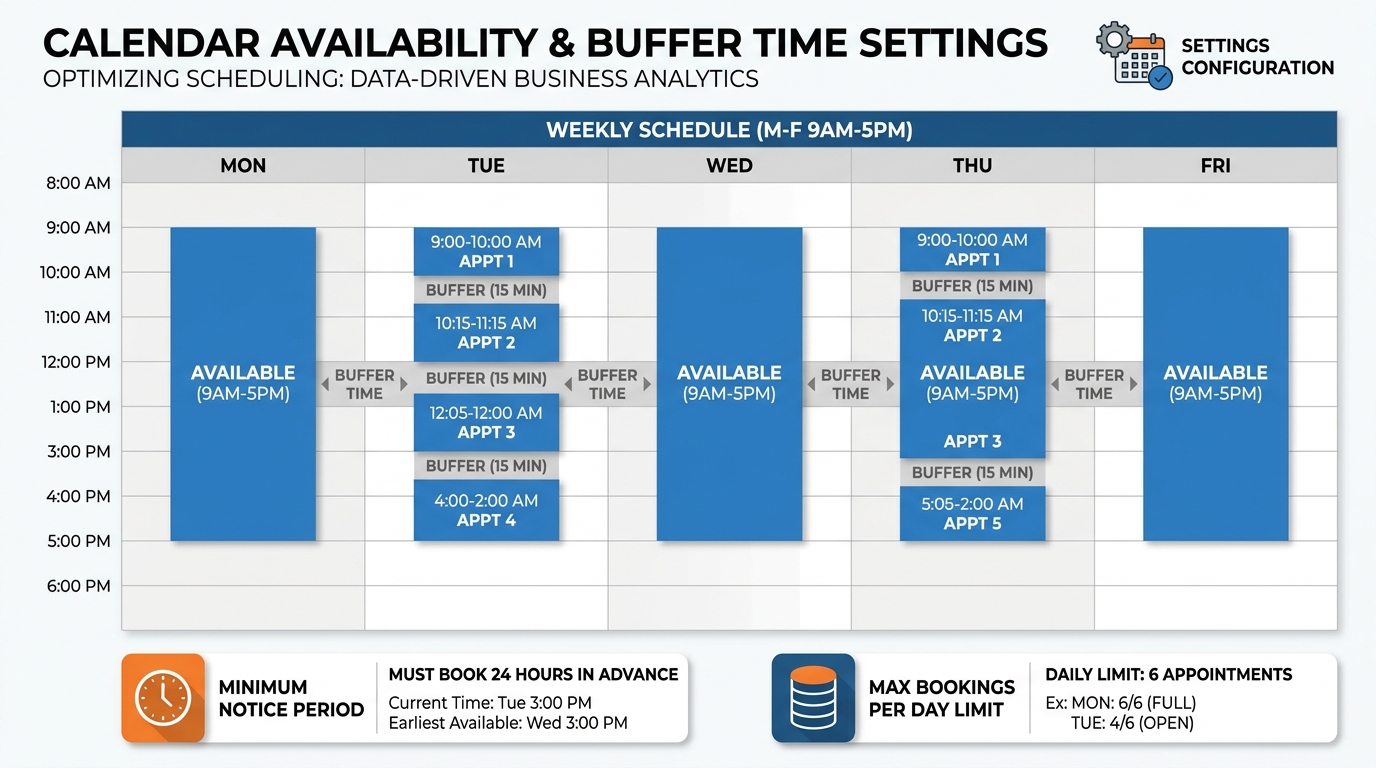
Figure 8:Availability settings translate your working reality into automated scheduling rules — what you configure here is what prospects can book, nothing more.
Three availability settings that every professional should configure deliberately:
Buffer Time: Add 10–15 minutes after each appointment. Back-to-back meetings compound into disaster by 2 p.m. Buffer time is the structural cushion that keeps your day intact.
Minimum Notice Period: Prevents same-hour or same-day bookings. Most professionals need at least a few hours’ notice to prepare. Set it accordingly.
Maximum Bookings Per Day: A hard cap on daily appointments. Unlimited bookings with no ceiling is a burnout path. VibeReach stops accepting bookings automatically once the cap is reached — you never manually close the calendar.
117.11 Google and Outlook Sync: Two-Way, Real-Time, No Double Bookings
Every calendar conflict story ends the same way: an apologetic email, a reschedule request, and a small erosion of professional credibility. Two-way calendar sync prevents this at the infrastructure level.

Figure 9:Two-way sync means VibeReach reads from and writes to your external calendar — a dentist appointment added in Google Calendar at noon blocks that slot in VibeReach before any prospect can book it.
In VibeReach, calendar integrations are configured under Settings → Integrations → Calendar. Connecting a Google account establishes OAuth-based sync that operates in real time. The same flow works for Microsoft Outlook and Office 365 accounts.
How two-way sync works:
When a prospect books a slot in VibeReach, the appointment is written to your connected Google or Outlook calendar immediately.
When you add, modify, or delete an event in Google Calendar — a doctor appointment, a personal errand, a block of focus time — VibeReach reads that event and marks those hours as unavailable.
The result: prospects only ever see slots that are genuinely open. No manual blocking required.
The multiple-calendar problem: Professionals with separate work and personal calendars can connect both to VibeReach. VibeReach reads all connected calendars when determining availability but writes new bookings only to the primary designated calendar. Personal appointments remain private — VibeReach knows the slot is blocked without exposing the reason.
One detail worth verifying: VibeReach syncs in polling intervals (typically every few minutes), not true real-time updates. A meeting added to Google Calendar at 10:03 a.m. may remain bookable in VibeReach until 10:06 a.m. For high-volume booking environments, be aware of this gap.
127.12 Taking Payment at Booking — Ending No-Shows Forever
The research is consistent: paid appointments show up. Unpaid appointments, especially free consultations, do not.
A 2019 study published in the Journal of Health Economics found that appointment no-show rates dropped by over 67% when a modest prepayment was required — not because patients were trying to avoid losing money, but because the act of payment itself signals commitment. Behavioral economists call this the sunk-cost effect: once you have paid for something, you are psychologically invested in getting value from it.
In VibeReach, payment at booking is configured under Calendar Settings → Payments. Connect the calendar to a payment product and set the amount. Three options:
Full payment at booking — confirmed only after payment clears.
Deposit at booking — partial amount upfront; remainder at delivery.
Hold only — capture card details without charging; charge manually for confirmed no-shows.
The booking page displays a Stripe-powered payment form as the final step. No payment, no booking.
The pricing psychology of deposits: Even a $25 deposit reduces no-shows disproportionate to the amount. The commitment act matters more than the dollar figure. A prospect who paid will reschedule. One who booked for free will simply not show.
137.13 Appointment Automations: Reminders, Confirmations, No-Show Recovery
Booking an appointment is the beginning of the automation sequence, not the end.
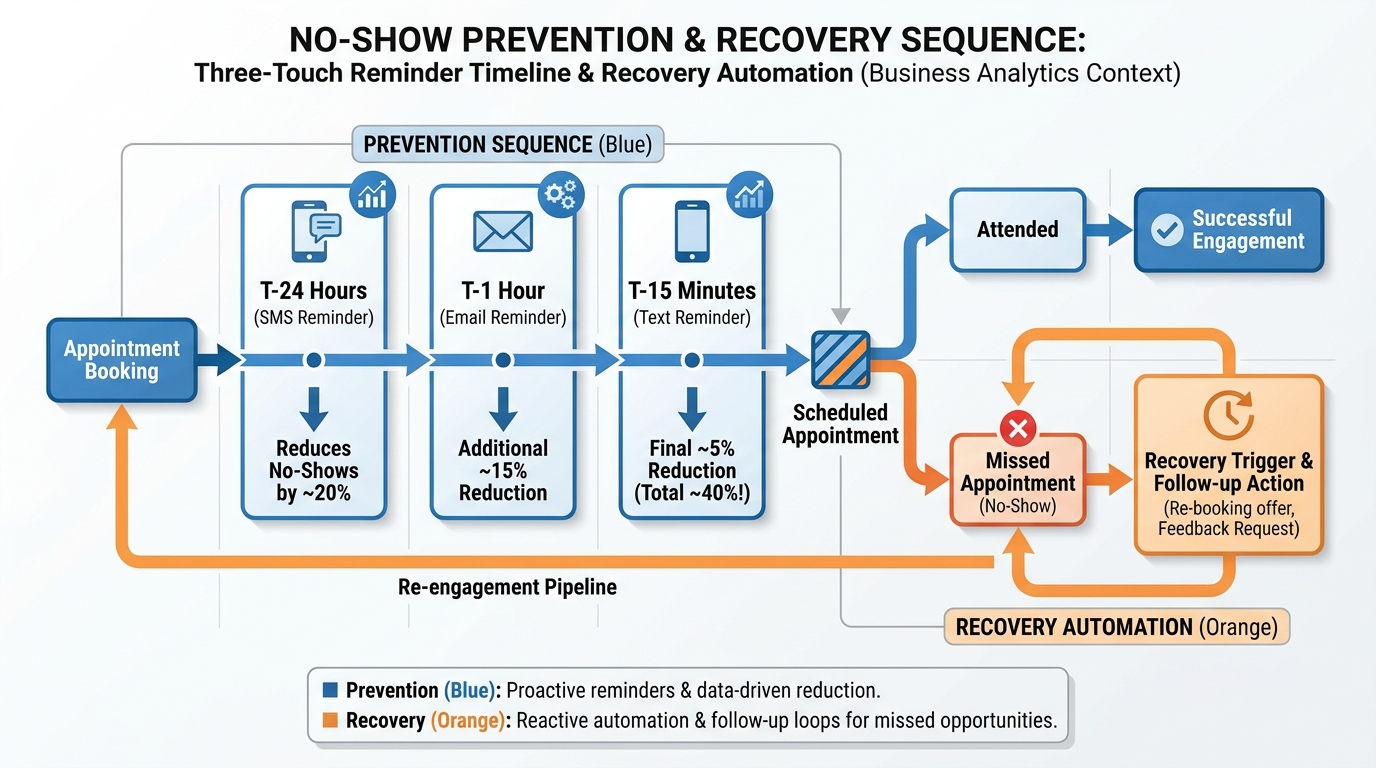
Figure 10:The three-touch reminder sequence — timed reminders via multiple channels reduce no-shows by keeping the appointment top-of-mind from booking through arrival.
VibeReach triggers appointment automations via the Appointment event in Workflows. The trigger fires when an appointment is booked, rescheduled, cancelled, or reaches a specific time condition relative to the appointment time.
Standard appointment automation sequence:
Immediate confirmation (trigger: appointment booked) — an email and SMS confirmation with the appointment date, time, location or video link, and a reschedule/cancel link. Sends within seconds of booking.
24-hour reminder (trigger: 24 hours before appointment time) — an SMS reminder: “Your appointment with [Business Name] is tomorrow at [Time]. Reply STOP to cancel.” Keep it short.
1-hour reminder (trigger: 1 hour before appointment time) — an email reminder with any preparation instructions, directions, or video call link they will need.
15-minute reminder (trigger: 15 minutes before appointment time) — an SMS with the Zoom or meeting link if applicable. This is the one they read on their phone as they are driving or walking to your location.
No-show recovery (trigger: appointment status = No Show, delay 30 minutes) — “We missed you today. Here is a link to reschedule at your convenience.” Keep the link one tap away. No guilt, no lecture. Just the link.
Cancellation recovery is the underbuilt sequence: when a prospect cancels, trigger a short sequence that offers an alternative time, not a sales pitch. A cancellation is a scheduling conflict, not a rejection.
147.14 Embedding Calendars in Funnels, Pipelines, and Conversations
A calendar that only lives on a standalone page is a calendar half-deployed.
In Funnels: The calendar widget is an embeddable element in the VibeReach funnel builder (Chapter 2). After a lead magnet page, instead of redirecting to a static thank-you page, route to a funnel step with the calendar embedded directly on the page. The prospect books their call before they leave the funnel. Conversion rates on this pattern are consistently higher than any external link because the momentum of the form submission carries directly into the booking step.
In Pipelines: When an opportunity moves to the “Proposal Sent” stage, a workflow can automatically send a text message with the booking link: “Your proposal is on its way. While you’re reviewing it, feel free to grab a time for us to walk through it together.” This makes the calendar a deal-acceleration tool inside the pipeline.
In Conversations: The Conversations module (Chapter 6) supports trigger links — a sales rep in live chat can drop a calendar link with a single click, without leaving the inbox. The prospect books in-thread.
In SMS workflows: Keep the link short (VibeReach auto-shortens) and the message direct: “Pick a time that works for you: [link].” Fewer words between the prospect and the booking page means higher conversion.
157.15 Case Study: The Medical Spa That Cut No-Shows by 78%
A mid-sized medical spa in South Florida was running a respectable volume — forty to sixty appointments per week — but losing approximately twenty-two hours of provider time per month to no-shows. At 3,850 in lost revenue every month. The practice manager described the problem accurately: “We had a scheduling system, not a commitment system.”
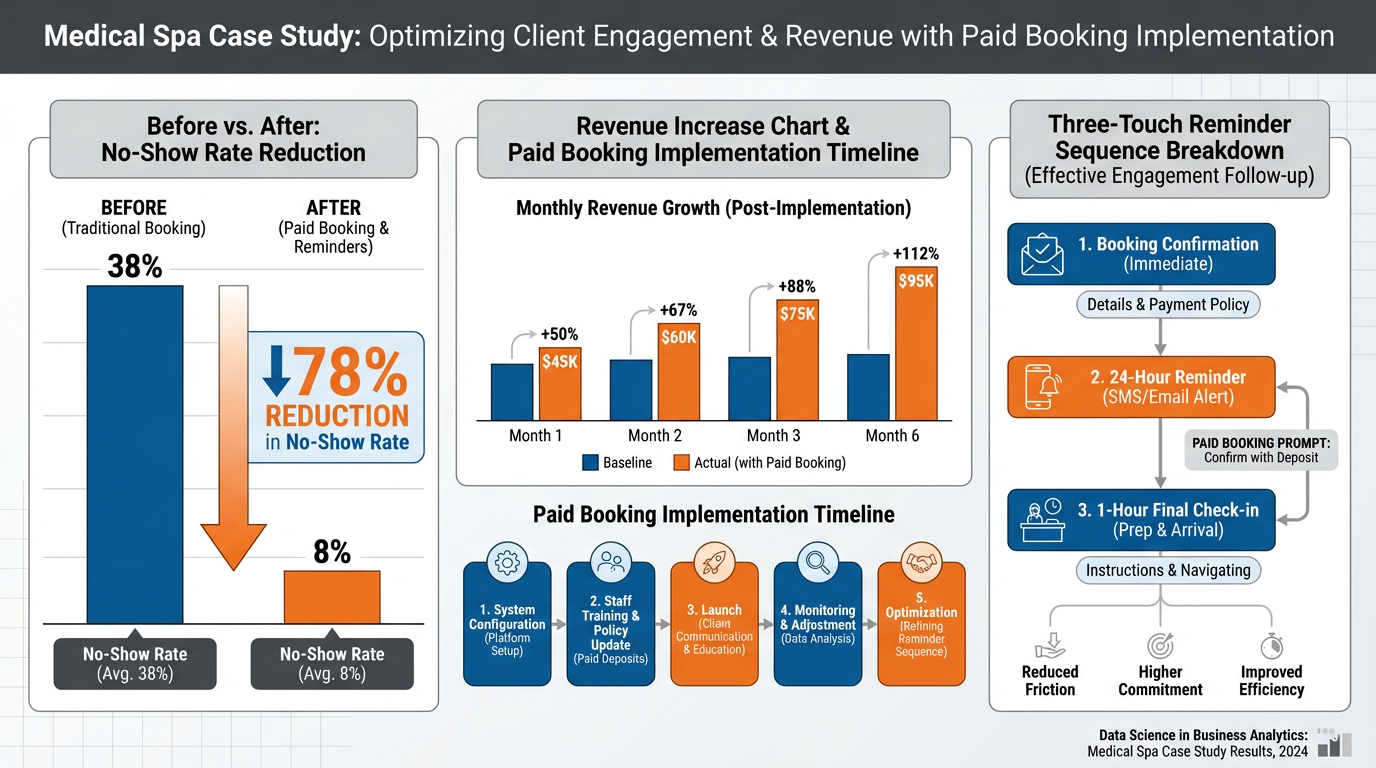
Figure 11:Ninety days after implementing paid booking and a three-touch reminder sequence, the medical spa’s no-show rate dropped from 38% to 8% — recovering over $3,200 per month in provider time.
The intervention had two components:
Component 1 — Paid booking deposit. The spa implemented a 25 hold, charged only in confirmed no-show cases.
Component 2 — Three-touch reminder sequence. Built inside VibeReach Workflows:
T-24 hours: SMS — “Your appointment at [Spa Name] is tomorrow at [Time] with [Provider]. Reply RESCHEDULE if you need to change it.”
T-1 hour: Email — full appointment details, address with Google Maps link, what to expect during the visit, and a preparation checklist.
T-15 minutes: SMS — “We’re ready for you! See you soon at [Address].”
Results after 90 days:
No-show rate: 38% → 8% (78% reduction)
Monthly recovered provider hours: 18.4 hours
Monthly recovered revenue: approximately $3,200
Staff time spent on manual reminder calls: eliminated (previously 6+ hours per week)
The practice manager noted a secondary benefit the data did not capture: provider morale. Providers previously demoralized by empty slots reported higher job satisfaction once their days became predictable. That does not appear in a revenue report but matters for retention.
What this means for humans in the room: technology did not fix the no-show problem. Psychology did. The technology deployed it consistently, at scale, without forgetting.
167.16 Lab 7: Build an Application Form That Routes to a Booked Consultation
A consultation booking process built from disconnected tools — a Typeform for the application, a Calendly for scheduling, a PDF for the agreement — creates friction, loses data, and produces no automatic follow-up. This lab wires all three into a single integrated flow inside VibeReach.io: a branded application form that qualifies the prospect, routes qualified applicants directly to a calendar booking page, and triggers a preparation workflow automatically. By the end, someone can go from “I’m interested” to “consultation booked with prep documents sent” in under 5 minutes — without any manual intervention from your team.
16.1Step 1: Create the Application Form
In the left sidebar, click Sites → Forms (or Marketing → Forms depending on your GHL version).
Click + New Form.
Select Start from Blank → enter form name:
Consultation Application — [Your Service].Click Create Form.
The form builder opens with a blank canvas.
You’ll know you did this right when: A blank form builder canvas appears with a toolbar of form elements on the left side.
16.2Step 2: Add Your Qualification Questions
Click form elements from the left panel to add them to the form. For a business services consultation, build these fields in order:
Section 1 — Contact Information (always first)
First Name (text field — required)
Last Name (text field — required)
Email Address (email field — required)
Phone Number (phone field — required)
Business Name (text field — required)
Section 2 — Qualification Questions
Add a section divider element and label it “Tell Us About Your Business.”
What industry is your business in? (dropdown — required. Pre-populate with your most common industries plus “Other”)
How long have you been in business? (dropdown — required. Options: Less than 1 year / 1–3 years / 3–10 years / 10+ years)
What is your approximate annual revenue? (dropdown — required. Options: Under 100K–500K–1M)
What is the primary challenge you’re hoping to solve? (textarea — required, min 50 characters)
How did you hear about us? (dropdown — optional)
You’ll know you did this right when: The form preview shows all 10 fields organized in two logical sections, with clear labels and required field indicators.
16.3Step 3: Set the Form Submission Action — Route to Calendar
Click the Form Settings tab (gear icon) in the form builder.
Under On Submit / Redirect:
Select Redirect to URL or Calendar Page (if GHL shows the calendar option directly)
Select Redirect to URL → enter the URL of your GHL calendar booking page
To find your GHL calendar URL:
Go to ⚙️ Settings → Calendars
Click on your consultation calendar
Look for “Booking Link” or “Calendar URL” — copy it
Paste this URL in the form’s redirect field
Click Save Settings.
You’ll know you did this right when: The form settings show a redirect URL that matches your GHL calendar booking link.
16.4Step 4: Configure Field Mapping to CRM
In the form builder, click the CRM Mapping or Field Mapping tab.
Map each custom form question to the appropriate GHL contact field:
First Name → First Name (standard)
Last Name → Last Name (standard)
Email → Email (standard)
Phone → Phone (standard)
Business Name → Company Name (standard)
Industry → Industry (custom field — create if needed in Settings → Custom Fields)
Annual Revenue → Annual Revenue (custom field)
Primary Challenge → Notes (standard field, or create a “Consultation Notes” custom field)
Click Save Mapping.
You’ll know you did this right when: All form fields are mapped to GHL fields. When you submit a test entry, the contact record in GHL is fully populated with all submitted values.
16.5Step 5: Publish the Form and Get the Embed Code
Click the Publish button in the form builder.
The platform generates an embed code. You have two options:
Iframe embed: A code block you paste into any web page
Direct form URL: A hosted GHL form page you can link directly
Copy the direct form URL for sharing, and copy the iframe code for embedding on your website.
Embed in Your Funnel (recommended): In your Lab 2 funnel, add a new step for “Apply for Consultation.” Add a Form element to the page and select your new application form. This keeps everything inside your funnel ecosystem.
16.6Step 6: Build the Post-Application Workflow
Now wire the automated preparation workflow that fires when someone submits the application:
Automation → Workflows → + New Workflow → Start from Scratch
Name:
Consultation Application — AutomationTrigger: Form Submitted → Filter: Form Name = your application form
Add actions:
Action 1 — Apply Tag: consultation-applicant
Action 2 — Create Pipeline Opportunity:
Search for “Create Opportunity” in the action picker
Pipeline: Your Sales pipeline
Stage:
Qualified(or “Consultation Scheduled” if you have this stage)Value: Your average consultation-to-client value (estimate)
Action 3 — Send Confirmation Email:
Subject: “Application received — here’s what happens next”
Body: Confirm their application was received, tell them what to expect, include your calendar link again as a backup, and send 1–2 preparation questions to help them get more from the call.
Action 4 — Internal Notification to You:
Use “Send Internal Notification” action
Notify your email: “[New Consultation Application] {{contact.first_name}} {{contact.last_name}} — {{contact.company_name}}”
Toggle workflow to Active → Publish.
You’ll know you did this right when: The workflow shows all four actions in sequence, the trigger is linked to your application form, and the workflow is Active.
16.7Step 7: Test the Full Flow End to End
Open the application form URL in an incognito browser window.
Complete the form with test data (use your own contact info).
Submit the form.
Verify:
You are redirected to the calendar booking page
A new contact was created in GHL with all form fields populated
The
consultation-applicanttag is applied to the contactA pipeline opportunity appears in your Sales pipeline under “Qualified”
You received the internal notification email
Complete a test calendar booking — verify the appointment appears in your GHL calendar.
You’ll know you did this right when: The full flow completes — application submitted → redirected to calendar → appointment booked → contact in CRM with tag and opportunity created → confirmation email received.
Troubleshooting Common Issues
Form submitted but contact wasn’t created in GHL: Verify that Email or Phone is mapped in the CRM field mapping — GHL requires at least one unique identifier to create or match a contact. Check the form’s CRM Mapping tab and confirm the mapping is saved.
Redirect to calendar doesn’t work — a blank or error page appears: Verify the calendar URL is correct. Go to Settings → Calendars → click your calendar → copy the exact booking link URL. Test it independently in a browser before pasting it into the form redirect setting. Make sure the calendar is set to “Public” visibility.
The pipeline opportunity wasn’t created: The “Create Opportunity” action requires a pipeline and stage to be selected. If either is blank, the action fails silently. Check the workflow execution log (Automation → Workflows → History tab) for the specific test contact to see what error occurred.
Form fields appear in the wrong order in the published form: In the form builder, drag elements to reorder them. If order doesn’t match the published form, clear your browser cache and reload. The builder may be showing a cached view.
The confirmation email arrived but preparation questions weren’t included: The email body is fully customizable. Edit the “Send Email” action in the workflow, click into the email body, and add your preparation questions as bullet points. Save and re-publish the workflow.
Calendar booking isn’t appearing in GHL after test booking: Go to Settings → Calendars → your calendar → Integrations tab. Confirm it is set to GHL internal calendar (not Google Calendar sync only). If syncing to external Google Calendar, check the sync settings and permissions.
177.17 Chapter Takeaways & Reflection Questions
17.1Chapter Takeaways
Forms are conversations. Conditional logic, multi-step presentation, and partial submission capture transform a static data collection tool into a dynamic qualification engine.
Document intelligence eliminates manual data entry. Smart fields pull from CRM records, conditional sections adapt to opportunity data, and the result is a personalized document generated in seconds.
E-signatures are legally binding. Under ESIGN (U.S.) and eIDAS (EU), a digital signature carries the same weight as wet ink. The signing link in a text message converts better than a PDF attachment in email.
Documents generate workflow triggers. Sent, Viewed, Signed, and Completed are four distinct automation trigger points. The “Viewed” trigger — reaching a prospect while they are actively reading your contract — is the most underused.
Proposals and invoices belong in the same flow. Separating them into different platforms creates friction, data re-entry errors, and revenue leakage. The signed proposal should automatically generate the invoice.
The calendar is the conversion endpoint. A booked appointment is the first irreversible commitment. The form qualifies. The document closes. The calendar commits.
Buffer times and availability rules are not optional. Unlimited bookings with no gaps is a burnout recipe. Configure these settings on day one.
Two-way sync eliminates double bookings. Google and Outlook calendar integration means any external calendar event automatically blocks that slot in VibeReach without manual intervention.
Payment at booking changes behavior. A $50 deposit reduces no-shows by a percentage disproportionate to the dollar amount because of commitment psychology, not financial pain.
Three-touch reminders compound. Each additional touch reduces no-shows further. T-24, T-1 hour, T-15 minutes is the proven sequence; automate all three from the moment of booking.
17.2Reflection Questions
Think about the last time a deal in your experience was delayed or lost due to a document process problem. What specific step broke down, and how would the VibeReach closing flow have changed the outcome?
Conditional logic in forms mirrors the qualifying questions a skilled salesperson asks in conversation. What are the three most important qualifying questions in your target industry, and how would you configure them as branching form logic?
The “Document Viewed” trigger allows outreach when a prospect is actively reading your contract. Some argue this feels intrusive; others see it as attentive service. Where do you draw the line between responsive and invasive, and how should that judgment be encoded into automation rules?
A service business could require payment at booking (eliminating no-shows) or offer free consultations (lowering friction). Using the behavioral economics concepts in Section 7.12, construct an argument for each position and defend which you would implement for a medical aesthetics practice.
18Discussion
Discussion Prompt: The integration of forms, documents, and calendars into a single automated closing flow eliminates most manual handoffs in the sales-to-service transition. Critics argue this level of automation depersonalizes the client relationship — that removing the human touch from the contract and scheduling process signals to clients that they are being processed rather than served. Supporters argue that fast, frictionless execution IS the service — that a client who signs in ten minutes and gets a calendar link immediately feels better served than one who waits three days for a manually prepared PDF.
Analyze both perspectives using what you have learned in this chapter. Consider the role of personalization at scale — when does automation feel personal, and when does it feel mechanical? Ground your argument in at least one specific industry or business type where the calculus between speed and human touch is particularly consequential.
Discussion Guidelines: Write a substantive response of at least 200 words addressing the prompt above. Include at least one scholarly or credible citation (journal article, textbook, or authoritative industry report) to support your argument. Then respond to at least TWO peers with substantive feedback — go beyond “I agree” and explain why their perspective adds to or challenges your thinking.
19Glossary
Smart Form A web-based data collection form that uses conditional logic and multi-step presentation to show each respondent only the fields relevant to their situation, adapting dynamically based on prior answers.
Conditional Logic A rule-based system in forms and documents that shows, hides, requires, or skips specific fields or sections based on values already entered by the respondent or stored in the CRM.
Merge Tag
A placeholder variable in a document template (e.g., {{contact.first_name}}) that is automatically replaced with the corresponding data from the CRM record when the document is generated or sent.
Document Intelligence The automated generation, population, routing, and tracking of documents using CRM data, conditional templates, and workflow triggers — eliminating manual data entry in the contract and proposal process.
E-Signature A legally recognized digital method for signing documents, including drawn, typed, or click-to-accept signatures. Recognized under ESIGN (U.S.) and eIDAS (EU) as legally equivalent to wet ink signatures.
Audit Trail A time-stamped record of every interaction with a document — including when it was sent, first opened, signed, and by whom — that establishes the legal enforceability of an e-signature.
Personal Calendar A VibeReach calendar type linked to a single team member, routing all bookings to that individual. Best for solopreneurs and individual consultants.
Round Robin Calendar A VibeReach calendar type that distributes incoming bookings among multiple team members using either an optimized (load-balanced) or strict (sequential) rotation rule.
Class/Group Calendar A VibeReach calendar type that allows multiple attendees to book the same time slot, up to a configured maximum capacity. Used for webinars, group coaching, and fitness classes.
Service Calendar A VibeReach calendar type that associates bookings with specific services of varying durations, showing only slots long enough to accommodate the selected service.
Buffer Time A configured gap added before or after each appointment that is blocked from new bookings, providing transition time between sessions.
Minimum Notice Period The minimum advance time required before a prospect can book an appointment, preventing same-hour or same-day bookings when adequate preparation time is needed.
Two-Way Calendar Sync A bidirectional integration between VibeReach and an external calendar (Google or Outlook) that both reads external events to block availability and writes new VibeReach appointments to the external calendar.
No-Show Recovery An automated workflow triggered when an appointment is marked as a no-show, typically sending a reschedule link within 30 minutes to recover the booking opportunity.
Sunk-Cost Effect A behavioral economics principle explaining why people are more likely to follow through on a commitment after making an advance payment, even when the payment amount is modest relative to the total value.
NPS Survey Net Promoter Score survey — a single-question measurement tool (“How likely are you to recommend us?”) used to gauge client satisfaction and identify promoters, passives, and detractors for follow-up automation.
Signing Order A configuration in e-signature workflows that defines the required sequence in which multiple parties must sign a document before it is considered complete.
20Exercises
Exercise 7.1 — Map the closing flow for a business in one of the following industries: residential real estate, legal services, or health coaching. Draw the sequence of touchpoints from initial form submission to signed agreement to booked first appointment. Identify every point where a document trigger could fire an automated action, and specify what that action would be.
Exercise 7.2 — A consulting firm currently collects client onboarding information via a 47-field static PDF that clients print, fill by hand, scan, and email back. The completion rate is 38%. Redesign this as a smart form in VibeReach. Specify which fields would be on each step of a multi-step form, which fields would use conditional logic and what rules would govern them, and what the on-submit action would be.
Exercise 7.3 — Configure a document trigger automation on paper (or in VibeReach if you have access): a consulting agreement is sent to a prospective client. Define what should happen at each of the four trigger points (Sent, Viewed, Signed, Completed) and write the actual SMS or email message for each automated touchpoint. Justify each timing and channel choice.
Exercise 7.4 — Solution Guide
Prompt: A therapist’s practice has a 34% no-show rate for initial consultations booked via an online form. Design a complete intervention using VibeReach tools covered in this chapter. Specify every configuration setting and automation step.
Solution:
Step 1 — Payment at booking: Navigate to Calendars → [Consultation Calendar] → Settings → Payments. Connect to Stripe. Set a $75 deposit for “Initial Consultation (50 min).” Configure deposit as credit toward session fee. This alone will reduce no-shows by an estimated 60–70% based on behavioral economics research.
Step 2 — Reminder automation (Workflow trigger: Appointment Booked):
Immediate: Email confirmation with intake form link, therapist bio, and office address with parking instructions.
T-48 hours: SMS — “Your appointment with [Practice Name] is in 2 days on [Date] at [Time]. Need to reschedule? [link]”
T-24 hours: Email — full appointment details with what to bring and what to expect in a first session.
T-1 hour: SMS — “Your appointment is in 1 hour. [Address + Maps link]. See you soon.”
T-15 minutes: SMS — “We’re ready for you. Looking forward to meeting you today.”
Step 3 — No-show recovery (Workflow trigger: Appointment status = No Show, delay 45 minutes):
SMS: “We missed you today. I know things come up. Here’s a link to find a new time: [calendar link]. We’d love to connect when you’re ready.”
Tag contact: “No Show - Outreach Needed.”
Create task for front desk: follow up by phone within 24 hours.
Expected outcome: A practice implementing all three components (paid deposit + reminder sequence + no-show recovery) should expect no-show rates to decline from 34% to under 8% within 60 days. The $75 deposit screens out low-commitment prospects while the reminder sequence keeps high-commitment prospects engaged.
End of Chapter 7.
21🎯 Your Turn: Apply It to Your Business
Your closing process is either moving at the speed of trust or the speed of a fax machine. This chapter gives you the tools to close the gap between “yes” and signed. Now apply them to your real business.
1. Audit the current time between “yes” and paid/signed. Think of the last five deals you closed. How many hours — or days — elapsed between when the prospect verbally agreed and when you received a signature or payment? Write the number down. That gap is the vulnerability your competitors are exploiting. Every hour you take to send paperwork is an hour the prospect talks themselves out of it or finds another option.
2. Build a smart intake form with conditional logic.
In GHL → Sites → Forms → + New Form, build a multi-step form for your primary service inquiry. Add conditional logic: if the prospect selects “I need help with X,” show them fields relevant to X; if they select “Y,” show different fields. Add at least one file upload field (e.g., “Upload your last 3 months of bank statements” for financial services, or “Upload your logo” for marketing agencies). Set the form to create/update a contact on submission and apply a tag (intake-form-completed). Embed it in your intake funnel page.
3. Create a proposal or contract template in GHL Documents. In GHL → Payments → Documents & Contracts → + New Document, build a professional template for your most common agreement. Add merge fields for contact name, business name, and service details so it auto-populates from the contact record. Add an e-signature field. Send it to yourself as a test — sign it — and confirm the signed document appears back in the contact record. This is the workflow that replaces your PDF email attachment forever.
4. Set up your calendar and configure reminder sequences. In GHL → Calendars → + New Calendar, configure a calendar for your primary appointment type (discovery call, consultation, etc.). Set available hours, buffer time between appointments, and max bookings per day. Then in Automation → Workflows, build a reminder sequence: confirmation email immediately on booking, reminder email 24 hours before, SMS reminder 1 hour before. Publish it. Book a test appointment with your own email. Did the reminders fire?
5. Connect your calendar to a funnel thank-you page. In your primary funnel’s thank-you page (GHL → Sites → Funnels → your funnel → Thank You step), add a calendar embed widget. Now when someone opts in, the thank-you page immediately offers them a chance to book a call. This is the “strike while the iron is hot” close — converting a warm opt-in into a booked appointment before they ever leave your funnel.