Humans forget. Workflows do not.
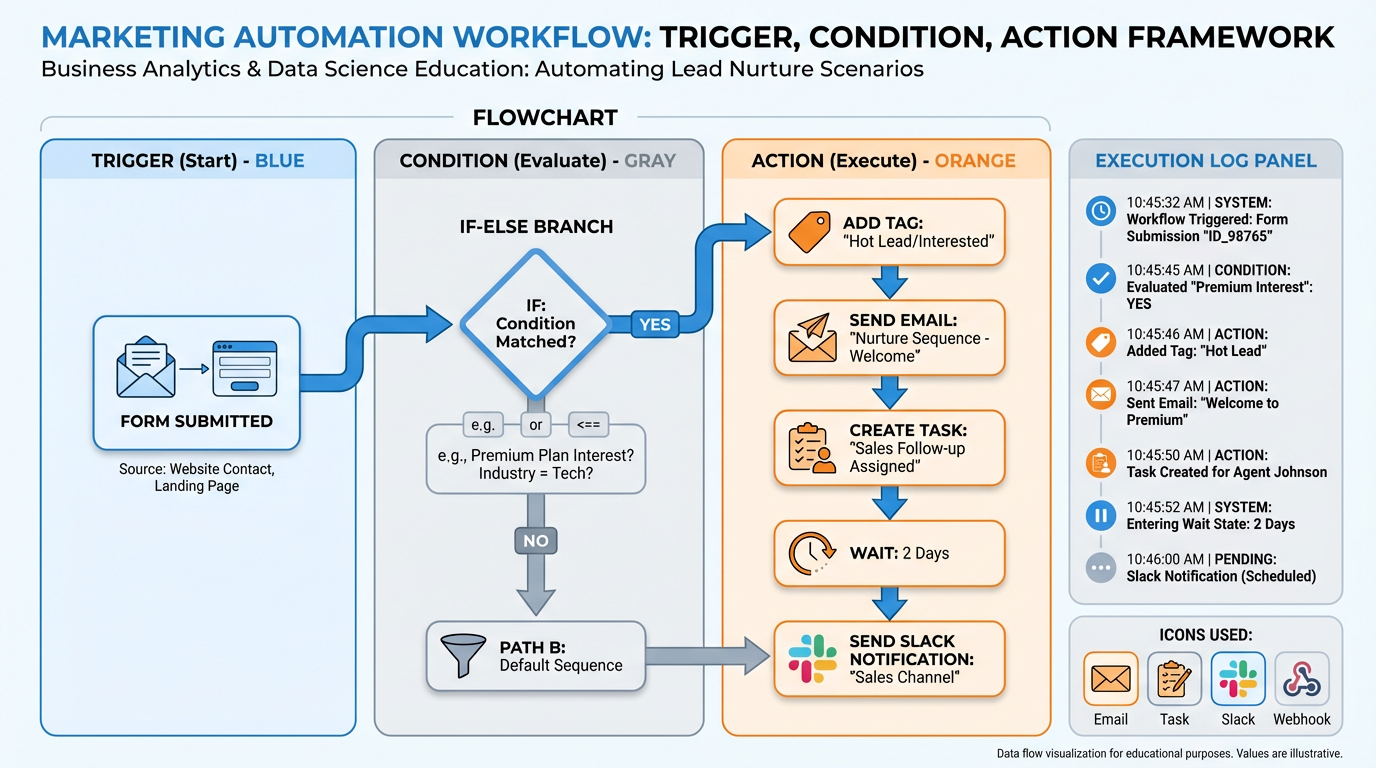
Figure 1:The automation engine: every workflow starts with a trigger, evaluates conditions, and fires a sequence of actions — with a full execution log tracking every step.
Imagine you could take your single best employee — the one who never drops a lead, always sends the follow-up email exactly on time, remembers to create the task, logs every interaction, and still manages to be warm and personal in every message — and make a thousand copies of them, each running simultaneously, 24 hours a day, seven days a week, without vacation, without sick days, without forgetting.
That is not a fantasy. That is a workflow.
The concept is not new. Henry Ford did not invent the automobile — he invented the assembly line, the systematic process that could build the same car the same way a thousand times a day. The insight was not about the product; it was about the system. Before Ford, manufacturing meant skilled craftsmen producing bespoke objects one at a time. After Ford, it meant a repeatable process that encoded the knowledge of those craftsmen into the line itself, so that consistent, high-quality output no longer depended on any one person showing up in a good mood that morning.
Workflows are the assembly line for knowledge work. They encode your best follow-up sequences, your most reliable onboarding processes, your sharpest lead qualification logic — and then they run that logic automatically, on every contact, every time, exactly the way you designed it.
In this chapter, you will learn to build that assembly line. You will master the Trigger–Condition–Action framework that underlies every automation. You will explore the full libraries of triggers and actions available in VibeReach. You will learn to branch, wait, set goals, and connect your workflows to the wider world through webhooks and premium integrations. You will see the twelve workflows every business should have running before they do anything else. And you will build your first real business automation in Lab 4 — a live, tested, working workflow that fires the moment a lead submits your funnel form.
By the end of this chapter, you will understand why the most powerful thing you can do in VibeReach is not send one great email — it is design a system that sends the right email to every lead, every time, without you.
14.1 The Grand Unified Theory of Automation: Trigger, Condition, Action
Every automation in every platform in the history of martech, regardless of how sophisticated it appears, reduces to three components: something happens, you check something, you do something. This is the grand unified theory.
The Trigger is the event that wakes the workflow up. It could be a form submission, an appointment booking, a tag being applied to a contact, a missed call, a payment failing, or a conversation reaching a certain point. Without a trigger, a workflow does nothing — it simply waits, ready, for the moment its conditions are met.
The Condition (sometimes called a filter) is the set of qualifying criteria that determines whether the trigger should actually set the workflow in motion. Not every form submission may need the same response. If your trigger is “form submitted” and you have ten different forms across your funnels, you may want to filter so that only the opt-in form for your flagship lead magnet activates this particular workflow. Conditions are the gatekeepers.
The Action is what the workflow does once triggered and qualified. Actions are the workhorses: sending emails, applying tags, creating tasks, moving opportunities through pipeline stages, updating contact fields, notifying team members, firing HTTP requests to external systems. A workflow may have one action or fifty. They execute in sequence, top to bottom, exactly as you arranged them in the builder.
The elegant power of this framework is that it scales without limit. One workflow handles one lead or one million leads with identical precision. The system does not get tired, distracted, or inconsistent. It simply evaluates: trigger? check. condition? check. action. Next action. Next action. Done.
24.2 The Full Trigger Library in Plain English — From Form Submitted to Conversation AI Fired
VibeReach provides a rich library of triggers covering virtually every meaningful moment in a contact’s lifecycle. Understanding what is available is the first step to knowing what to automate.
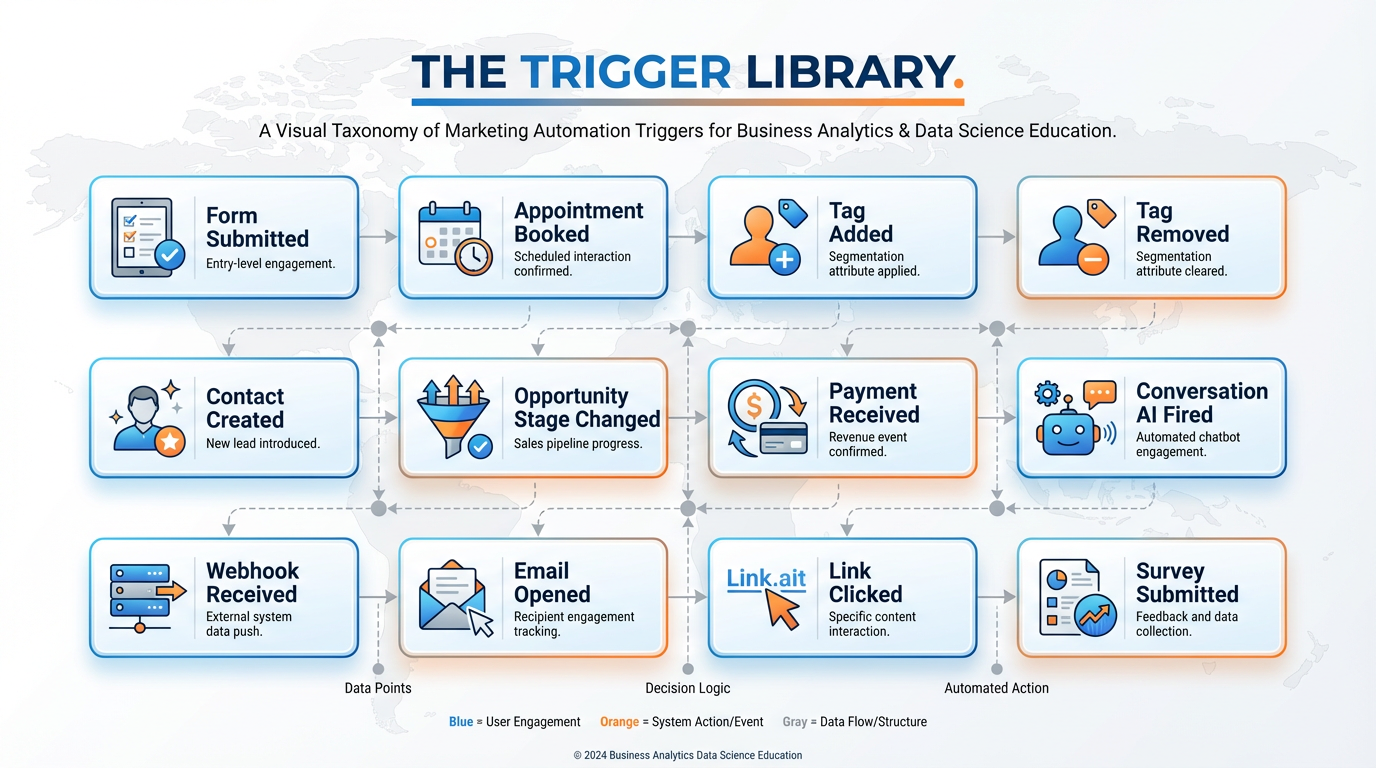
Figure 2:The Trigger Library organized by category: contact, behavioral, transactional, and system-level events.
Form Submitted — Fires when a contact completes any form. Filter by specific form name to target a single opt-in, survey, or intake form. This is the most common trigger for lead-intake workflows.
Contact Created — Fires the first time a contact record is created in the CRM, regardless of source. Useful for universal onboarding sequences.
Tag Added — Fires when a specific tag is applied to a contact, whether manually by a team member, by another workflow, or by an import. Excellent for kicking off tag-based segmentation sequences.
Tag Removed — The mirror of Tag Added. Fires when a tag is stripped from a contact. Use this to exit contacts from sequences or change their status.
Contact Field Updated — Fires when any specified contact field changes value. Trigger re-engagement when “Last Purchase Date” passes a threshold, or start an upgrade sequence when “Plan Type” changes.
Birthday — Fires on a contact’s birthday based on the date stored in their record. Use for birthday offers, personalized messages, and loyalty programs.
Anniversary — Similar to birthday, but for a custom date field — customer since date, policy start date, membership anniversary.
Email Opened — Fires when a contact opens a tracked email. Use with caution: open tracking has reliability limitations due to privacy features in modern email clients, but remains useful for identifying highly engaged segments.
Email Link Clicked — More reliable than opens. Fires when a contact clicks a specific tracked link within an email. Excellent for triggering follow-up based on demonstrated interest in a specific offer or resource.
SMS Link Clicked — Same concept applied to links sent via SMS messages.
Appointment Booked — Fires when a contact books through the calendar system. The starting gun for appointment reminder and preparation sequences.
Appointment Cancelled — Fires when a booked appointment is cancelled. Trigger a re-booking sequence immediately while the contact is still warm.
Appointment No-Show — Fires when a contact fails to attend a booked appointment. One of the highest-value triggers in service businesses — the right follow-up here recovers significant revenue.
Survey Submitted — Fires when a contact completes a survey. Branch on their answers to route them into segmented follow-up sequences.
Payment Received — Fires when a payment is processed. The trigger for customer onboarding sequences, receipt confirmations, and upsell offers.
Payment Failed — Fires when a charge is declined. Trigger an immediate dunning sequence: notification to the contact, task for the team, retry logic.
Subscription Created — Fires when a recurring subscription begins. Start the customer success journey here.
Subscription Cancelled — Fires when a subscription ends. Win-back sequences start here.
Opportunity Created — Fires when a new opportunity is added to any pipeline stage. Great for automatically assigning ownership and sending the salesperson a task.
Opportunity Stage Changed — Fires when an opportunity moves to a new pipeline stage. Use to trigger stage-specific communication sequences, internal notifications, or proposal workflows.
Inbound Webhook — Fires when an external system sends a POST request to a unique VibeReach webhook URL. This is how you connect any third-party tool — Typeform, Shopify, Calendly, your own app — to VibeReach workflows. Covered in depth in Section 4.6.
Conversation AI Fired — Fires when the AI conversation agent engages with a contact. Use to log the interaction, notify a human supervisor, or branch based on the AI’s assessment of the conversation.
Call Status — Fires based on the outcome of a phone call: answered, missed, voicemail. The trigger for the legendary missed-call text-back workflow covered in Section 4.12.
Note Added — Fires when a note is manually added to a contact record. Useful in high-touch service businesses where notes carry operational significance.
Smart List Enrollment — Fires when a contact enters a Smart List based on dynamic filter criteria. Connects your segmentation logic directly to action sequences.
Each trigger can have one or more filters applied at the trigger level. Filters are evaluated before any action fires. Common filter patterns include:
Form Submitted + Filter: Form Name = “MCA Funding Checklist Opt-In” — ensures only submissions from one specific form activate the workflow
Tag Added + Filter: Tag = “hot-lead” — fires only when that specific tag is applied, not any tag
Opportunity Stage Changed + Filter: Pipeline = “Sales Pipeline” + New Stage = “Proposal Sent” — fires only for the exact pipeline and stage combination
34.3 The Full Action Library in Plain English — Send, Wait, Branch, Update, Notify
Actions are where the work gets done. VibeReach’s action library is extensive, and understanding the full range of what is possible changes how you think about business process design.
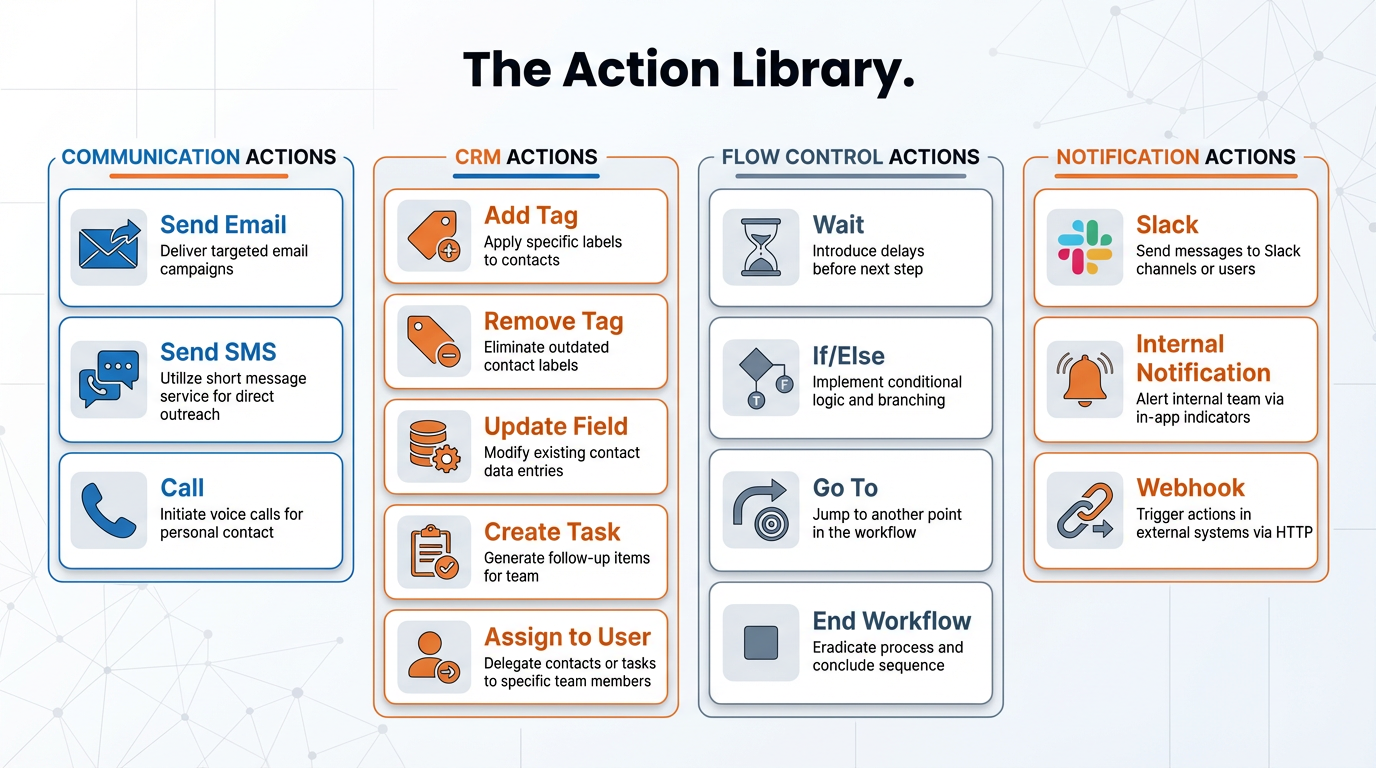
Figure 3:The Action Library: four categories covering communication, CRM operations, flow control, and external integrations.
Communication Actions
Send Email delivers an email to the contact using any template or custom composition. You have access to all merge fields (first name, last name, company, any custom field), and you can send from any connected email address in the account. The action logs the send, tracks opens and clicks, and handles unsubscribes automatically.
Send SMS sends a text message to the contact’s mobile number. This is one of the highest-engagement channels in marketing — SMS open rates routinely exceed 95% within three minutes of delivery. However, SMS requires A2P 10DLC carrier registration, which is covered in Chapter 5. It is listed here as a capability; students will implement it after provisioning is complete.
Make Call initiates an outbound call from a VibeReach phone number to the contact. The call connects to a team member using the platform’s call routing rules.
Send Voicemail drops a pre-recorded voicemail into the contact’s voicemail without their phone ringing. Also known as ringless voicemail. High-response for re-engagement campaigns.
CRM Actions
Add Tag and Remove Tag are two of the most strategically important actions in the platform. Tags drive segmentation, Smart Lists, and inter-workflow routing. Think of every tag as a boolean flag on the contact record — it is either on or off, and everything downstream reads those flags to make decisions.
Update Contact Field writes a value to any standard or custom field on the contact record. Use this to record lead source, capture pipeline stage timestamps, store survey answers, or update lifecycle stage.
Create Task generates an action item assigned to a specific user or to the contact’s owner (the assigned team member). Tasks appear in the user’s task dashboard and can be tracked for completion. The “Create Task” action is the bridge between automated workflow and human action — it is how you ensure a real person follows up at the right moment.
Assign to User routes the contact to a specific team member or applies round-robin assignment across a group. Critical for sales team lead distribution.
Create Opportunity adds a new opportunity record to a specified pipeline and stage. This action turns a contact event (form submission, conversation, appointment) into a trackable deal automatically — no manual pipeline entry required.
Move Opportunity Stage advances or retreats an existing opportunity to a new pipeline stage. Use in stage-based sequences to keep the pipeline current with minimal manual effort.
Add to Campaign or Remove from Campaign enrolls or removes the contact from a campaign (the predecessor to workflows, now largely replaced but still available for drip sequences).
Flow Control Actions
Wait pauses workflow execution for a defined period — minutes, hours, days — or until a specific date and time. Wait steps are how you introduce temporal logic: send the welcome email immediately, wait 24 hours, then check if they booked. Wait steps can also be conditional: wait until a specific event occurs, or wait until a specific time of day before sending.
If/Else introduces branching logic. The workflow evaluates a condition and follows one of two paths: the YES branch if the condition is true, the NO branch if it is not. If/Else is so important it gets its own full section (4.4).
Go To jumps execution to a different point in the same workflow. Use sparingly; overuse creates spaghetti logic that is hard to debug. A well-structured workflow rarely needs Go To.
End Workflow terminates execution cleanly. Always place an End action at every terminal branch of your workflow — it makes the execution log clear and prevents accidental re-processing.
Notification Actions
Internal Notification sends a message to a team member’s VibeReach notification inbox. No third-party connection required. Use for low-urgency internal alerts: “New lead came in from the Facebook campaign,” “Contact replied to your proposal email.”
Email Notification sends an email to a team member’s address (not the contact’s). Useful when a salesperson needs an email alert about a contact action.
44.4 If/Else, Wait Steps, and the Power of Branching Logic
A workflow without branching is a conveyor belt — every contact gets the same experience regardless of what they do. A workflow with branching is an intelligent system that adapts its behavior based on what it knows about each individual contact.
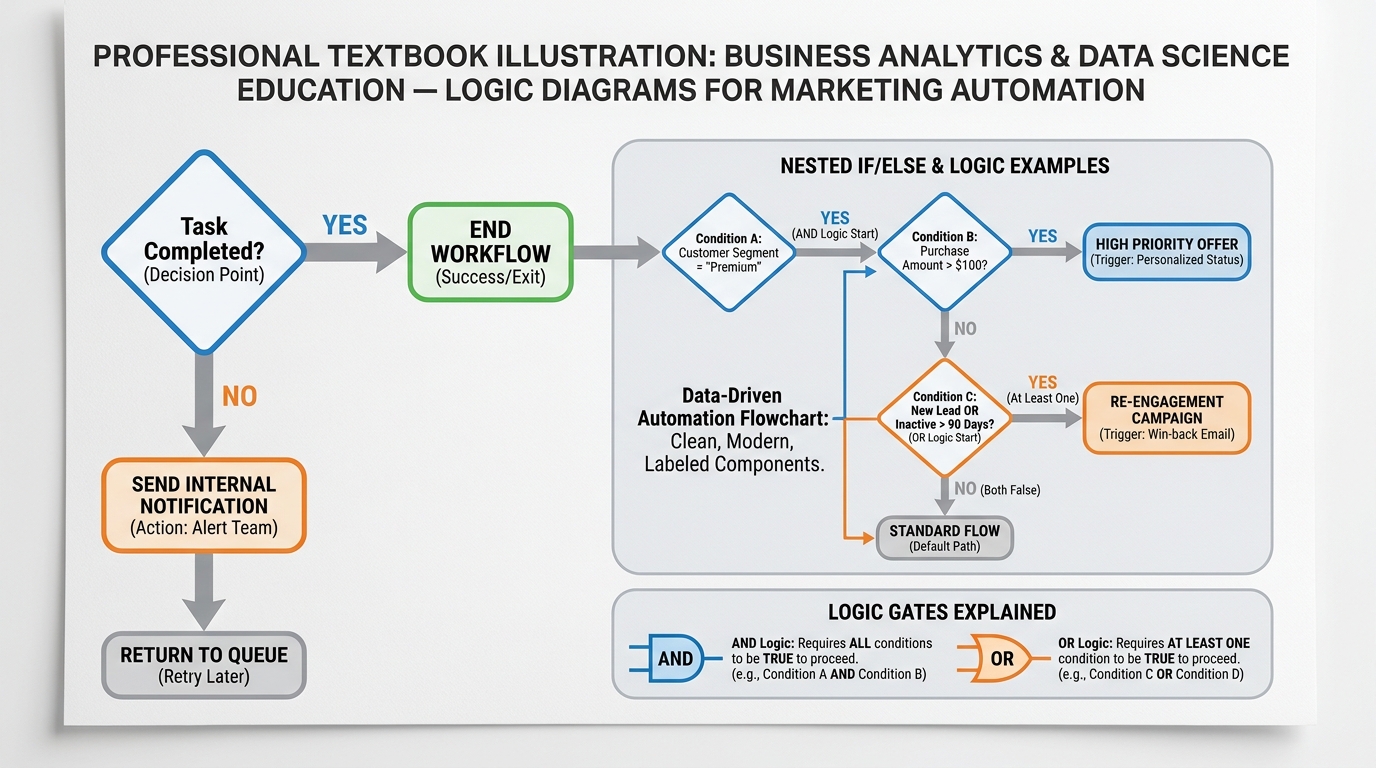
Figure 4:If/Else branching: the decision point that makes workflows intelligent rather than merely sequential.
The If/Else action presents the workflow with a condition to evaluate. If the condition is true, the workflow follows the YES branch. If false, it follows the NO branch. You can nest multiple conditions within a single If/Else using AND (all conditions must be true) or OR (any condition must be true) logic.
Common If/Else use cases:
Tag-based routing: IF contact has tag “existing-customer” → send loyalty offer. IF NOT → send new customer welcome.
Source-based routing: IF lead source = “Facebook” → assign to the Facebook specialist. IF lead source = “Google” → assign to the Google specialist.
Engagement-based escalation: IF email was opened → proceed to next nurture step. IF email was NOT opened → resend with different subject line.
Task completion check: IF task status = Completed → end workflow. IF NOT → escalate with internal notification.
Opportunity value routing: IF opportunity value > $10,000 → assign to senior sales rep. IF less → assign to junior rep.
Wait Steps introduce time-based logic. A Wait step pauses the contact at that point in the workflow until the specified time has elapsed. The contact is not blocked from other workflows — they can still receive other communications and be updated by other automations. The Wait step simply holds this workflow’s next action in queue.
Types of Wait:
Wait for a duration — wait 1 hour, 24 hours, 3 days, 2 weeks
Wait until a specific time — wait until 9:00 AM on the contact’s local time before sending the next email (critical for email deliverability and open rates)
Wait until an event occurs — wait until the contact books an appointment, or until their tag changes, up to a maximum duration
54.5 Goals, Exits, and Re-entries: Keeping Contacts From Getting Stuck
Three mechanics govern how contacts flow into, through, and out of workflows over time. Understanding them prevents the two most common workflow disasters: contacts who never make it out (stuck in perpetual sequences), and contacts who get enrolled in the same workflow multiple times when they should not.
Goals define the outcome you want a workflow to achieve. When you set a Goal on a workflow, VibeReach will automatically advance a contact to the Goal step (and the actions following it) as soon as the goal condition is met — even if they are currently waiting somewhere earlier in the workflow.
Example: Your welcome sequence has a Goal set to “Appointment Booked.” A contact submits the form, enters the workflow, and receives the welcome email. While waiting for Day 3’s follow-up, they book an appointment directly from the email. The Goal fires, the contact skips the Day 3 follow-up, and jumps straight to the post-booking confirmation sequence. The automation is aware of what the contact did and responds appropriately.
Exit conditions define circumstances under which a contact should leave the workflow regardless of where they are. Common exit triggers include:
A specific tag is applied (e.g., “customer” — meaning they converted, so stop the prospect sequence)
The opportunity moves to a terminal stage (“Closed Won” or “Closed Lost”)
The contact unsubscribes from communications
The contact is manually removed by a team member
Re-entry settings control whether a contact can enter the same workflow more than once. Options include:
Allow only once — the contact will never be enrolled again after their first run, even if the trigger fires again
Allow every time trigger fires — re-enroll every time the trigger condition is met (useful for recurring event-based workflows like birthday sequences)
Allow after exiting — re-enroll the contact after they have completed or exited the workflow, but not while actively enrolled
64.6 Inbound and Outbound Webhooks — How Workflows Talk to the Outside World
No marketing platform is an island. Your CRM connects to your website, your scheduling tool, your payment processor, your helpdesk, your analytics platform. Webhooks are the universal language that lets all of these systems speak to each other in real time.

Figure 5:Webhooks as the universal integration layer: inbound brings data in, outbound sends data out.
Inbound Webhooks (Trigger) give every workflow a unique URL that external systems can POST data to. When an external tool — Typeform, Shopify, Calendly, your custom application — sends a POST request to that URL, the workflow triggers and the payload data (email address, name, form fields, order details) is mapped to contact fields. This is how you connect any third-party lead source or event to VibeReach without a direct native integration.
Outbound Webhooks (Action) send data from VibeReach to an external URL when the action executes in a workflow. You configure the destination URL, the HTTP method (POST is most common), and the payload — typically a JSON object built from contact field merge values. The receiving system (your custom app, a Zapier zap, a Make scenario, your analytics database) then processes that data however it needs to.
Common outbound webhook use cases:
Logging lead intake to a custom database or data warehouse
Triggering a Zapier or Make automation that connects to a tool VibeReach does not natively integrate with
Sending a contact’s data to an external AI scoring system and receiving a lead quality score back
Posting conversion events to Facebook Conversions API for advanced ad attribution
Notifying a custom inventory or scheduling system of a new booking
Webhooks are powerful but require technical comfort with HTTP, JSON payloads, and endpoint configuration. For businesses without an in-house developer, Zapier and Make (formerly Integromat) serve as no-code middleware that can receive VibeReach webhooks and route the data to hundreds of other applications.
74.7 Premium Actions: Google Sheets, Slack, and Custom Code
Beyond the core action library, VibeReach offers a set of premium actions that connect workflows to specific third-party platforms and unlock advanced capabilities. Premium actions appear in a dedicated section of the action picker, clearly marked.
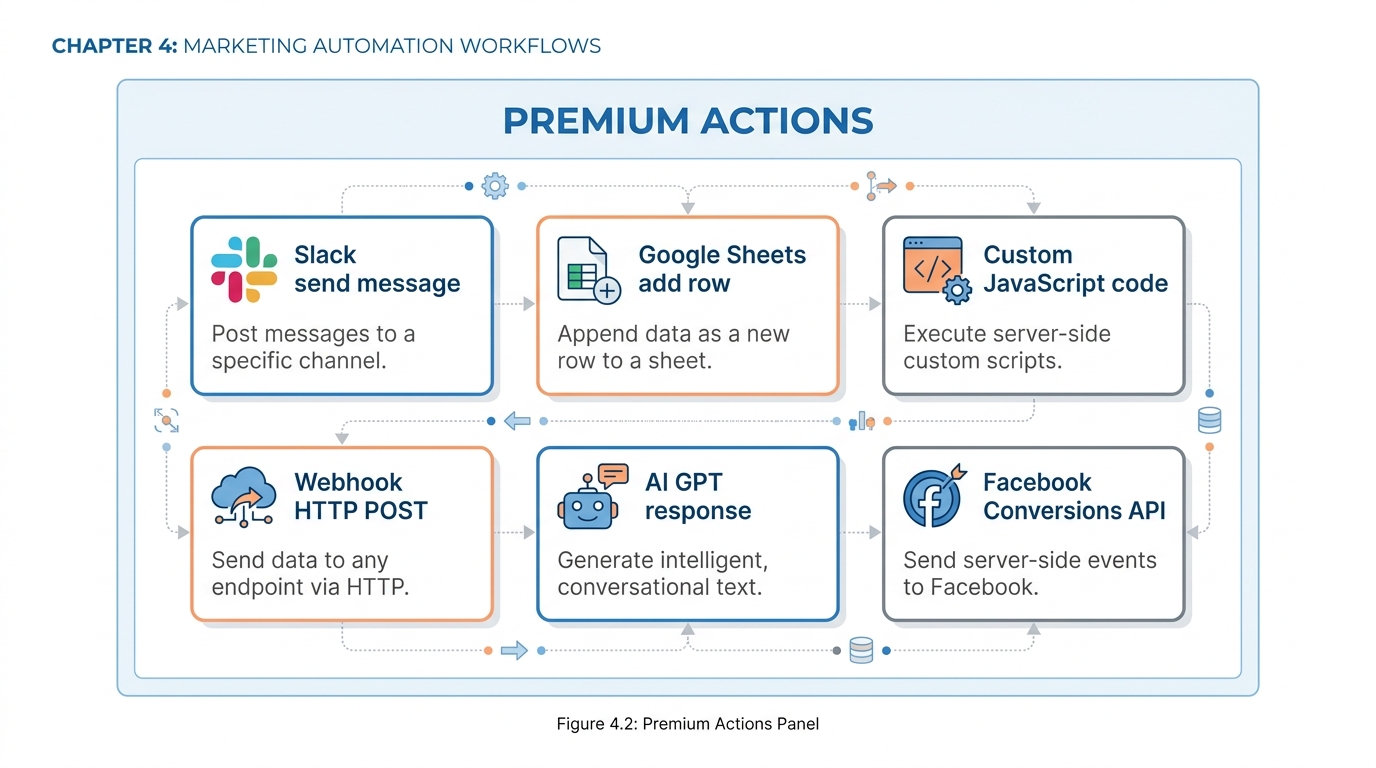
Figure 6:Premium Actions extend workflows to Slack, Google Sheets, custom JavaScript, and advanced API integrations.
Google Sheets integration allows workflows to append rows to or update rows in a connected Google Sheet when an action fires. This is how small teams build lightweight reporting dashboards without a dedicated BI tool. Every new lead, every appointment booked, every payment received can be logged automatically to a shared spreadsheet where the whole team can see the real-time pipeline without logging into VibeReach.
Use cases:
Lead intake log with source, date, and contact details
Daily sales report where each converted opportunity appends a row
Tracking follow-up task completion rates across the team
Syncing contact data to a spreadsheet that feeds a custom reporting tool
Slack integration sends a message to any connected Slack channel or direct message when the action fires. The message content can include contact merge fields, making it possible to craft rich, contextual alerts: “🔥 New hot lead: {{contact.first_name}} {{contact.last_name}} from {{contact.company}} just submitted the high-ticket inquiry form. Lead score: {{contact.custom_field.lead_score}}. Assigned to: {{contact.owner}}.”
Custom Code is the escape hatch for advanced users. It allows you to write JavaScript directly in the workflow action and execute it against the contact’s data. This unlocks virtually unlimited capability — custom field transformations, API calls to proprietary systems, complex business logic that cannot be expressed through the visual builder. Custom Code requires JavaScript proficiency but transforms VibeReach from a marketing tool into a programmable business automation engine.
Other premium actions include Facebook Conversions API (for sending conversion events directly to Meta for ad attribution), ChatGPT / AI actions (for generating personalized content or making AI-assisted routing decisions), and Stripe (for triggering payment-related actions beyond the native payment triggers).
84.8 Workflow AI Assistant: Building Automations by Describing Them
One of the most remarkable capabilities in modern VibeReach is the AI Workflow Assistant — a natural language interface that allows you to describe a workflow in plain English and receive a draft automation as output.
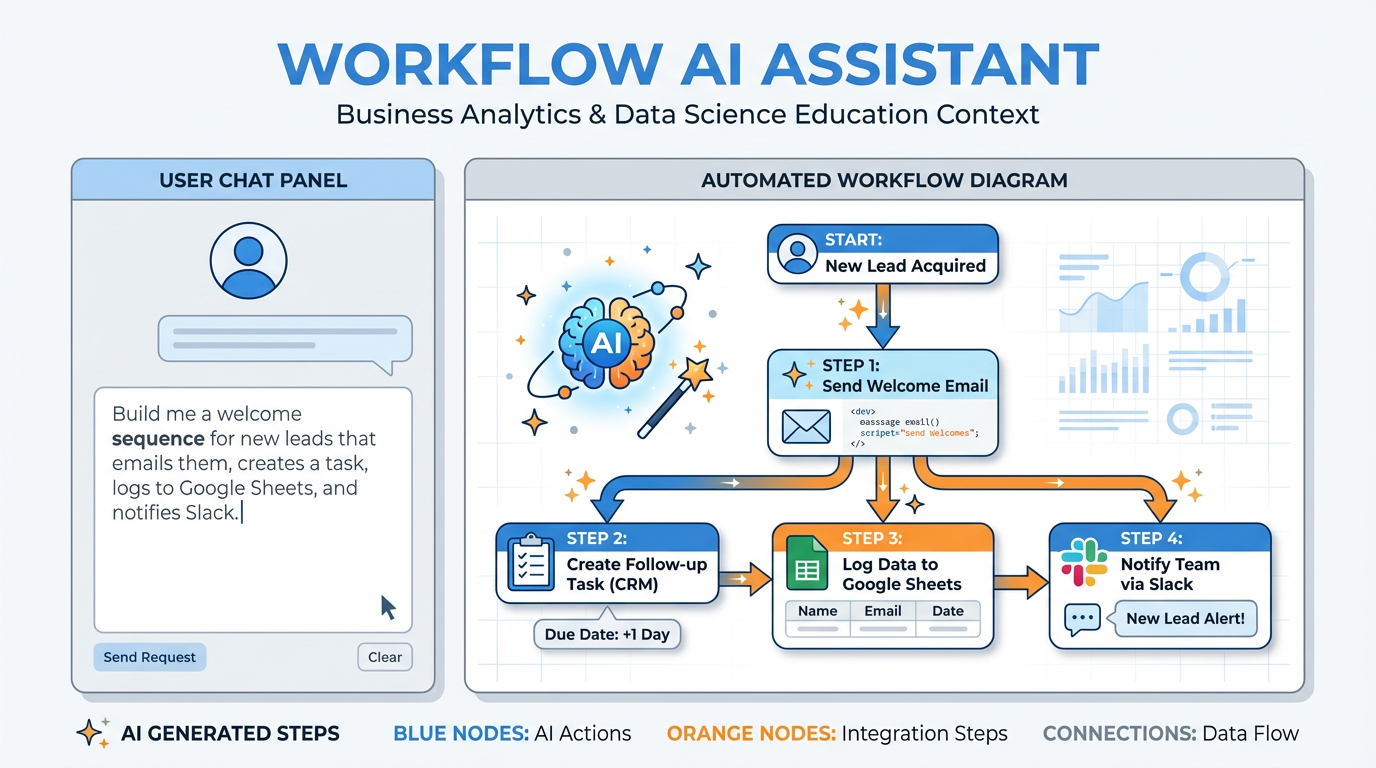
Figure 7:Describe what you want. The AI Workflow Assistant generates the framework. You refine and publish.
The experience works as follows: inside the workflow builder, you access the AI Assistant and type a description of the automation you want. Something like:
“Build me a new lead welcome workflow. When a contact submits a form, add the tag ‘new-lead’, send them a welcome email within 5 minutes, create a task for the assigned user to follow up within 1 hour, wait 24 hours, and if the contact still has no appointment booked, send a follow-up email with a calendar link.”
The AI interprets this description and scaffolds the workflow — trigger, actions, wait steps, If/Else branch — as a draft in the builder. The draft is rarely perfect on the first pass. Field references may need to be mapped, email templates selected or created, and conditions refined. But the structural scaffolding — the sequence, the branching pattern, the wait durations — arrives ready to be tuned rather than built from scratch.
This dramatically changes the workflow creation experience for non-technical users. Instead of learning which actions go in which order and how the branching logic is configured, a business owner can describe their ideal process in natural language and iterate from a working draft. The AI serves as an expert translator between business intent and automation logic.
Best practices for using the Workflow AI Assistant:
Be specific about sequence. Instead of “follow up with leads,” say “send email within 5 minutes, then wait 1 day, then check if they replied, then send a second email if they did not.”
Mention the trigger explicitly. “When a contact submits the intake form” gives the AI a clear starting point.
Describe the outcome, not just the steps. “The goal is to get them to book a call” helps the AI understand what the Goal action should be set to.
Plan to refine. The AI draft is a starting point. Walk through every step, verify conditions, and test before publishing.
The Workflow AI Assistant does not replace understanding — it accelerates it. Knowing what triggers, actions, and branching logic do (as covered in the preceding sections) is what allows you to evaluate the AI’s output intelligently and correct it where needed.
94.9 Company-Based Workflows for True Account-Level Automation
Everything discussed so far operates at the contact level. Contact submits form. Contact receives email. Contact’s field updates. This is entirely appropriate for B2C businesses and simple B2B lead intake. But for B2B organizations selling to accounts — where one company has multiple stakeholders, multiple contacts, and a single buying decision — contact-level automation is insufficient.
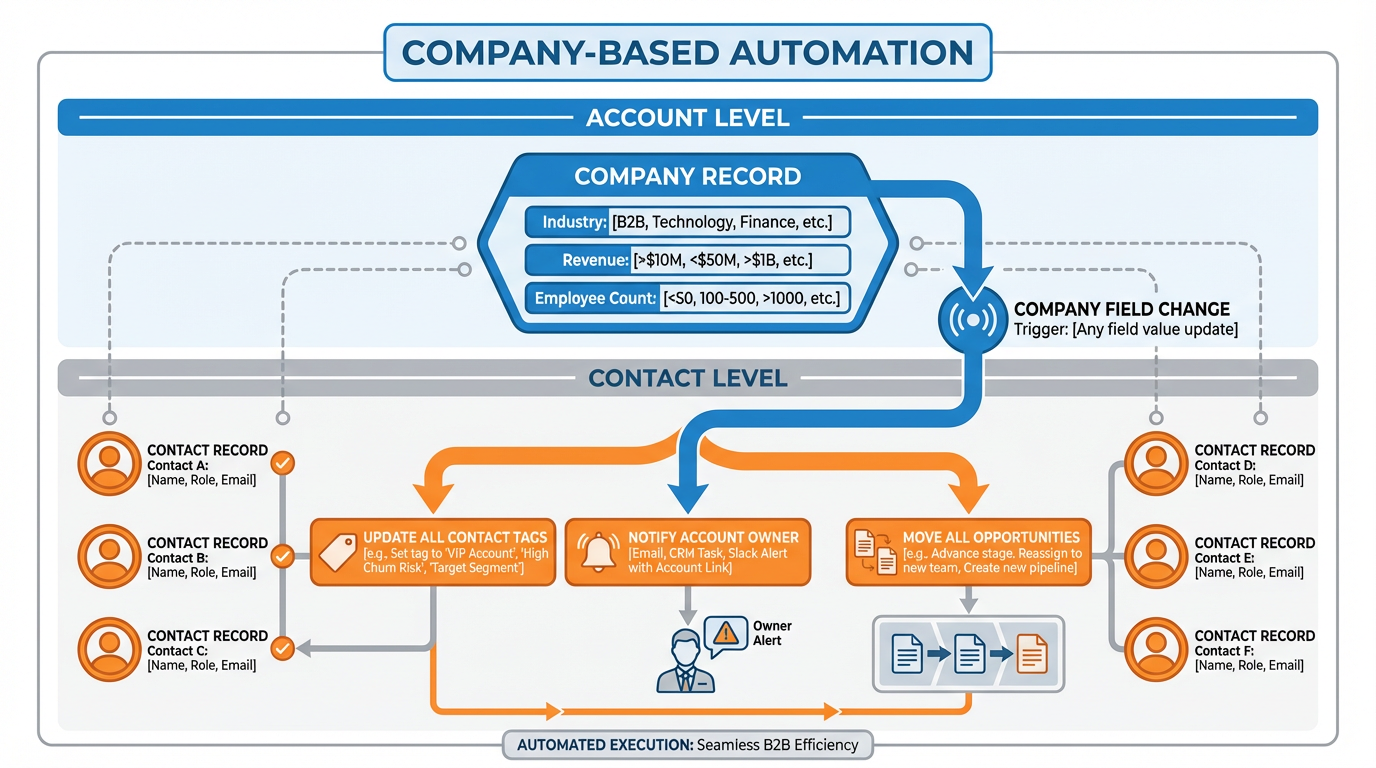
Figure 8:Company-based automation: trigger at the account level, act across all associated contacts simultaneously.
Company-based workflows operate on the Company record rather than the Contact record. In VibeReach’s data model, a Company is a parent object. Contacts are associated with Companies, and those contacts inherit certain company-level attributes. Company-based workflows unlock a fundamentally different type of automation:
When a Company’s industry field is updated, automatically retag all associated contacts for a new segmentation campaign
When a Company’s opportunity moves to “Proposal Stage,” notify the account owner and create tasks for every contact at that company
When a Company’s subscription renews, send a thank-you email to all contacts marked as decision-makers at that account
When a Company’s employee count field exceeds a threshold (indicating growth), trigger an upsell sequence to the account’s primary contact
The trigger types available for company-based workflows mirror the contact-based library but operate at the company level: Company Field Updated, Company Tag Added, Company Created, Opportunity Stage Changed (scoped to company).
Company-based automation is particularly valuable in:
SaaS businesses — where one license covers a team of users across one account
Professional services — where a firm serves multiple contacts at each client company
Franchise or multi-location businesses — where the company record represents a franchisee and contacts represent the staff
104.10 The Twelve Workflows Every Business Should Have Running Tomorrow
Most businesses do not need custom automation architecture on day one. They need a set of proven, reliable workflows that address the most common revenue-impacting gaps in their follow-up and operations. Here are the twelve.
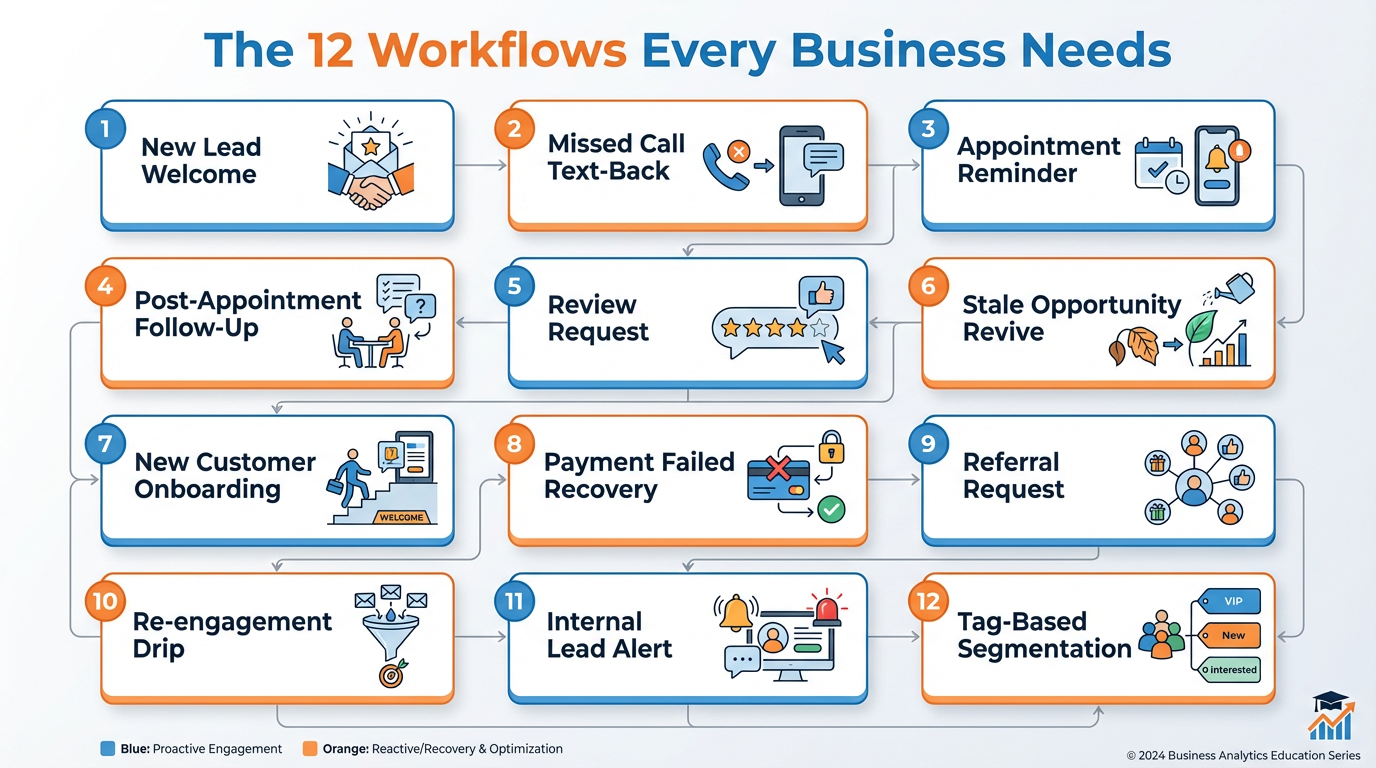
Figure 9:The twelve workflows every business should build — ranked roughly by immediate revenue impact.
1. New Lead Welcome Sequence. Triggers when a contact submits your primary opt-in form. Sends a welcome email, applies a tag, creates a follow-up task, and waits to see if the lead books. This is what you build in Lab 4.
2. Missed Call Text-Back. Triggers when a call is missed on your VibeReach phone number. Immediately sends the caller an SMS saying you missed their call and you are following up shortly. Recovers a staggering percentage of leads who would otherwise call your competitor next. (Covered in depth in Section 4.12.)
3. Appointment Reminder Sequence. Triggers when an appointment is booked. Sends a confirmation email, then a reminder 24 hours before, then a reminder 1 hour before. Add a two-way SMS reminder once your number is provisioned. Reduces no-shows by 40–60%.
4. Post-Appointment Follow-Up. Triggers when an appointment is completed. Sends a thank-you email, moves the opportunity to “Proposal” or “Follow-Up” stage, and creates a task to send the proposal within 24 hours.
5. Review Request Sequence. Triggers 48–72 hours after a service is delivered (tag applied, payment received, or opportunity marked Won). Sends a warm, personal email asking for a review. Branches: if they click the review link, tag as “reviewed.” If not, send a gentle reminder on Day 5.
6. Stale Opportunity Revive. Triggers when an opportunity has not had any stage change in 14 days. Sends an internal notification to the assigned rep and an automated “checking in” email to the contact. Move or close the deal — do not let it rot.
7. New Customer Onboarding. Triggers when a payment is received or an opportunity moves to “Won.” Sends onboarding resources, introduces the client success team member, creates an onboarding task sequence, and schedules the kickoff call. This is how every client gets the same excellent first impression.
8. Payment Failed Recovery. Triggers when a subscription charge fails. Immediately notifies the contact by email, explains how to update their payment method, creates a task for the billing team, and retries the conversation three days later with an internal escalation if unresolved.
9. Referral Request. Triggers 30 days after a customer becomes active (tag applied at day 30). Sends a warm email asking if they know anyone who might benefit from your service. Provides an easy way to make the introduction. One of the highest-ROI automations in any service business.
10. Re-engagement Drip. Triggers when a contact has not engaged with any email or communication in 60 days. Sends a re-engagement sequence with fresh content, a compelling offer, or a simple “Still interested?” check-in. Contacts who do not respond after the sequence get tagged “inactive” for suppression.
11. Internal Lead Alert. Triggers when a high-value form is submitted or a contact is tagged “hot-lead.” Sends an immediate email and internal notification to the assigned rep with the contact’s details, source, and any custom field data collected. No rep ever learns about a hot lead from the end-of-day report.
12. Tag-Based Segmentation Entry. A meta-workflow: triggers when a specific tag is applied to any contact, and uses that event to route the contact into the appropriate specialized sequence. Think of this as the workflow dispatcher — it reads the tag and sends the contact to the right place based on who they are.
114.11 Testing, Debugging, and the Execution Log (aka Where Automations Go to Tell Their Truth)
A workflow that has never been tested is a workflow that has never worked. The single most important habit you can develop as a workflow builder is testing every automation with a real contact before publishing it, and reading the execution log after every test.
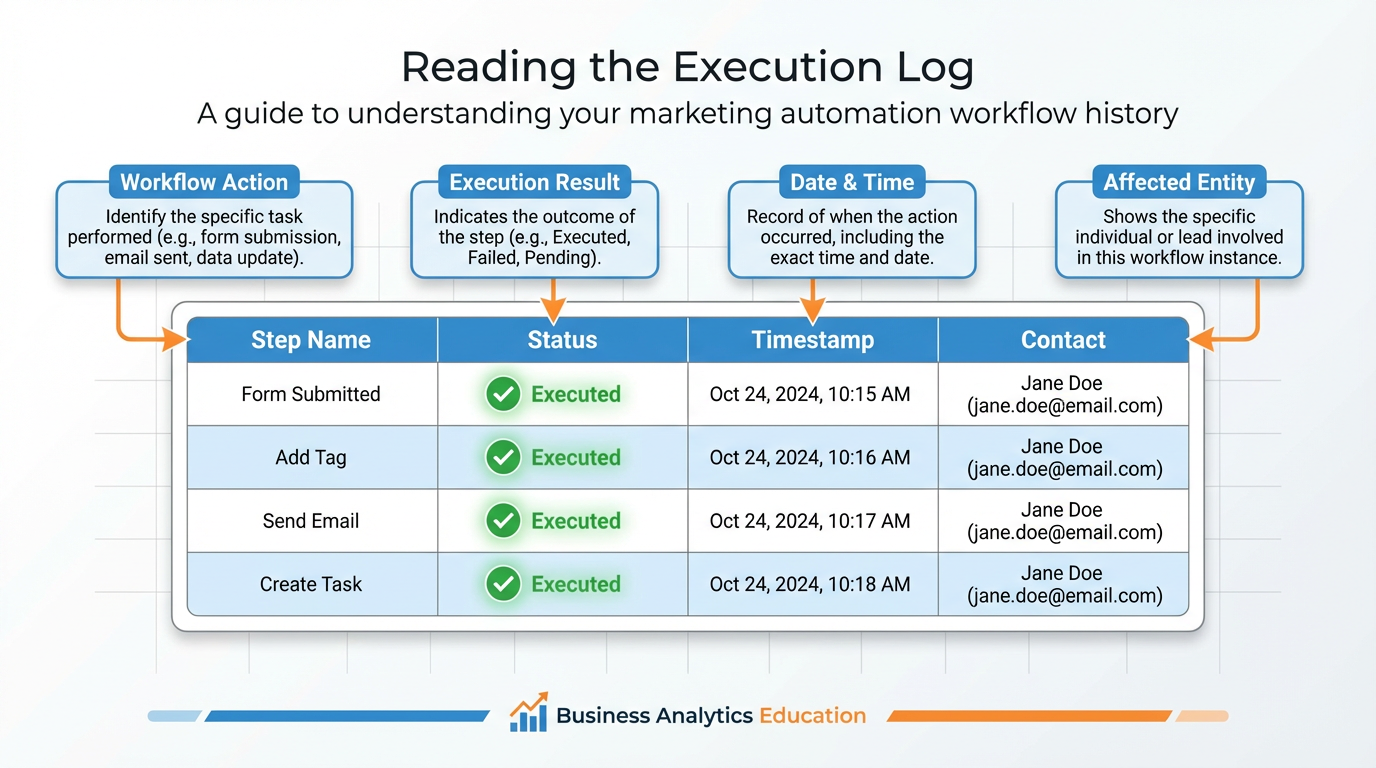
Figure 10:The Execution Log: a timestamped record of every step the workflow attempted, succeeded at, or failed on.
How to access the Execution Log: Navigate to Automation > Workflows, open your workflow, and click the History tab. You will see a list of contacts who have been processed by the workflow. Click any contact to expand the per-step execution detail.
Reading the log: Each row in the execution log represents one step in the workflow for that contact. Status indicators:
✅ Executed — the action fired successfully
⏳ Pending — the action is queued and waiting (typically a Wait step that has not yet elapsed)
⏭️ Skipped — the action was bypassed, usually because an If/Else condition directed the workflow down the other branch
❌ Failed — the action attempted to execute and encountered an error
When an action shows Failed, expand the row to see the error detail. Common failure reasons include:
Email address missing or invalid on the contact record
Template referenced in the action no longer exists
The If/Else condition referenced a field that is not set on the contact
A webhook URL returned a non-200 HTTP response code
Testing best practices:
Create a dedicated test contact with your own email address and a clearly labeled name (e.g., “Test Contact - Lab 4”). This contact will receive all test emails and be processed through your workflow.
Submit the trigger event manually. For a Form Submitted trigger, fill out your actual form with the test contact’s email. For a Tag Added trigger, manually apply the tag from the contact record.
Watch the execution log in real time. Open the History tab immediately after triggering. Steps that execute instantly will show up within seconds. Wait steps will show as Pending until the timer elapses.
Verify outcomes on the contact record. After the workflow runs, open the test contact’s record and confirm: tag was applied, email appeared in the contact’s timeline, task was created and appears in the task list.
Delete test data before going live. Remove the test contact from the workflow’s history if necessary, delete any tasks or opportunities created during the test, and archive the test contact after testing is complete.
124.12 Case Study: The “Missed Call Text-Back” Workflow That Recovered $186,000 in One Quarter for a Home-Services Company
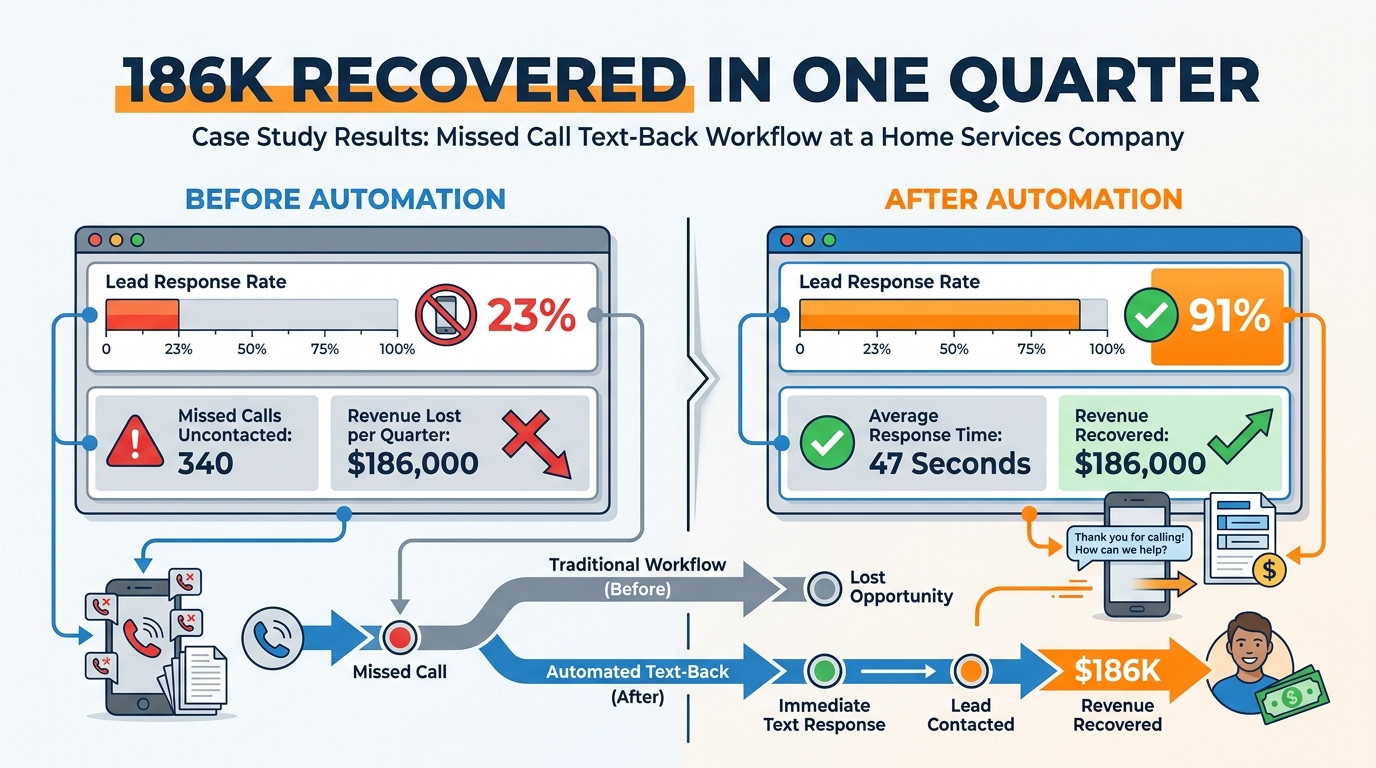
Figure 11:Before and after: the missed-call text-back workflow recovered $186,000 in one quarter by converting missed calls into booked appointments.
A residential HVAC and plumbing company in the American Southeast was experiencing a problem so common in service businesses that most owners had normalized it: they were missing calls. On average, their three-person office fielded 340+ inbound calls per month during peak season — late spring and early summer, when air conditioning systems fail across the region. Between hold times, double-bookings, and the sheer volume, roughly 23% of inbound calls went unanswered.
The team knew they were losing business. What they did not know was how much.
When a consultant ran the numbers — average job value of 1,800 average value represented over $140,000 in annual revenue that was quite literally ringing away unanswered.
The solution was a single, two-step workflow.
The Workflow:
Trigger: Call Status = Missed (on the company’s VibeReach phone number)
Action 1: Send SMS — “Hi, this is [Company Name]. We just missed your call and we’re sorry we couldn’t pick up! We’re replying by text because we don’t want you to wait on hold. What can we help you with today?” — sent within 47 seconds of the missed call
That is the entire workflow. Two steps. One trigger, one action.
The results after one quarter:
Lead response rate climbed from 23% (calls answered live) to 91% (calls answered live + SMS follow-up)
Average response time dropped from “we’ll call you back sometime today” to 47 seconds
Of the contacts who received the SMS, 38% replied and converted to booked appointments
Incremental revenue recovered in Q3: $186,000
Time invested in building and testing the workflow: approximately 15 minutes
Why does this work so well? Three reasons.
First, recency. The person who just called you is at peak motivation. They have a problem. They just tried to solve it by calling you. When they get an SMS response within a minute, their problem is still fully in mind and they are primed to engage. When they get a callback three hours later, they have already called someone else.
Second, channel preference. Many consumers in the post-smartphone era strongly prefer text to voice, particularly for initial inquiries. The workflow meets them where they are most comfortable.
Third, scale without cost. The SMS goes out 340 times per month automatically. No additional staff time is required. The cost is the SMS per-message rate (a few cents) and the five-minute investment in building the workflow once.
What made this recoverable revenue rather than lost revenue?
The key insight is that most missed calls are not gone — they are merely delayed. If you reach back within the first few minutes, a significant percentage of callers have not yet committed to an alternative. The window varies by industry: in emergency services (HVAC failure in July, plumbing emergency at midnight), the window is measured in minutes. In lower-urgency categories (landscaping, painting), the window might be hours or days. The missed-call text-back workflow works in any category because it is not trying to win back an already-converted customer — it is simply responding before the window closes.
The lesson is not that SMS is magic. It is that speed beats quality in first response. A fast, warm, personal-feeling response — even an automated one — converts at dramatically higher rates than a delayed, manual one. The workflow’s job is to ensure the response is always fast. The team’s job is to ensure the subsequent conversation is excellent.
134.13 Lab 4: Build a New-Lead Welcome Workflow
Every new lead who submits your funnel deserves the same excellent first impression — whether they arrive at 9 AM on a Tuesday or 2 AM on a Sunday. A welcome workflow delivers that consistency automatically. In this lab, you build a published, tested workflow that fires the moment a contact submits your Lab 2 funnel form, tags them as a new lead, delivers a warm welcome email, and creates a follow-up task for your team. This is the first real automation in your system — and it runs forever without anyone having to remember to send it.
13.1Step 1: Navigate to the Workflow Builder
In the left sidebar, click Automation → Workflows.
Click + New Workflow in the upper right.
When prompted, select Start from Scratch.
In the “Workflow Name” field, type:
New Lead Welcome SequenceClick Create Workflow.
The builder canvas opens with an empty trigger slot at the top of the canvas.
You’ll know you did this right when: The workflow canvas appears with an empty trigger node labeled “Add Trigger” and a blank canvas below it.
13.2Step 2: Add the Trigger — Form Submitted
Click the + Add New Trigger button in the trigger node (or the grey trigger block at the top of the canvas).
In the trigger search panel on the right side, type:
Form→ select Form Submitted from the results.In the trigger configuration:
Click + Add Filter
Select Form Name → is → choose your Lab 2 opt-in form from the dropdown
Click Save Trigger.
You’ll know you did this right when: The trigger node shows “Form Submitted” with the filter displaying your form’s name below it.
13.3Step 3: Action 1 — Add Tag
Click + Add Action (the blue + button below the trigger node).
In the action search panel, type:
Tag→ select Add Tag.In the tag field, type:
new-leadIf
new-leaddoesn’t exist yet, GHL creates it automatically when the workflow first fires.Click Save Action.
You’ll know you did this right when: An “Add Tag” node appears on the canvas connected below the trigger, showing new-lead as the tag value.
13.4Step 4: Action 2 — Send Email (Welcome + Lead Magnet Delivery)
Click + Add Action below the Add Tag node.
Search for and select Send Email.
Configure the email:
Subject:
Your [Lead Magnet Name] is here, {{contact.first_name}}!From Name: Your name or business name
From Email: Your verified sending domain address
Reply-To: Your monitored business email
Body: Write a short, warm welcome. Example:
Hi {{contact.first_name}},
Your [Lead Magnet Name] is attached — it’s the same checklist we walk through with every client before starting a funding application.
[Attach PDF or link to lead magnet here]
I’ll be reaching out personally within the next business hour. If you’d rather connect now, you can grab a time on my calendar here: [calendar link]
Talk soon, [Your Name]
Attach your lead magnet PDF (or include a link if it’s hosted online).
Click Save Action.
You’ll know you did this right when: The Send Email node shows your subject line and the email preview renders correctly with the {{contact.first_name}} merge field visible.
13.5Step 5: Action 3 — Create Task (Human Follow-Up Reminder)
Click + Add Action below the Send Email node.
Search for and select Create Task.
Configure:
Task Name:
Follow up with {{contact.first_name}} — new leadDue Date:
1 hourfrom workflow execution (use the relative time option)Assigned To: Your user account
Notes:
Lead submitted [Form Name]. Welcome email sent. Next: personal outreach call or text.
Click Save Action.
You’ll know you did this right when: A “Create Task” node appears on the canvas, showing the task name with the {{contact.first_name}} merge field and the 1-hour relative due date.
13.6Step 6: Add a Wait Step and Second Email (Optional but Recommended)
For a complete welcome sequence, add a 24-hour follow-up:
Click + Add Action below the Create Task node.
Select Wait → set duration to 1 Day → toggle “Send during business hours” ON.
Click Save.
Add another Send Email action below the Wait:
Subject:
Quick question for you, {{contact.first_name}}Body: One paragraph, one question about their specific situation. Example: “I wanted to check in — did the checklist I sent answer your questions about funding readiness? What’s the biggest challenge you’re running into right now?”
Save.
You’ll know you did this right when: The canvas shows: Trigger → Add Tag → Send Email → Create Task → Wait (1 Day) → Send Email. The workflow reads as a linear sequence from top to bottom.
13.7Step 7: Test the Workflow
Before publishing, run a live test:
In the workflow builder, click the Test Workflow button (or use the “Add Test Contact” option).
Select a contact from your database (use yourself or a test contact) → Run Test.
Verify in the contact’s record:
The
new-leadtag was appliedThe welcome email appears in the contact’s email timeline
A task was created and appears in the contact’s Tasks tab
Check your own email inbox to confirm the welcome email arrived.
You’ll know you did this right when: All three actions show as executed in the contact’s activity timeline.
13.8Step 8: Publish the Workflow
In the top right of the workflow builder, toggle the workflow status from Draft to Active (or click the Publish button, depending on your GHL version).
Confirm the status shows “Published” or “Active” in the workflow list.
You’ll know you did this right when: The workflow appears in the Workflows list with a green “Active” status indicator. From this point on, every new form submission triggers the entire sequence automatically.
Troubleshooting Common Issues
The workflow triggered but the tag wasn’t applied: Check the Add Tag action configuration. The tag name must exist or be typed correctly — check for extra spaces. Open the workflow execution log (click the workflow → History tab) to see if the action was attempted and any error message.
The welcome email didn’t arrive in my test: Verify the From Email uses your verified sending domain. If the sending domain shows “Unverified” in Settings → Email Services, the email will not send. Also check your spam folder before assuming it didn’t send.
The task was created but has the wrong due date: The “1 hour from now” relative time only works for relative time settings. If you accidentally set a specific date and time instead of a relative offset, edit the task action and switch from “Specific Date” to “Relative Time” → set to 1 hour.
The workflow is Active but never fires when I submit the form: The most common cause: the trigger filter specifies a different form than the one you submitted. Check that the form name in the trigger filter exactly matches the name of the form in your funnel. If names contain special characters, try removing them.
{{contact.first_name}} shows literally in the email instead of the contact’s name: The merge field is not resolving. Verify the contact record has a First Name value. If First Name is blank on the contact, the merge field returns empty. For the test, use a contact with a populated first name, or add a fallback: {{contact.first_name | default: ‘there’}} — which renders as “Hi there” if the field is empty.
144.14 Chapter Takeaways and Reflection Questions
14.1Reflection Questions
Think about the last time you failed to follow up with a potential customer or client in a timely way. What trigger event should have initiated the follow-up? What action should have fired? Sketch the two-step workflow that would have prevented that failure.
The missed-call text-back case study recovered $186,000 with a two-step workflow built in fifteen minutes. What is the equivalent “dropped ball” in your own business or in a business you have worked for? What would the recovery workflow look like?
Branching logic (If/Else) is what distinguishes a responsive workflow from a broadcast. Describe a business scenario where two contacts who submit the same form should receive different follow-up sequences based on something you know about them. What data point drives the branch? What are the two paths?
The chapter argues that “automation amplifies your best process, not your worst.” Do you agree? Can you think of a case where automating a flawed process made the flaw worse rather than better? What would have been the correct first step before automating?
14.2Exercises
Map Before You Build
Before opening VibeReach, choose one of the twelve workflows from Section 4.10 (other than the New Lead Welcome Sequence you built in Lab 4). On paper or in a diagramming tool, sketch the complete workflow:
What is the trigger?
Are there any filters at the trigger level?
What is the first action? The second? Third?
Where do you need a Wait step?
Where should you add an If/Else branch?
What is the Goal of this workflow, and what tags or events represent achieving it?
What are the exit conditions?
Compare your sketch with a classmate’s version of the same workflow. Where do they differ? Whose branching logic handles edge cases better?
Execution Log Analysis
Submit your Lab 2 funnel form three times using three different contact records (use three email addresses you have access to). Let the workflow you built in Lab 4 process all three. Then:
Open the History tab and compare the execution logs for all three contacts
Identify any steps that show different outcomes across the three runs
Note the timestamps — how many seconds elapsed between the Form Submitted trigger and the Send Email action?
Verify that all three contacts have the
new-leadtag and the follow-up task on their records
Write a 150-word reflection: What surprised you about the execution speed? What would you change about the workflow based on what you observed?
The Wait + Check Extension
Extend your Lab 4 workflow with the following additions:
After the Create Task action, add a Wait step of 1 hour
After the Wait step, add an If/Else action with the condition: Task Status = Completed
YES branch: Add End Workflow
NO branch: Add an Internal Email Notification action alerting the contact owner that the follow-up task is overdue, then End Workflow
Save and test using a test contact. Observe the execution log — the Wait step will show as Pending for up to 1 hour. If you want to test the NO branch immediately, delete the Wait step, save, test, then restore it after.
Document what the execution log shows for the If/Else step. Did it go to YES or NO? Why?
Trigger Identification Challenge
For each of the following business scenarios, identify: (a) the correct trigger, (b) any filter to apply at the trigger level, and (c) the first two actions the workflow should take. Do not reference the twelve workflows from Section 4.10 — reason from the trigger and action libraries independently.
Scenario A: A real estate agent wants to follow up with every contact who clicks the “View Properties” button in their newsletter email.
Scenario B: A law firm wants to notify their intake coordinator every time a contact’s pipeline opportunity stage changes to “Consultation Requested.”
Scenario C: A membership fitness studio wants to send a special renewal offer to every member 7 days before their annual membership anniversary date.
Scenario D: An e-commerce brand wants to log every new contact who submits a product inquiry form to a Google Sheet shared with the customer service team.
Solution — Exercise 4.4
Scenario A: Trigger: Email Link Clicked. Filter: Specific Link = “View Properties” button URL. Actions: (1) Add Tag “property-interested”, (2) Send Follow-Up Email with featured listings.
Scenario B: Trigger: Opportunity Stage Changed. Filter: Pipeline = Law Firm Intake Pipeline + New Stage = “Consultation Requested.” Actions: (1) Internal Email Notification to intake coordinator with contact details, (2) Create Task “Schedule consultation call with {{contact.first_name}}” assigned to intake coordinator.
Scenario C: Trigger: Anniversary. Filter: Custom Date Field = “Membership Start Date.” Actions: (1) Wait until 7 days before anniversary (configured in the Wait step), (2) Send Email with renewal offer and personalized member duration (“You’ve been a member for {{years}} — here’s a special offer just for you”).
Scenario D: Trigger: Form Submitted. Filter: Form Name = “Product Inquiry Form.” Actions: (1) Add Tag “product-inquiry”, (2) Google Sheets Premium Action — append row to the Customer Service Inquiry Log sheet with contact name, email, form fields, and submission timestamp.
14.3Discussion
Discussion Prompt
Automation is often framed as a productivity tool — it saves time and scales output. But the case study in Section 4.12 reveals something more profound: automation can fundamentally change the competitive dynamics of a business by eliminating response latency at scale. Respond to the following:
Do you believe the primary value of workflow automation is efficiency (doing the same things faster and cheaper) or capability (doing things that were previously impossible at this scale)? Draw on the trigger and action library presented in this chapter, the missed-call case study, and at least one scholarly or industry source to support your argument. Consider the implications for small businesses versus enterprise organizations. Is the value proposition different at different scales?
Discussion Guidelines: Write a substantive response of at least 200 words addressing the prompt above. Include at least one scholarly or credible citation (journal article, textbook, or authoritative industry report) to support your argument. Then respond to at least two peers with substantive feedback — go beyond “I agree” and explain why their perspective adds to or challenges your thinking.
15Glossary
Workflow An automated sequence of actions triggered by a defined event, optionally filtered by conditions, and executed in order against a contact, company, or conversation record.
Trigger The initiating event that causes a workflow to begin executing. Can be contact-based, behavioral, transactional, or system-level.
Action A discrete task performed by the workflow on or for a contact record, ranging from sending communications to updating CRM fields to firing external HTTP requests.
Condition A logical rule evaluated at the trigger level or within an If/Else branch that determines whether an action or execution path should proceed.
Filter A condition applied at the trigger level to qualify which instances of the trigger event should activate the workflow. Filters narrow the trigger’s scope.
If/Else Branch A flow control action that evaluates a condition and routes the workflow down one of two execution paths — YES (condition true) or NO (condition false).
Wait Step A flow control action that pauses workflow execution for a defined duration or until a specific event occurs before proceeding to the next action.
Goal A workflow setting that defines the desired outcome. When a contact meets the goal condition, they advance to the goal step regardless of where they currently are in the workflow.
Exit Condition A rule that removes a contact from an active workflow, typically triggered by a tag, stage change, opt-out, or manual removal.
Re-entry The setting that controls whether a contact can be enrolled in the same workflow more than once and under what circumstances.
Execution Log A timestamped record of every step a workflow attempted to execute for a specific contact, showing status (Executed, Pending, Skipped, Failed) and error details for failures.
Webhook An HTTP-based mechanism for real-time data transmission between systems, using POST requests with JSON payloads. Inbound webhooks trigger workflows; outbound webhooks send data to external systems.
Inbound Webhook A unique URL generated by VibeReach that external systems can POST data to in order to trigger a workflow.
Outbound Webhook A workflow action that sends an HTTP POST request containing contact data to an external URL when the action fires.
A2P 10DLC Application-to-Person 10-Digit Long Code — the US carrier compliance framework that governs SMS messaging from business applications to consumer phone numbers. Registration is required before sending automated SMS and is covered in Chapter 5.
Merge Field A dynamic placeholder in an email, SMS, or task that is replaced with a contact’s actual field value when the action executes (e.g., {{contact.first_name}} becomes “Sarah”).
Premium Action A workflow action that connects to a specific third-party platform (Slack, Google Sheets, Custom Code) or provides advanced capabilities beyond the core action library.
Company-Based Workflow A workflow that operates on the Company record rather than the Contact record, enabling account-level automation that affects all contacts associated with a company.
Tag A label applied to a contact record used for segmentation, workflow routing, Smart List membership, and lifecycle stage tracking. Tags function as boolean flags — a contact either has a tag or does not.
Smart List A dynamically updated contact list in VibeReach that automatically includes or excludes contacts based on defined criteria, including tags, field values, and workflow enrollment status.
Chapter 5 covers The Phone System: provisioning your VibeReach number, A2P 10DLC registration, call routing, voicemail drops, and the full SMS automation library — including adding SMS back into the New Lead Welcome Sequence you built in this lab.
16🎯 Your Turn: Apply It to Your Business
You just learned the assembly line. Now run something down it. The most dangerous thing you can do with this chapter is close it and go back to manually following up with leads. Build one workflow today — even an imperfect one — and improve it next week.
1. Identify your single biggest manual follow-up leak. Think about the last five leads your business dropped. Not “maybe dropped” — actually, definitively lost because nobody followed up. What was the trigger event that should have kicked off a response? A form submission? A missed call? An email that went unanswered? That trigger event is where your first workflow goes. Write it down before opening GHL.
2. Sketch your workflow on paper before building it. Pick any of the 12 essential workflows from Section 4.10. Before logging into GHL, draw the trigger → conditions → actions on paper. What fires first? What’s the wait time? Where does the If/Else branch? What does the YES path do? The NO path? What tag signals that the goal was achieved? Sketching first eliminates 80% of the rebuild time that comes from building without thinking.
3. Build and publish the Missed-Call Text-Back workflow. Log into GHL → Automation → Workflows → + New Workflow. Trigger: Call Status → filter: Status = Missed. Action: Send SMS — write a warm, human message that says you missed them and want to help. Publish it. This takes under 10 minutes and, as the case study showed, can recover five figures in a single quarter. If your number isn’t provisioned yet, save it as a draft and come back the moment Chapter 5’s setup is complete.
4. Add a Goal to your Lab 4 workflow. Open the New Lead Welcome Sequence you built in Lab 4. In the workflow settings (gear icon), find Goal and set it to “Appointment Booked.” Now any lead who books during the sequence automatically skips to the post-booking path instead of continuing the follow-up sequence. Save and republish. This one change stops you from sending “Are you still interested?” emails to people who already said yes.
5. Read five execution logs from any active workflow. In GHL → Automation → Workflows, open any active workflow and click the History tab. Pick five contacts at random. For each one, expand the full execution log. Did every step execute? Were there any Skipped or Failed steps? What does the wait step timing look like — are messages going out at 3 AM? Fix one thing you find in those five logs.