Before You Can Market: Planting Your Digital Flag
You cannot build a skyscraper on borrowed land. This chapter is the concrete.
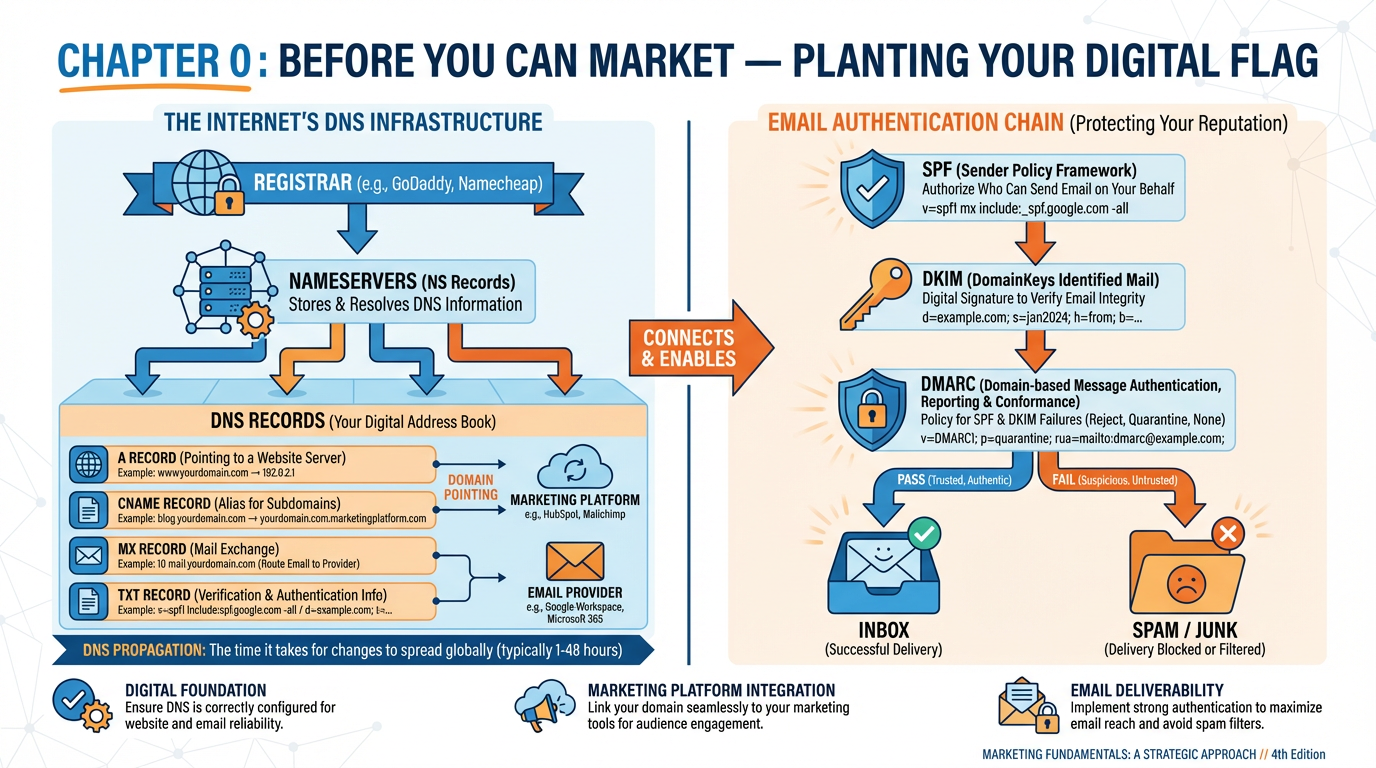
Figure 1:Chapter 0 at a glance: from domain registrar to authenticated inbox — every layer of your digital foundation.
Here is something most marketing courses never tell you: the most sophisticated campaign in the world can be completely invisible to its intended audience before a single human being decides to ignore it. Not because the copy was weak. Not because the targeting was off. Because the sender had a misconfigured DNS record — and every email went straight to spam.
This chapter is not glamorous. You will not learn how to write a viral hook or build a funnel that converts strangers into superfans. What you will learn is the infrastructure that makes all of that possible. Before a city can have skyscrapers, someone has to lay the sewer lines, pour the concrete, and map the streets. This chapter is that work — and most marketers skip it, which is precisely why most marketers underperform.
By the end, you will own your digital address, understand how email actually travels across the internet, and have a fully authenticated sending domain that tells every major inbox provider: this sender is legitimate. That credibility is not a technicality. It is the difference between a 42% open rate and landing in the promotions tab that nobody checks.
10.1 The Invisible Wiring of the Internet: DNS in Plain English
Imagine the early twentieth century, before area codes, before smartphones, before the concept of “dialing direct.” If you wanted to reach someone by telephone, you picked up the handset and asked an operator — a human being sitting at a switchboard — to connect you. You gave the operator a name, and the operator translated that name into a physical circuit and made the connection happen. You never needed to know which copper wire carried your voice. The operator handled the translation.
The Domain Name System — DNS — is the internet’s version of that operator. Except instead of connecting telephone calls, it translates human-readable names like yourbusiness.com into numerical addresses like 104.21.18.92 that computers actually use to route data. And instead of a single operator at a switchboard, it is a globally distributed hierarchy of servers that collectively answer billions of queries per second, twenty-four hours a day, with no central authority and no single point of failure.
Understanding this system is not optional for a modern marketer. It is the foundation upon which every domain, every website, every marketing email, and every automation workflow is built.
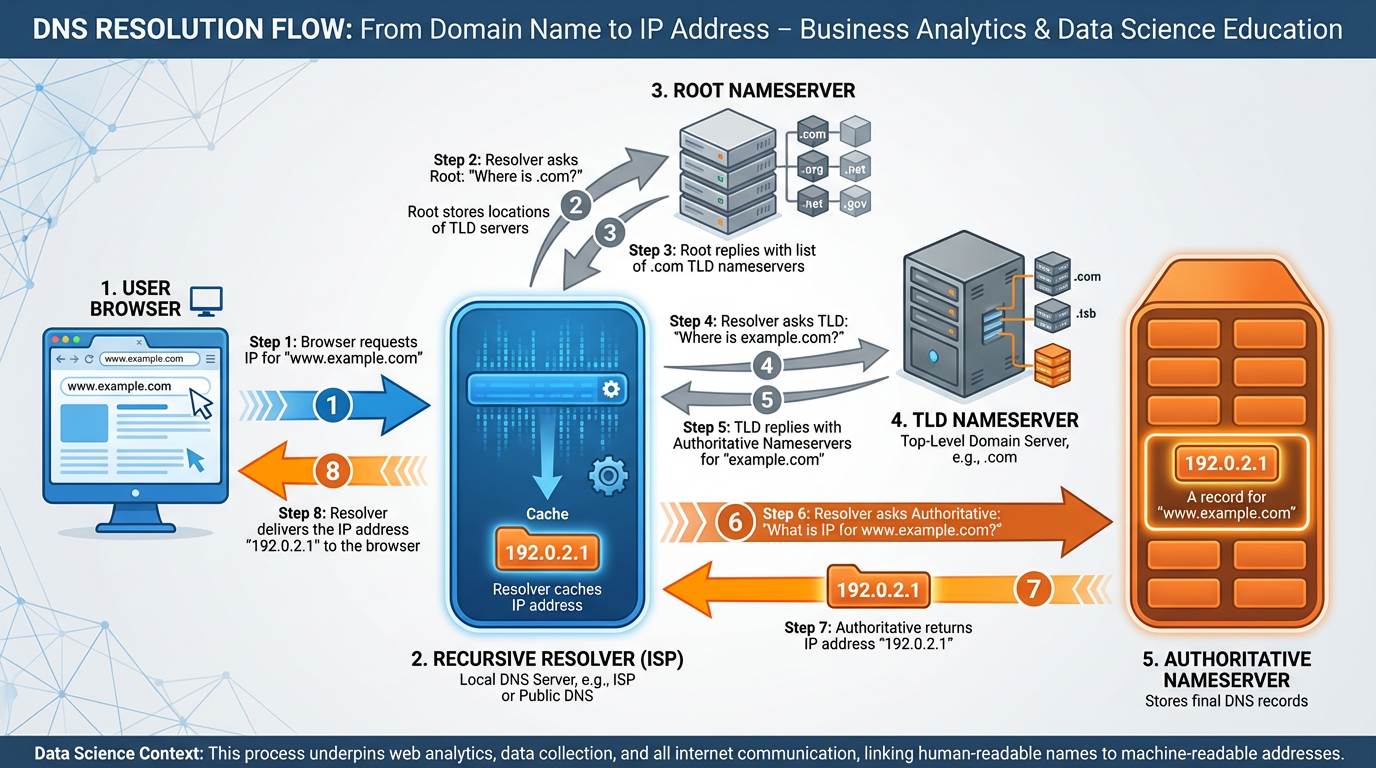
Figure 2:The DNS resolution chain: your browser asks a series of increasingly specific servers until it gets the IP address it needs.
1.1How DNS Resolution Actually Works
When you type yourbusiness.com into a browser, your computer does not have any idea where that site lives. It has to ask. Here is the chain of events, simplified but accurate:
Your device checks its local cache. If it recently looked up this domain, it already has the answer stored temporarily. If not, it asks your recursive resolver — typically a server operated by your internet service provider or a third-party like Google (
8.8.8.8) or Cloudflare (1.1.1.1).The recursive resolver checks its own cache. If it doesn’t know the answer, it goes to the root nameservers — thirteen clusters of servers distributed across the globe that form the backbone of the entire DNS system. Root servers do not know where
yourbusiness.comlives, but they know who does: the.comregistry.The root server points to the TLD (top-level domain) nameserver. For
.comdomains, this is Verisign’s infrastructure. The TLD server says, “I don’t know the specific IP, but I know which nameservers are authoritative foryourbusiness.com.”The resolver queries your authoritative nameservers. These are the servers specified at your registrar — typically your DNS provider (Cloudflare, Route 53, your registrar’s own nameservers). The authoritative nameserver has the actual answer: the specific IP address your domain points to.
The IP address is returned to your browser. Your browser connects to that IP, and the website loads. The entire process typically completes in under 50 milliseconds.
1.2Why Propagation Takes Time
Here is a concept that trips up nearly every new marketer: DNS propagation delay. When you make a change to a DNS record — adding an A record, modifying an MX record, updating a TXT record — that change does not instantly appear everywhere on the internet. Each server in the chain maintains a local cache of DNS records, and that cache is only cleared when the record’s TTL (Time to Live) expires.
TTL is measured in seconds. A common setting is 3,600 seconds (one hour), meaning that after you make a change, it could take up to an hour — or in some cases up to 48 hours — for all the world’s DNS resolvers to “see” the new record. This is not a bug. It is a deliberate design choice that makes the global DNS system efficient and scalable. But it means you need to plan ahead: do not make DNS changes the morning your campaign launches.
20.2 Your Domain Is Your Digital Address — Choosing One That Will Outlive Trends
In 1995, a company named their business with a clever portmanteau that made perfect sense in the mid-nineties internet. By 2015, it was embarrassing. By 2025, they were paying a rebranding agency six figures to undo what a fifteen-minute naming session had created.
Your domain name is not just a URL. It is the permanent address of your business on the internet — on every email, business card, invoice, contract, and social media bio. Changing it is expensive, disruptive, and never fully clean. Choose it as though you will be using it for the next twenty years. Because you might be.
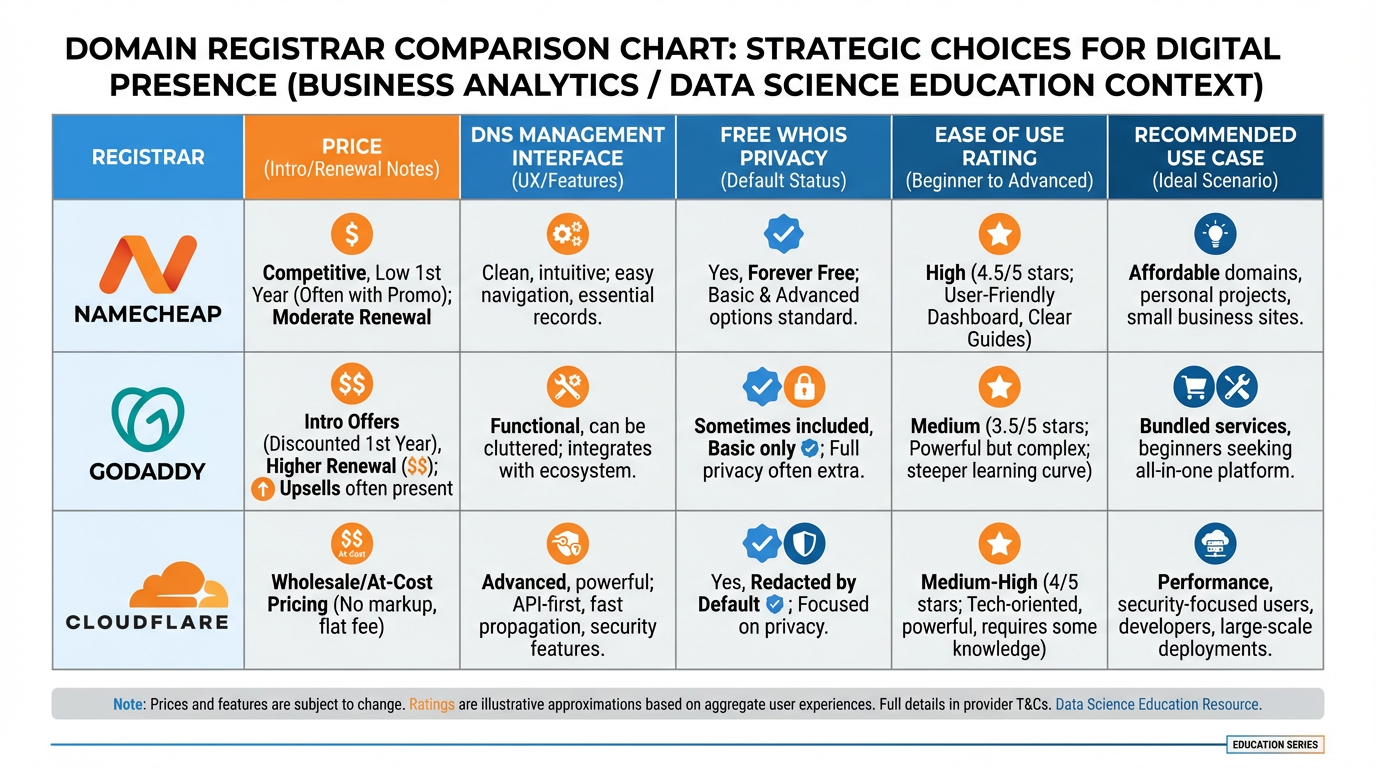
Figure 3:Three registrars compared: Namecheap for beginners, GoDaddy for brand recognition, Cloudflare for advanced users who want superior DNS performance at cost.
2.1Principles for Choosing a Domain That Lasts
Keep it short and pronounceable. If you have to spell it out every time you say it aloud, it is too complicated. Your domain should survive a phone conversation.
Avoid hyphens and numbers. best-marketing-agency-2024.com will haunt you in ways you cannot currently imagine.
Use .com if you possibly can. Despite the proliferation of new TLDs (.io, .ai, .co), a .com still carries the most trust with spam filters, older demographics, and the general public. If your first-choice .com is taken, consider a variation before jumping to an exotic TLD.
Own your brand, not a keyword. affordableplumbingmiami.com might rank today. But when you expand services or change positioning, that domain becomes a liability. Build around your brand name, not a category.
Buy it before you build anything. Register the domain the moment you decide on a name, even months from launch. Domains cost approximately $10–15 per year. Losing a domain you chose because someone registered it while you were procrastinating is expensive and often permanent.
2.2Where to Register
Best for: New marketers, beginners, and budget-conscious operators.
Transparent, low pricing (~$10/year for
.com)Free WhoisGuard privacy protection
Clean, beginner-friendly DNS management interface
Easy to navigate for first-time domain owners
Recommended for students working through this lab
DNS Path: Dashboard → Domain List → Manage → Advanced DNS
Best for: Those who prefer a known brand and want integrated hosting options.
Widely recognized; large support ecosystem
Higher renewal prices than competitors (watch for renewal rate increases)
DNS management is straightforward but interface can feel cluttered
Often runs promotions on first-year pricing
DNS Path: My Products → DNS → Add/Edit Records
Best for: Intermediate to advanced users who want maximum DNS performance and security.
Free DNS management (you transfer your domain here to use their nameservers)
Fastest DNS propagation of any major provider
Built-in DDoS protection, SSL, and CDN
Analytics on DNS queries
Steeper learning curve for complete beginners
DNS Path: Select Domain → DNS → Records → Add Record
30.3 A Records, CNAMEs, and MX: The Three Letters That Make Everything Work
DNS records are the individual instructions stored in your authoritative nameserver that tell the internet what to do with requests for your domain. Think of them as different types of entries in an address book, each serving a specific purpose. A phone book might list a person’s home phone, work phone, and fax number separately. DNS records do the same for your domain — routing web traffic, email, subdomains, and authentication separately, each to the right destination.
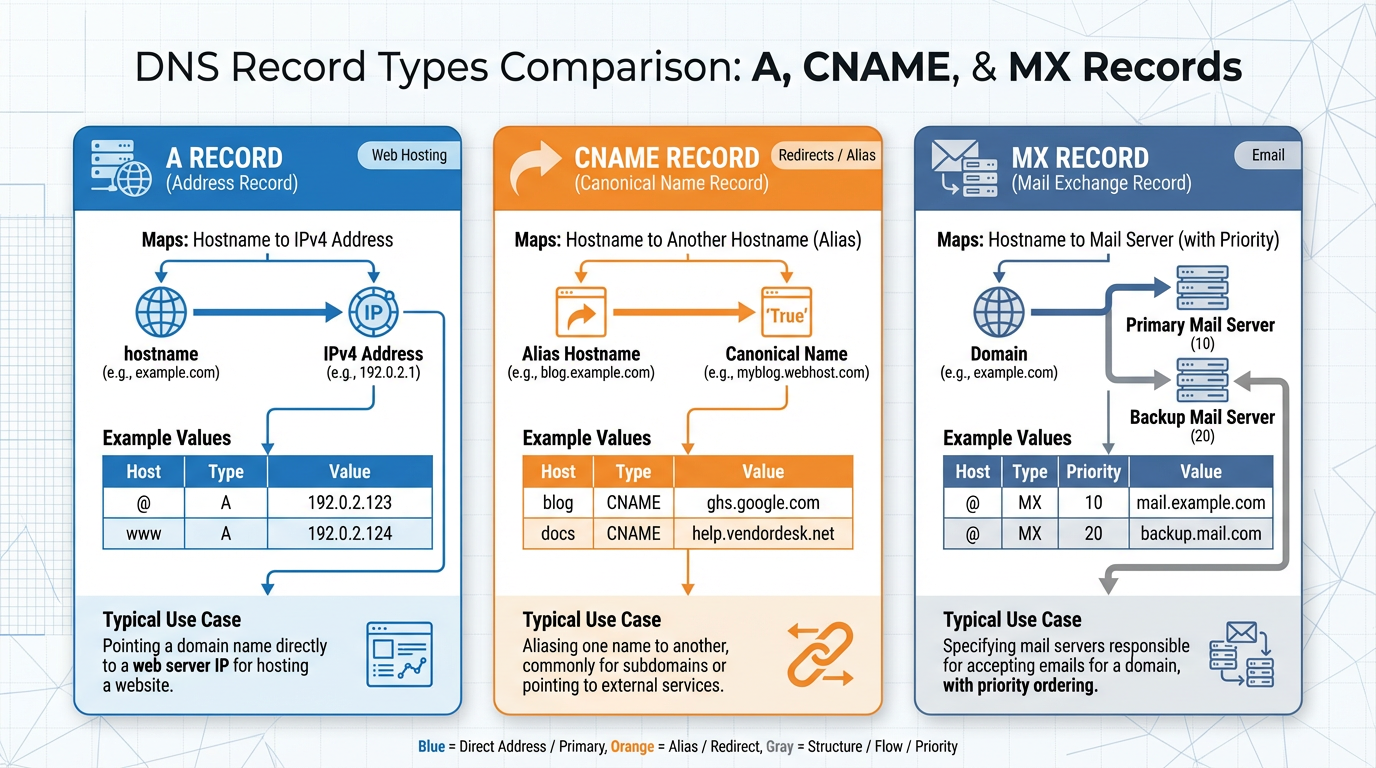
Figure 4:The three essential DNS record types every marketer must master: A records for web hosting, CNAMEs for subdomains, and MX for email routing.
3.1A Record: The Web’s Home Address
The A record is where the internet starts when looking for your website. When you connect your domain to VibeReach.io, you are primarily working with A records. The platform will give you a specific IP address, and you create an A record that says: “All traffic for yourbusiness.com goes to this IP.”
| Record Type | Host/Name | Value | TTL |
|---|---|---|---|
| A | @ (root domain) | 104.21.18.92 | 3600 |
| A | @ (root domain) | 172.67.14.45 | 3600 |
3.2CNAME: The Alias System
CNAMEs are powerful because they let a subdomain (like www.yourbusiness.com or go.yourbusiness.com) follow wherever the root domain points, without needing its own IP address. When you create a marketing funnel page at go.yourbusiness.com, you typically set a CNAME pointing to the platform’s generic domain, and the platform routes traffic based on the subdomain you’ve configured in its settings.
| Record Type | Host/Name | Value | TTL |
|---|---|---|---|
| CNAME | www | yourbusiness.com | 3600 |
| CNAME | go | sites.vibereach.io | 3600 |
3.3MX: The Postal System for Email
If the A record is your street address, the MX record is the mailbox specification — it tells the internet’s mail routing infrastructure where to deliver email addressed to @yourbusiness.com. Without MX records, no one can email you at your domain. With incorrect MX records, email disappears into the void.
40.4 Setting Up Your Sending Domain for Deliverability
4.1Why SPF, DKIM, and DMARC Matter More Than Your Copy
You could hire the best copywriter on the planet. You could craft subject lines that make people weep with joy and want to open your email immediately. None of it matters if your email is delivered to the spam folder — or worse, silently blocked before it ever reaches the recipient’s server.
Email deliverability is not primarily about your writing. It is about your reputation, and your reputation is established through three authentication protocols that act as a digital chain of trust: SPF, DKIM, and DMARC.
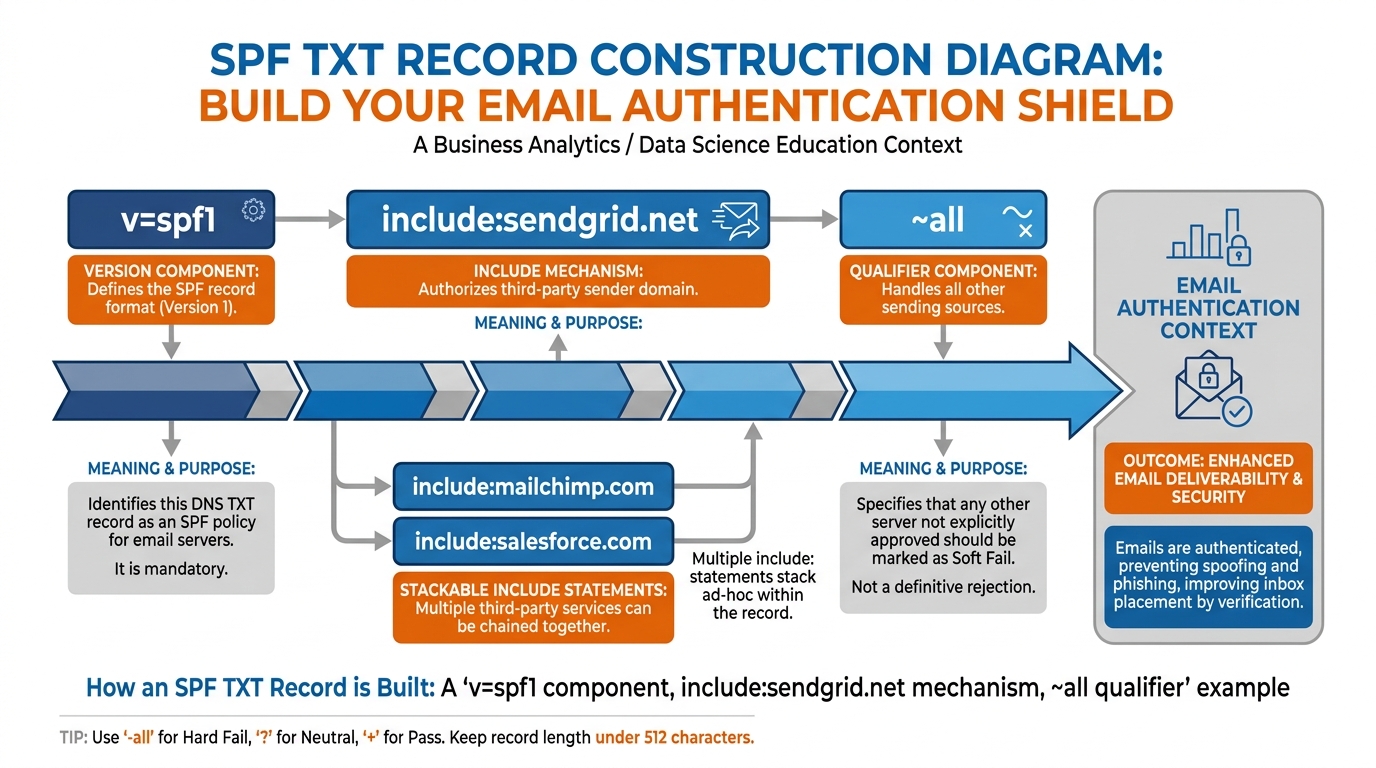
Figure 5:Anatomy of an SPF record: every component has a specific function that tells receiving servers which senders to trust.
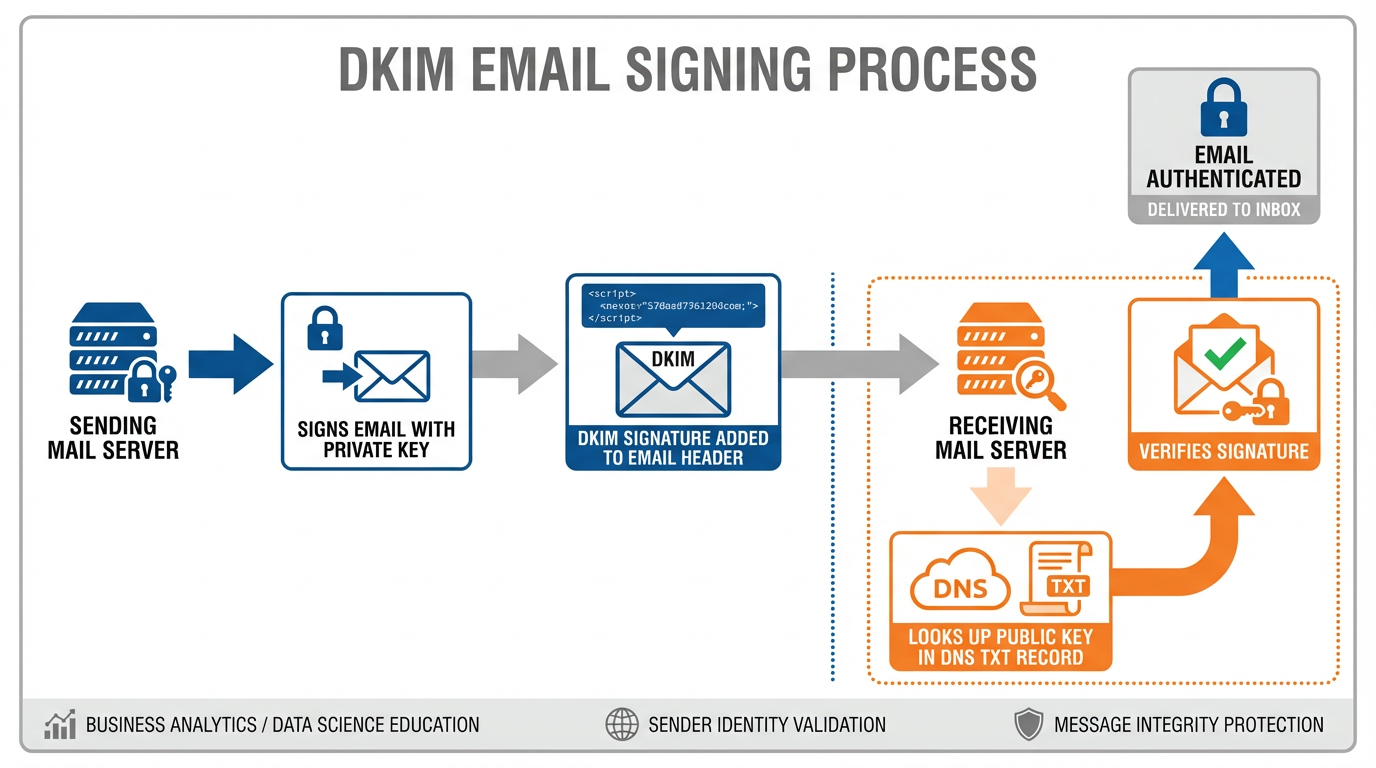
Figure 6:DKIM’s cryptographic handshake: your sending server signs; the recipient’s server verifies using your published public key.
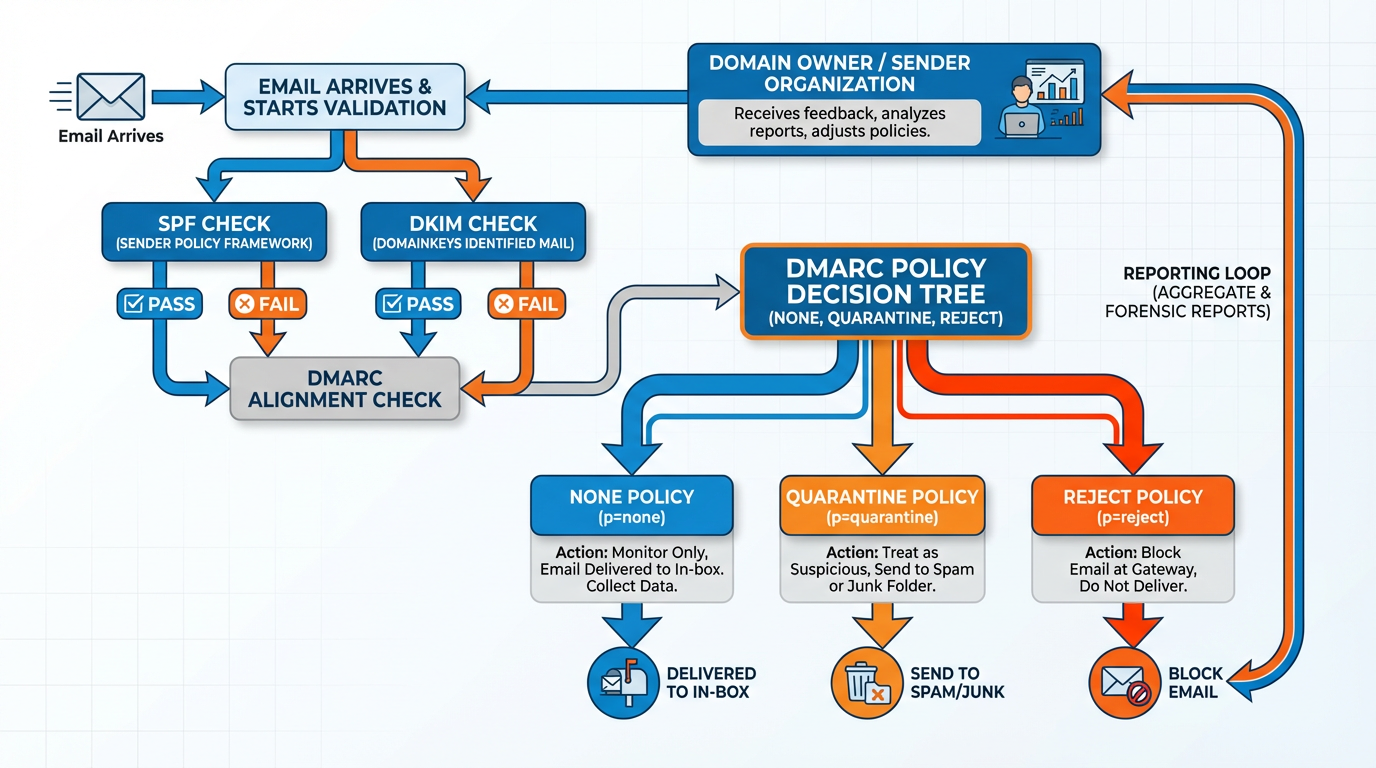
Figure 7:DMARC ties SPF and DKIM together with a policy layer: monitor, quarantine, or reject — and always report.
4.2The Three-Layer Authentication Stack
Think of SPF, DKIM, and DMARC as three security checkpoints at an airport. SPF checks if the server is authorized. DKIM verifies the message has not been tampered with. DMARC decides what to do if either check fails, and sends you reports so you know who is attempting to use your domain without authorization.
All three must be configured. Configuring only SPF is like locking the front door and leaving the back window open. Major inbox providers — Gmail, Outlook, Yahoo — now require all three for bulk senders, and the threshold for “bulk” keeps dropping.
50.5 Connecting Your Domain to Your Platform — The One Setting Beginners Always Miss
Here is where many beginning marketers make a critical error. They purchase a domain, build a funnel inside VibeReach.io, get excited, share the link with prospects — and the link contains the generic platform URL: something like sites.vibereach.io/s/my-funnel-slug.
The funnel works. But every person who clicks sees a URL that signals “this person does not own their digital infrastructure.” It undermines trust in ways no headline optimization can fix.
The fix is connecting your custom domain to the platform and configuring it inside the platform’s settings so it knows to serve your content when someone visits your URL.
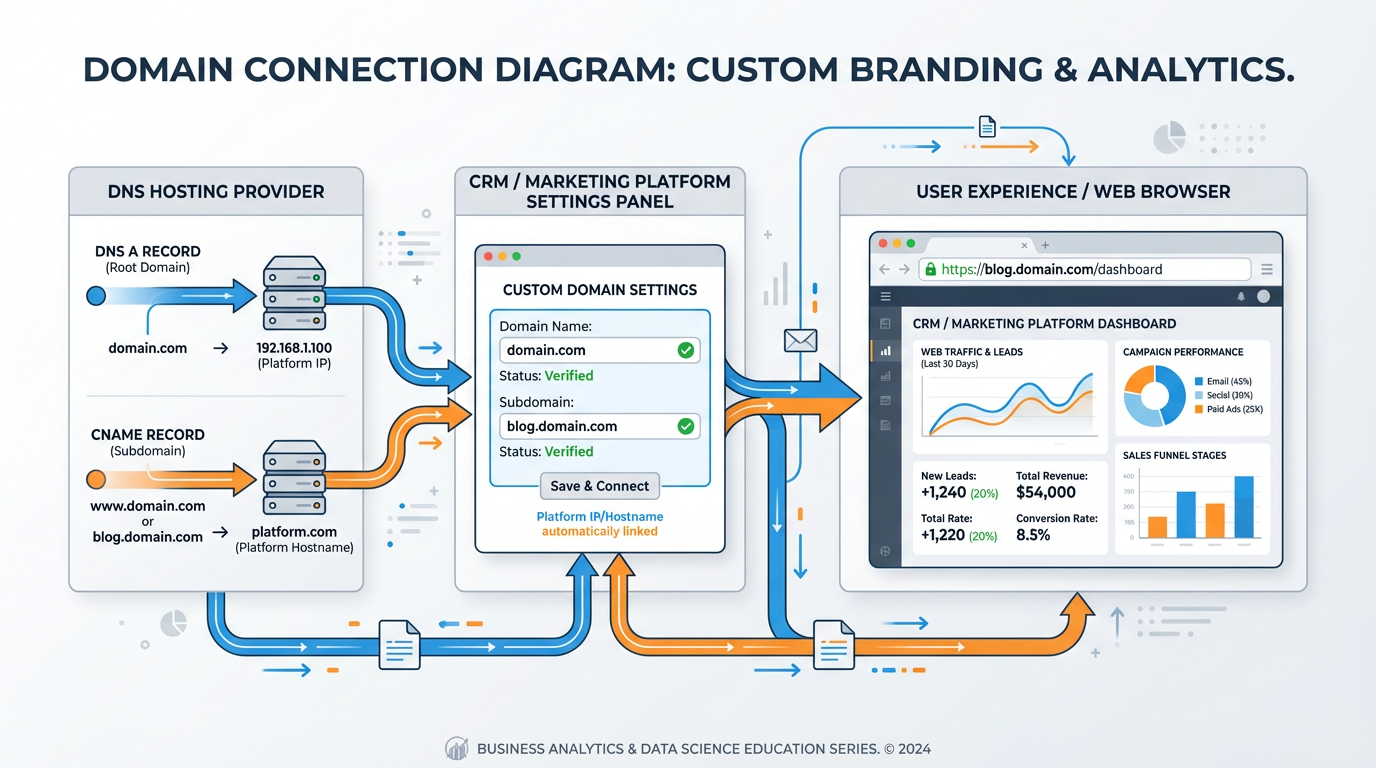
Figure 8:The domain connection loop: DNS points your domain to the platform, and the platform’s settings associate your domain with your account.
This second step — configuring the domain inside the platform — is the one setting beginners always miss. They add the DNS records at their registrar and then assume it is finished. It is not. You must also:
Navigate to Settings → Domains inside VibeReach.io
Click Add Domain
Enter your custom domain or subdomain
Wait for the platform to verify the DNS records are correctly pointed
Set the domain as the default for your funnels, websites, or client portal
Until you complete step 5, your platform continues to serve content from its own URL. The DNS records you added are pointing at the platform’s servers, but the platform does not know to associate those requests with your account until you register the domain inside its interface.
What if my domain shows “Pending Verification” for a long time?
This is almost always a DNS propagation issue. The platform’s verification system checks your DNS records and will not confirm until it sees the correct values globally. Steps to troubleshoot:
Use
whatsmydns.netto check your A record or CNAME globally — look for green checkmarks across multiple regions.Verify the record values you entered match exactly what the platform specified. A single extra space or missing period can break verification.
Check your TTL — if you set a high TTL before making changes, old records may be cached for hours.
Wait the full 24–48 hours before contacting support. Most “broken” DNS setups simply need time.
60.6 Your First Professional Email Address and Why Free Gmail Is Killing Your Credibility
Imagine receiving an invoice from a contractor. The “From” field reads bestplumber_2007@gmail.com. Before you even open it, your brain processes a signal: this person either does not take their business seriously, or is too new to know better. Either way, trust drops.
The same invoice from marcus@clearflowplumbing.com — same contractor, same work — creates an entirely different perception. The domain-based email address communicates permanence, professionalism, and investment in business identity.
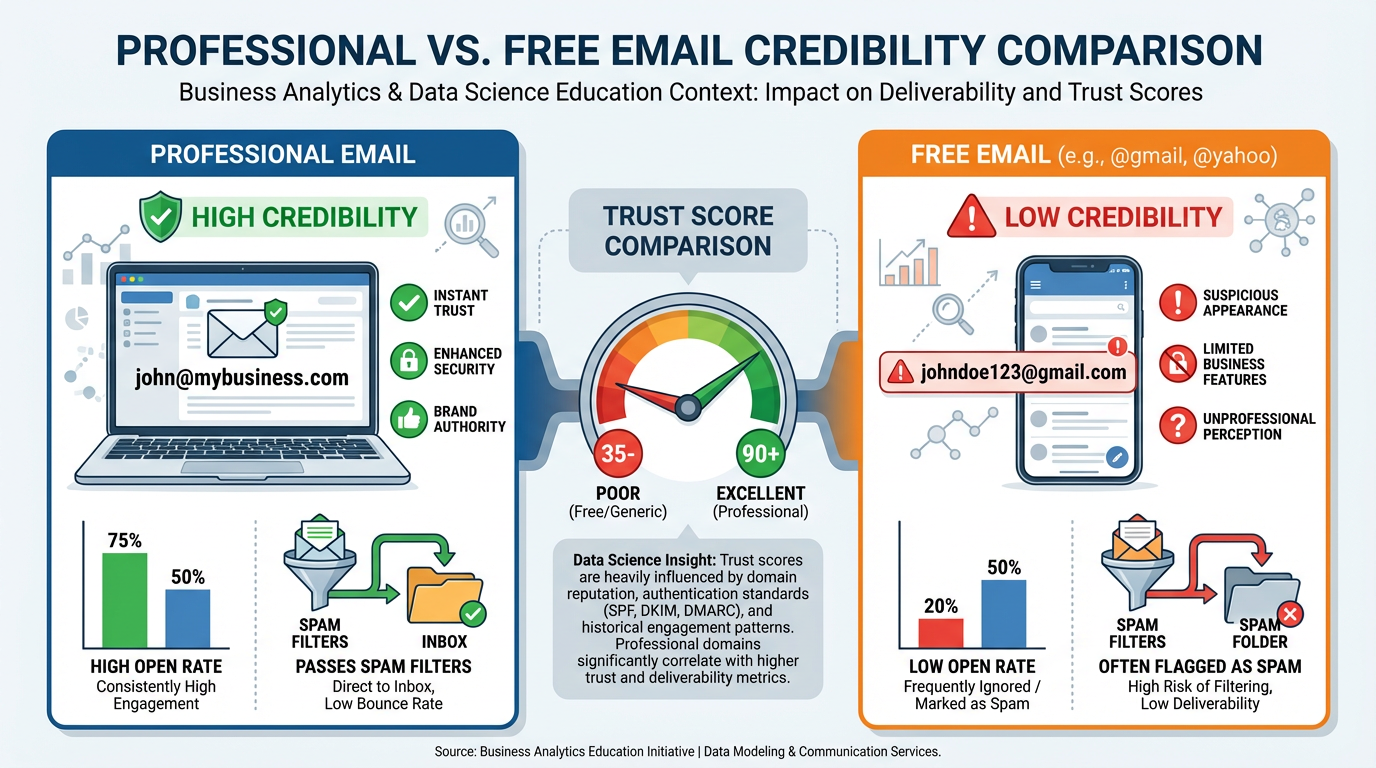
Figure 9:The credibility gap is real: a domain-based email address signals investment, permanence, and professionalism that free email accounts cannot replicate.
This is also technical. Spam filters treat free email addresses differently in marketing contexts. When a platform sends email on behalf of your Gmail address, the “From” address and actual sending server do not align — an authentication mismatch that directly damages your deliverability scores.
6.1The “From” Address Strategy
For marketing emails specifically — newsletters, campaigns, automations — you need to think strategically about your “From” address:
Use a role-based address for campaigns:
hello@yourbusiness.comreads as slightly less personal but survives personnel changesUse your personal address for 1:1 outreach:
ernesto@yourbusiness.comcreates appropriate intimacy for direct contactNever use a no-reply address for cold outreach:
noreply@yourbusiness.comsignals disinterest before the recipient reads a word
70.7 Lab 0: Point a Domain, Verify a Sending Domain, and Send Your First Authenticated Email
Your domain is the foundation of every marketing campaign you will ever run. Without a properly configured domain and authenticated sending address, your emails land in spam, your funnels break, and your brand looks unprofessional at every customer touchpoint. This lab gives you a fully authenticated, deliverability-ready domain in VibeReach.io — so every campaign you build in this course starts with the best possible infrastructure beneath it.
7.1Step 1: Add Your Domain to VibeReach.io
Log in to your VibeReach.io sub-account.
In the left sidebar, click the ⚙️ Settings gear icon → Domains.
Click the + Add Domain button in the upper right.
In the “Domain Name” field, type your root domain:
yourbusiness.com(nowww, nohttps://).Click Add Domain.
The platform displays the IP address you need for your A record. Copy this IP address — you need it in Step 2.
You’ll know you did this right when: Your domain appears in the Domains list with a “Pending” status and the platform shows you DNS values to copy.
7.2Step 2: Add DNS Records at Your Registrar
Open your domain registrar in a new browser tab.
Namecheap: Domain List → Manage → Advanced DNS tab
GoDaddy: My Products → your domain → DNS
Cloudflare: Select domain → DNS → Records
First, delete any default A record pointing to a registrar parking page (they conflict). Then add:
| Record Type | Host / Name | Value | TTL |
|---|---|---|---|
| A | @ | (IP address from Step 1) | 3600 |
| CNAME | www | yourbusiness.com | 3600 |
Click Save after each record.
You’ll know you did this right when: Both records appear in your DNS table. Propagation begins immediately but may take 2–48 hours globally.
7.3Step 3: Set Up Your Email Sending Domain
In VibeReach.io: ⚙️ Settings → Email Services → Dedicated Domain & IP.
Click + Add Domain.
For best deliverability, use a subdomain like
mail.yourbusiness.com. Type it → Add & Verify.The platform generates two DKIM TXT records. They look like:
| Type | Host / Name | Value |
|---|---|---|
| TXT | s1._domainkey | v=DKIM1; k=rsa; p=MIGfMA0GCSqGSIb3... (long string) |
| TXT | s2._domainkey | v=DKIM1; k=rsa; p=MIGfMA0GCSqGSIb3... (long string) |
Copy both TXT record names and values exactly — do not shorten the long key strings.
7.4Step 4: Add DKIM Records at Your Registrar
Return to your registrar’s DNS panel:
Add Record → select TXT
Host field: enter
s1._domainkey(your registrar may auto-append the domain name)Value: paste the full DKIM value from VibeReach.io
TTL: 3600 → Save
Repeat for
s2._domainkey
You’ll know you did this right when: Both DKIM TXT records appear in your DNS table.
7.5Step 5: Add Your SPF Record
Add this TXT record at your registrar:
| Type | Host | Value | TTL |
|---|---|---|---|
| TXT | @ | v=spf1 include:_spf.gohighlevel.com ~all | 3600 |
You’ll know you did this right when: Exactly one v=spf1 TXT record exists for your root domain, and it includes _spf.gohighlevel.com.
7.6Step 6: Add Your DMARC Record
| Type | Host | Value | TTL |
|---|---|---|---|
| TXT | _dmarc | v=DMARC1; p=none; rua=mailto:dmarc@yourbusiness.com | 3600 |
Replace yourbusiness.com in the rua= address with your actual domain. Start with p=none — this monitors without blocking anything. After 30 days of clean reports, upgrade to p=quarantine.
7.7Step 7: Verify Your Domain in VibeReach.io
Settings → Email Services → Dedicated Domain & IP
Find your domain → click the ⋮ three-dot menu → Verify Domain
The platform checks your records live:
✅ Green checkmark — record found, correctly formatted
❌ Red X — missing or incorrectly formatted
🔄 Spinning — still propagating; retry in 1–4 hours
Do not proceed until all three records (DKIM ×2, SPF, DMARC) show green.
You’ll know you did this right when: All authentication indicators show green and your domain status reads “Verified.”
7.8Step 8: Score Your Email With mail-tester.com
Open mail-tester.com — copy the unique test address shown.
In VibeReach.io, create a test email → send it to the mail-tester address using your verified sending domain.
Return to mail-tester.com → Check your score.
Target 8/10 or higher. All three should read PASS: SPF ✅ · DKIM ✅ · DMARC ✅
You’ll know you did this right when: Your score is 8/10 or higher with no authentication failures.
Troubleshooting Common Issues
All records show red Xs immediately after adding them: DNS propagation takes time — up to 48 hours globally. Wait at least 2 hours, then click Verify again. Use dnschecker.org to check global propagation status for each record type.
DKIM still fails after 48 hours:
The most common cause is your registrar auto-doubling the domain name in the host field. If you entered s1._domainkey and your registrar stored it as s1._domainkey.yourbusiness.com.yourbusiness.com, delete it and re-enter with just s1._domainkey. Check what the registrar actually stored vs. what you typed.
SPF shows red even though I added the record:
You likely have two SPF records. Check your DNS panel for any other TXT record beginning with v=spf1 at the @ host. Delete the duplicate and merge both include: directives into one record.
DMARC shows red:
The host field must be exactly _dmarc (with the underscore). Some registrars store this differently — check whether _dmarc.yourbusiness.com resolves. Also verify the value starts exactly with v=DMARC1; — no extra spaces.
Settings → Email Services is not visible: You’re likely in the Agency view, not a sub-account. In VibeReach.io, email sending domains are sub-account level settings. Click into a sub-account from the agency dashboard first.
Mail-tester score below 7 despite passing SPF/DKIM/DMARC: Review the full scorecard. Common causes: your IP is on a shared blacklist, the test email content contains spammy phrases, or the HTML is malformed. Each flagged item links to specific remediation instructions.
80.8 Case Study: The $40,000 Lost Invoice
8.1How a Misconfigured MX Record Cost a Contractor His Biggest Deal
Marcus ran a mid-sized commercial painting company in the Southeast. In eight years of business, he had never lost a job to a competitor. He lost exactly one job in those eight years — to an MX record.
Marcus won his largest contract to date: repainting a corporate office park for $40,000, paid in two installments. He completed the first phase and sent an invoice to the procurement director.
The invoice never arrived.
Marcus waited a week, then followed up by phone. The procurement director apologized — she had been waiting for the invoice. His accounting software showed it sent. Her inbox showed nothing. He resent it. Nothing. Third time. Nothing.
By the time they discovered the problem — two weeks later, the procurement director had put payment on hold pending “receipt of invoice.” Marcus missed the net-30 payment window. The contract had a late-invoice clause. Payment was delayed 45 days, creating a cash flow gap that forced Marcus to delay payroll for his crew.
The Root Cause:
When Marcus migrated to a new domain the prior year, his IT consultant updated the A records and website content but not the MX records. The old MX records still pointed to the old hosting provider’s mail server — which had been decommissioned. Email addressed to @marcuspaintingco.com was routing to a server that no longer existed.
From the sender’s perspective, emails appeared to send successfully. Many mail servers fail silently at the MX lookup stage without generating a bounce notification. Marcus’s invoices and follow-up emails had been silently vanishing for eleven months. He had assumed clients were ignoring him. Several simply were not receiving his emails.
The Fix: A correctly configured MX record pointing to Google Workspace. Ten minutes of work. Total cost: nothing. The damage: $40,000 delayed, three client relationships damaged, one payroll crisis.
The Lesson: DNS is not a one-time setup. Every time you change hosting providers or email platforms, audit all DNS records — not just the ones you think you changed. Use mxtoolbox.com to verify MX records are resolving correctly before relying on your domain for business-critical communication.
90.9 Chapter Takeaways and Reflection Questions
9.1Chapter Takeaways
DNS is the internet’s address system. It translates human-readable domain names into IP addresses through a hierarchical chain of servers: root → TLD → authoritative nameserver. Changes propagate over hours to days due to TTL-based caching.
Your domain is permanent business infrastructure. Choose it for longevity, not trend-following. Prefer
.com, avoid hyphens and numbers, and register it before you build anything.Three DNS record types power your marketing: A records map your domain to an IP address (website hosting). CNAMEs create subdomain aliases. MX records route inbound email to the correct mail server. All three must be correctly configured for a fully functional business domain.
Email deliverability depends on three authentication protocols: SPF authorizes your sending servers. DKIM signs your messages cryptographically. DMARC enforces policy and generates reports. Configuring all three correctly is the single highest-ROI technical task for a marketer — it directly determines whether your campaigns reach inboxes or spam folders.
Connecting your domain to your platform requires two actions: updating your DNS records at your registrar and registering the domain inside your marketing platform. Most beginners do only one of these, and their content continues to serve from generic platform URLs.
Free email addresses undermine both credibility and deliverability. A domain-based email address from your own domain signals permanence, professionalism, and technical competence. It also enables proper SPF/DKIM authentication alignment.
DNS is mission-critical infrastructure. As Marcus’s case study demonstrates, a single misconfigured DNS record can silently route your business communications into the void — for months — before you discover the problem. Audit your DNS records regularly and after any platform migration.
10Glossary
A Record — A DNS record mapping a hostname to an IPv4 address. The fundamental record type for web hosting.
Authoritative Nameserver — The DNS server holding definitive records for a domain. All queries ultimately resolve here.
CNAME (Canonical Name Record) — A DNS record mapping one hostname to another, creating an alias. Cannot be used on root/apex domains.
DKIM (DomainKeys Identified Mail) — An email authentication protocol that adds a cryptographic digital signature to outgoing emails, verified via a public key published in DNS.
DMARC (Domain-based Message Authentication, Reporting, and Conformance) — An email policy protocol specifying how receiving servers handle emails that fail SPF or DKIM, and enables aggregate reporting.
DNS (Domain Name System) — The hierarchical, distributed system translating human-readable domain names into IP addresses.
DNS Propagation — The time required for DNS changes to spread across global resolvers. Typically 24–48 hours, governed by TTL settings.
Domain Registrar — A company authorized to register domain names. Examples: Namecheap, GoDaddy, Google Domains, Cloudflare.
IP Address — A numerical label (e.g., 104.21.18.92) assigned to network-connected devices, used to route internet traffic.
MX Record (Mail Exchanger Record) — A DNS record specifying which mail servers handle inbound email for a domain, with a priority value for fallback routing.
Nameserver (NS Record) — DNS records specifying which servers hold authoritative DNS information for a domain. Set at the registrar level.
Recursive Resolver — A DNS server that queries other DNS servers on behalf of client machines to resolve a full answer.
Root Nameserver — The top-level DNS servers (13 clusters globally) directing queries to the appropriate TLD nameserver. Managed by IANA.
SPF (Sender Policy Framework) — An email authentication protocol listing authorized sending servers for a domain via a DNS TXT record.
TLD (Top-Level Domain) — The final segment of a domain name (.com, .org, .io, .ai). Administered by IANA through registry operators.
TXT Record — A flexible DNS record type used to store text values. Used for SPF records, DKIM public keys, DMARC policies, and domain ownership verification.
TTL (Time to Live) — A DNS setting (in seconds) specifying how long resolvers cache a record before requesting a fresh copy.
WHOIS — A public database of domain registration data. Privacy protection services mask the registrant’s personal details.
11Exercises
12Discussion
12.1Is Technical Literacy a Prerequisite for Modern Marketing?
This chapter argues that marketers must understand DNS, email authentication, and domain infrastructure to operate effectively in the current environment. Some practitioners argue the opposite: that specialization exists precisely so marketers do not need to understand technical infrastructure — that is what IT departments and technical co-founders are for.
Consider both perspectives. Is technical fluency in areas like DNS and email authentication a competitive advantage for modern marketers — or is it a distraction from the creative and strategic work that generates value? Where do you draw the line between what a marketer should understand at a conceptual level versus what they can safely delegate?
Discussion Guidelines: Write a substantive response of at least 200 words addressing the prompt above. Include at least one scholarly or credible citation (journal article, textbook, or authoritative industry report) to support your argument. Then respond to at least TWO peers with substantive feedback — go beyond “I agree” and explain why their perspective adds to or challenges your thinking.
13Reflection Questions
Think about a business you admire. Look up their domain name and consider: what does it communicate about their brand positioning? How long do you think they have owned it?
Before reading this chapter, did you know the difference between an A record, a CNAME, and an MX record? How has your understanding of these concepts changed your thinking about what it means to “own” a piece of the internet?
The Marcus case study describes email silently failing for eleven months with no bounces and no alerts. What processes or monitoring tools could a business implement to detect DNS configuration problems before they cause financial damage?
Consider the professional vs. free email question from Section 0.6. Can you recall a time when receiving an email from a free email address changed your perception of the sender? What does that experience tell you about the signals your own email address sends to recipients?
DMARC reports give domain owners visibility into who is attempting to send email using their domain. Why might this information be valuable beyond just email deliverability — for example, in the context of brand protection, competitive intelligence, or fraud prevention?
14🎯 Your Turn: Apply It to Your Business
You just learned the unsexy stuff that makes every campaign either fly or die. The businesses bleeding leads from their domain setup are not dumb — they just never had to stare this directly at the plumbing. Now you do. Time to fix it.
1. Audit your domain’s authentication right now. Go to MXToolbox.com and run a free check on your sending domain. Does SPF pass? DKIM? DMARC? Log into your GHL account → Settings → Email Services and confirm your connected domain shows “Verified.” If anything fails, don’t skip it — a broken authentication record is a silent campaign killer.
2. Check your sending address.
What email address do your GHL campaigns send from? If it’s a free Gmail or Yahoo address, stop. Log into Settings → Email Services and set up a custom domain address (yourname@yourbusiness
3. Map your DNS records like a pro. Log into your domain registrar (GoDaddy, Namecheap, Cloudflare — wherever you registered your domain). List every DNS record currently on your domain. Which ones are for email (MX, SPF, DKIM)? Which are for your website (A, CNAME)? Are there any old or conflicting records that should be cleaned up? A ten-minute audit now saves a week of troubleshooting later.
4. Set up DMARC if you haven’t already.
Most small businesses skip DMARC. Don’t be most businesses. Add a basic DMARC TXT record to your domain starting with p=none (monitoring mode — it will report without blocking). In 30 days, check the aggregate reports. Who else is sending from your domain? Are you being spoofed?
5. Create your “send from” email for every client location or brand. If you run an agency or manage multiple sub-accounts in GHL, each one needs its own authenticated sending domain. Make a list of every sub-account you manage and its current sending email status. Mark which ones still need domain authentication set up and give yourself a deadline.